Program Management
ClientTrack System Administration Guide

Written by April Lockett
Updated at October 2nd, 2023
Table of Contents

Programs are utilized in ClientTrack to indicate how a client participates with an organization. Programs can be differentiated one from another by the types of services the client might receive, the expected outcome for clients who participate, and the resources being used to provide services for the program. Clients are enrolled into programs upon entry, participate in a program for a length of time, and are exited from the program when their participation is complete.
Navigation
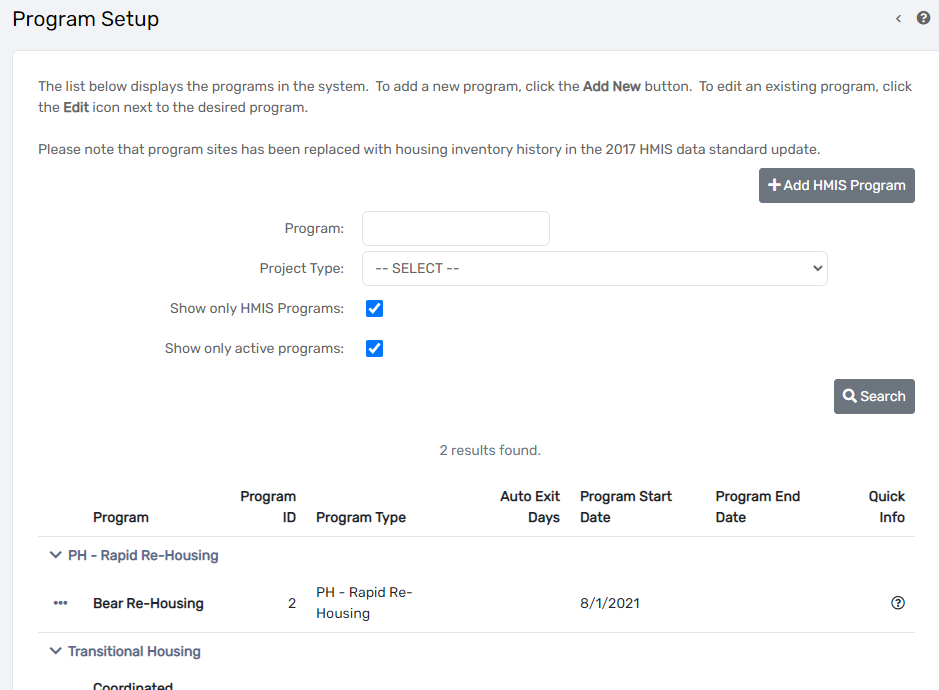
To access Programs, locate the Home space, then the Setup Data Management menu group. Click to expand the Setup Data Management option and click Programs.

This screen displays the current programs available in the system. Existing programs can be modified by click on the Action Button next to the program and selecting Edit.
Adding a New Program
Adding a New Program
- Select the appropriate Add New button at the top of the form.
| Please Note: For HMIS and Head Start Programs, use the corresponding Add New button. |

- Enter the full name of the program in the Program Name field.
- If appropriate, select Clients Can Enroll. This indicates whether clients can directly enroll into this program via the Enrollment module.
- Enter a Program Start Date and a Program End Date, which defines the date range in which a client is able to enroll in the program.
- If applicable, use the Define Eligibility button to associate the program with a pre-defined set of eligibility criteria. If defined, use the text box for Eligibility Description to briefly describe the eligibility criteria for future reference.
- If necessary, enter the amount of Auto-Exit Days, which allows the system to take certain actions should a specific scenario be identified. To utilize these features, you need to define Participating Services associated with this program (see Managing Participating Services for a Program).
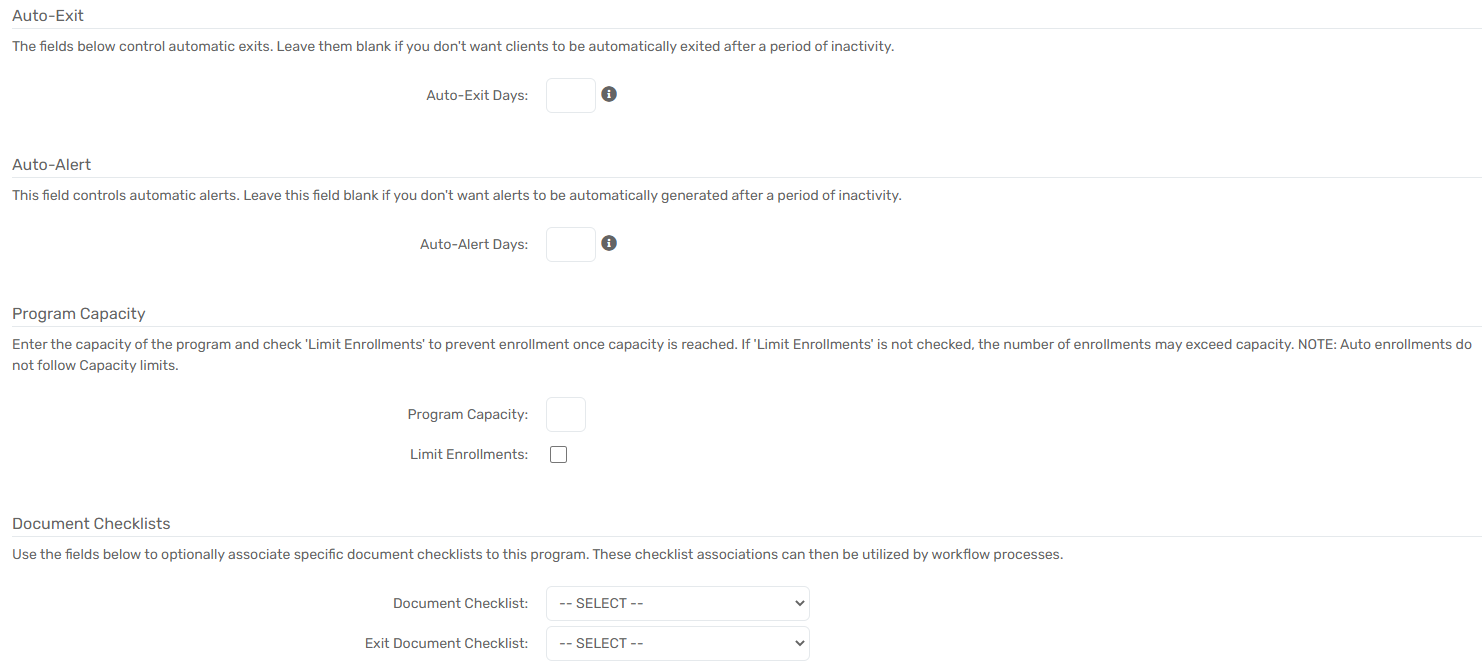
- If necessary, enter a Program Capacity. This sets the maximum number of enrollments allowed. If the Limit Enrollments box is also checked, this prevents enrollments once that number is reached.
| Please Note: Auto enrollments into a program do not adhere to program capacity settings. |
-
Use the Accessing Organization multi-select box to select which organization(s) have access
to this program. This multi-select box manages access for just this program. To manage access
to multiple programs, see Controlling Organization Access to Programs.
Report Mappings
Allows HUD reports to be run for Programs with the corresponding mappings selected.
-
If applicable, select the appropriate Program Type, HUD Program Descriptors, and Other
Reporting Compliance fields.
Organization Access to Programs
Organization Access to Programs
Program access can be controlled on a grant-by-grant basis using the Accessing Organizations field, as explained in the previous section. However, mass changes to program access are better managed through the Program Access screen.
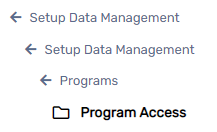
Navigation
This screen can be found by going to the Home space, clicking on the Setup Data Management menu group, expanding the Setup Data Management option and selecting Program Access.
Managing Organization Access to Programs
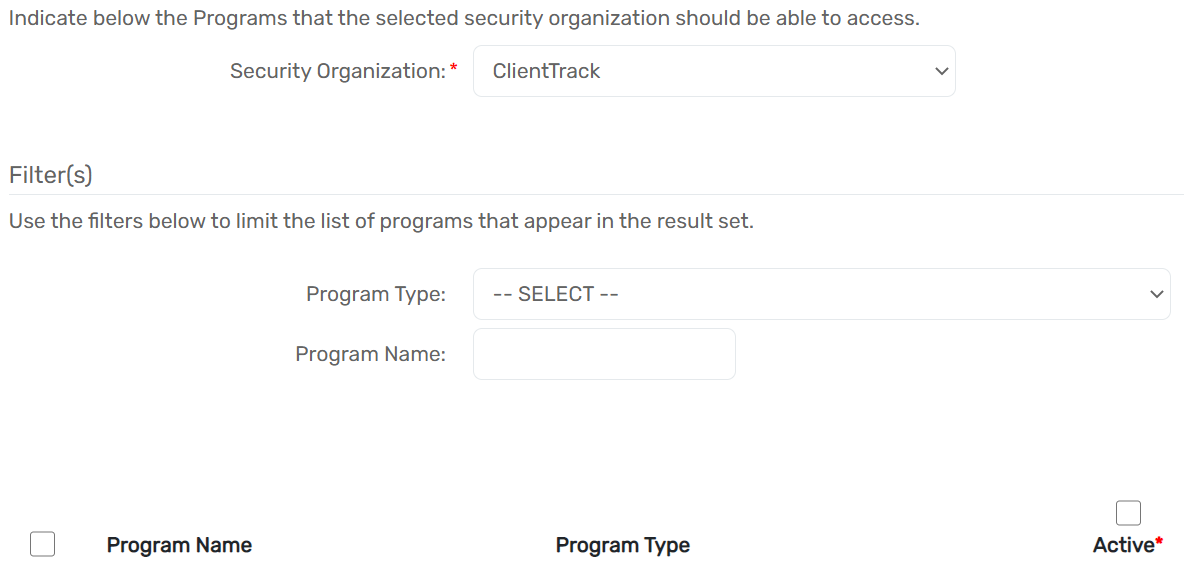
- Select the Security Organization the user wants to manage the access for. The form will default to the organization the user is currently logged into.
- If necessary, filter the list of programs displayed using the Program Type drop-down list and/or the Program Name open text field.
- Check or uncheck the Active box next to the grant to give or remove access for the selected Security Organization.
- Save your changes using the Save button at the bottom of the form.
Participating Services for a Program
Participating Services for a Program
| Please Note: Set up Service Codes for participating services prior to associating them with the Program using the instructions below. |
Navigation
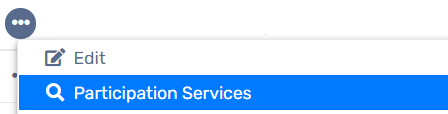
Participating Services for a program are managed by going to the Home space, clicking the Setup Data Management menu group, expanding the Setup Data Management option and clicking on Programs. Select the Action button next to a program name and select Participation Services.
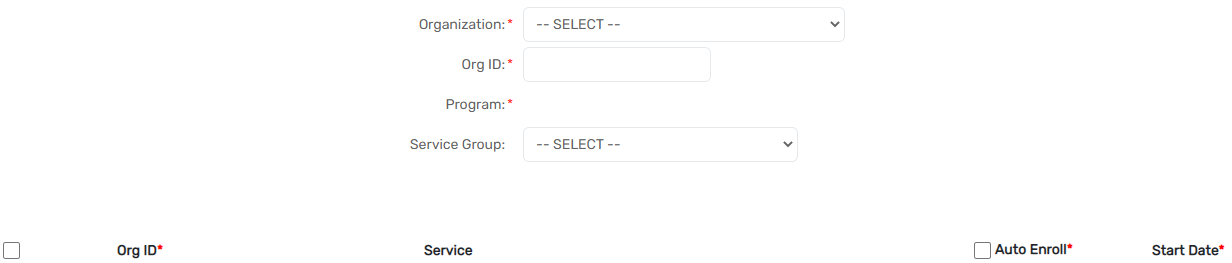
- Select the Organization and Program for which you are identifying the Participation Services from the list.
- If necessary, filter the list of services displayed by selecting a Service Group.
- If applicable, select the Auto-Enroll checkbox. This causes the selected service to be automatically created for any client upon their enrollment into the program.
- Enter the Start Date. This defines the first date this service should be counted as a Participation Service.
Auto-Posting Services for a Program
Auto-Posting Services for a Program
This functionality allows for Direct Services to be entered for every client in a program at an assigned interval. Service Codes need to be created prior to associating them with the program using the instructions below.
Navigation
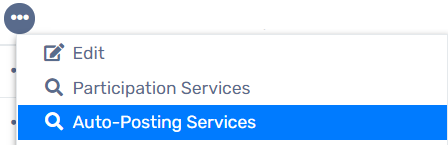
Auto-Posting Services for a program are managed by going to the Home space, clicking the Setup Data Management menu group, expanding the Setup Data Management option and clicking on Programs. Select the Action button next to a program name and select Auto-Posting Services.
Adding a New Auto-Posting Service for a Program
- Find the desired Program in the list and select the Action button to the left of the program name, followed by Auto-Posting Services.
- Select the Add New button in the top right-hand corner of the screen. The user will be redirected to a data entry form.
- Select the desired Service Code from the drop-down list and, if necessary, enter Units of Measure, Units, and Unit Value.
- Check the Auto-Post checkbox to bring up the Service Code’s posting interval options.
- Select the Frequency. This will set the number of services recorded per client, per interval. Select the Cycle. This will set the interval time. Choose from one of five options: Daily, Weekly, Monthly, Quarterly, and Yearly.
- If necessary, check the Prorate checkbox. Selecting the Prorate option will automatically change the units to correspond to the days enrolled depending on the interval selected. For example, if a service is setup to be auto-posted to enrolled clients at monthly, 30 Unit intervals, a client who was only enrolled in the program for 17 days in a month would receive a 17 Unit Prorated, Auto-Posted Service at the end of that month.
- Set the Date the User wants the service code to start Auto-Posting on. This is the date the auto-posting interval will begin.
- Select the Save button and the User will be redirected back to the list of all Auto-Posting Service Codes.
Managing Auto-Posting Services for a Program
Once Auto-Posting Services are on the list for a program, they can be edited or deleted.
-
Find the desired Program in the list and select the Action button to the left of the program name, followed by Auto-Posting Services.
- Select the Edit icon and the User will be redirected to the data entry form with the setup available for editing. Enter any necessary setup data and select the Save button. The User will be redirected back to the list of all Auto-Posting Service Codes.
- Select the Delete icon and the Auto-Posting Service Code will be removed from the list. Deleting an Auto-Posting Service Code is a “soft” delete and any User with Write Recycle Bin/Delete permissions can restore a deleted Auto-Posting Service Code’s association with a specific program.
- Select the Cancel button to return to the list of programs.
