ClientTrack Form Designer - API Plug-ins
Discover how to make API requests to external APIs from ClientTrack using the Form Designer API plug-ins.
Table of Contents
Introduction
The ClientTrack Form Design toolset includes two plug-ins that enable designers to connect ClientTrack with external APIs. These plug-ins are designed to work with REST APIs but may work with any API that uses HTTP requests.
They are commonly used on ClientTrack forms so that a ClientTrack User's action (e.g., clicking a button or navigating to a form) can trigger an API request, which can be designed to include data from the ClientTrack database and/or from the ClientTrack User's form inputs. The response to the API request can then be stored, displayed, and/or leveraged by other form elements by using the plug-in features for handling responses/errors in conjunction with other ClientTrack Form Design tools.
This article covers some background information, technical details, and tips for the plug-ins so that readers can understand when these tools might be useful and how to use them.
Background
Many organizations using ClientTrack are interested in integrating their ClientTrack solution with external APIs, and Eccovia has developed several flexible tools to make this possible, including these Form Designer plug-ins, which enable Form Designers to incorporate external web services into their designs.
ClientTrack Form Designer API Plug-in
Plug-in Properties
The ClientTrack API Plug-in has a variety of properties that can be configured by a Form Designer User to affect how an API request will be executed/formatted, how the response will be handled, and more.
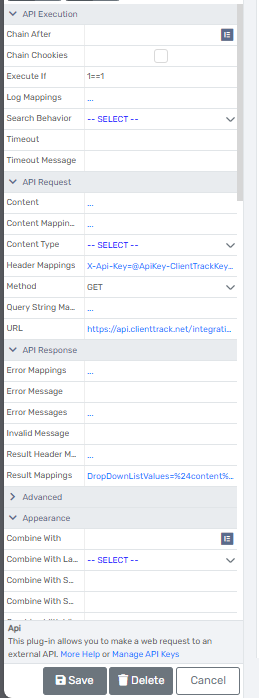
API Execution Properties
- Chain After - Choose another Api or ApiSearchResults element. This API will execute after the chosen element.
- Chain Cookies - Works with Chain After. If checked, this API will send any cookies set by the other API element.
- Execute If - An expression to determine when to execute the API. If set, the API will only execute if this evaluates to true.
- Log Mappings - Values to write to the log, in the format property=Element&property=Element. The URL and method are logged automatically.
- Save Behavior - When the UI Type is button or command link, setting this property will cause the form to save before or after executing the API. When using other UI types, setting this property will execute the API before or after you save the form, if this element has a value of Y.
- Timeout - The amount of time to wait for the API. This can be milliseconds or a timespan value (hh:mm:ss).
- Timeout Message - The message to display if the API times out.
API Request Properties
-
Content - The formatted text content to send in the PUT or POST request. This value will override the Content Mappings property.
- Note: When needing to dynamically populate the content using a ClientTrack dynamic variable that contains special characters or complex data prefix the variable name within the @@ characters with the string ‘raw-’. For example, if generating a JSON array string based on user selected values within a Multiple Select List box or the MultiSaveList Plugin the input to pass into the content could like this: @raw-UserSelectedValues@ or @raw-cmClient.Race@.
- Content Mappings - The values to send in the content of the PUT or POST API request, in the format property=Element&property=Element.
- Content Type - The type of content for POST and PUT requests. The default is JSON.
- Header Mappings - The values to send in the headers of the API request, in the format header=Element&header=Element.
- Method - The HTTP method to use (default is GET, other options are POST, PUT, and DELETE).
-
Query String Mappings - The values to send in the query string of the API request, in the format key=Element&key=Element. Also referred to as URL Parameters.
- Note: When editing/adding the query strings using the Query String Mappings Designer via the Plugin Properties that these values must be mapped to an existing element. Values simply typed into the Element drop down box will not be mapped correctly. For static data that needs to be mapped create custom elements on the form and set the default values of those elements. If needing these values for existing records when editing be sure to set this also in the SQL Expression property of the custom element as well.
- URL - The URL End Point of the API.
API Response Properties
- Error Mappings - If there's an error response, maps the properties of the results of the API back to the elements on the form, in the format Element=property&Element=property.
- Error Message - The message to display if there's an error executing the API. @message@ will be replaced with the actual message. Use NONE to ignore the error.
- Error Messages - Error messages to display based on the response code from the API, in the format responseCode=message (e.g. 404=Not Found).
- Invalid Message - The error message to display if the API returns an invalid response (e.g. a 400 response or 500 error).
- Result Header Mappings - Maps the headers of the response of the API back to the elements on the form, in the format Element=property&Element=property.
- Result Mappings - Maps the properties of the results (Body of the Response) of the API back to the elements on the form, in the format Element=property&Element=property
Appearance Properties
-
UI Type - This parameter determines how the plug-in presents itself to the user.
- None displays no UI and simply executes the API after saving if the element has a value of "Y".
- Checkbox displays a checkbox. On Form Save the API will execute only if the checkbox is checked. The input of the API Plugin when set to a checkbox can be set to True or 1 via a rule.
- Button displays a button that executes the API when clicked.
- Command Link displays a full-width button that executes the API when clicked
Tips for Configuring the Request
- The most important part of configuring the Api plug-in is using the properties in the API Request category to configure the request to match the format of the API being used.
- Specify the HTTP method of the request (GET, POST, PUT, or DELETE) with the Method property.
- Configure the base URL using the URL property. Query string data (i.e. ?key=value) can be added to this property directly or by using the Query String Mappings property.
- HTTP headers can be sent using the Header Mappings property.
- PUT or POST requests can send simple content by using the Content Mappings property and mapping the keys you want to send to elements on the form or other dynamic values (e.g. @UserID@). More complex content can be sent using the Content property instead (see below).
- When making PUT or POST requests, the content will be formatted according to the Content Type property. URL-encoded content will be sent with a Content-Type header of application/x-www-form-urlencoded and will look something like key=value&key=value (e.g. first=Homer&last=Simpson). JSON content will be sent with a Content-Type header of application/json and will look something like {"key":"value","key":"value"} (e.g. {"first":"Homer","last":"Simpson"}).
Complex/Formatted Content
If the content requires more complex formatting, you can use the Content property instead of Content Mappings. Enter the content following the format of the API and using dynamic values enclosed in @ symbols. When replacing dynamic values, the values will automatically be escaped following the rules of the Content Type. For example, when sending JSON, a value containing quotes would have the " replaced with \".
Note: You can use rules, formula fields, and/or RenderHTML elements to compose longer blocks of formatted content, then inject them into the API content by using the “raw-” prefix for the dynamic value (e.g. @raw-ElementInput@).
Formatting Form Data Examples
Continuing from the above note on complex data, the ClientTrack Formula plugin can be a great tool to use to format the data for use by the API Plugin when making requests. Below are examples of how the formula plugin could be the solution to getting data in the correct format for making API Requests using the API Plugin.
Format Date:
Examples of how one could use the formula plugin to format a date. Adding the below JavaScript into the formula property of a formula plugin will allow you to format any date being passed into the formula.
/* Javascript Format Date in Formula Plugin */

if (@TDate@ != '')
{
 	var t_date = new Date(@TDate@);
 	var dd = t_date.getDate();
  	var mm = t_date.getMonth()+1;
  	var yyyy = t_date.getFullYear();
 	if(dd<10)
  	{
 		dd='0'+dd;
	}
 	if(mm<10)
  	{
		mm='0'+mm;
	}
 	yyyy+'-'+mm+'-'+dd
}
Format CSV:
The below is an example of how you can pass either MulitSave Plugin user selections or MutltiSelect user selections into a JSON Array String format.
/* Format CSV Multisave/Select data into a JSON Array String */

/* These First two examples show how to do this on one single concise line. */
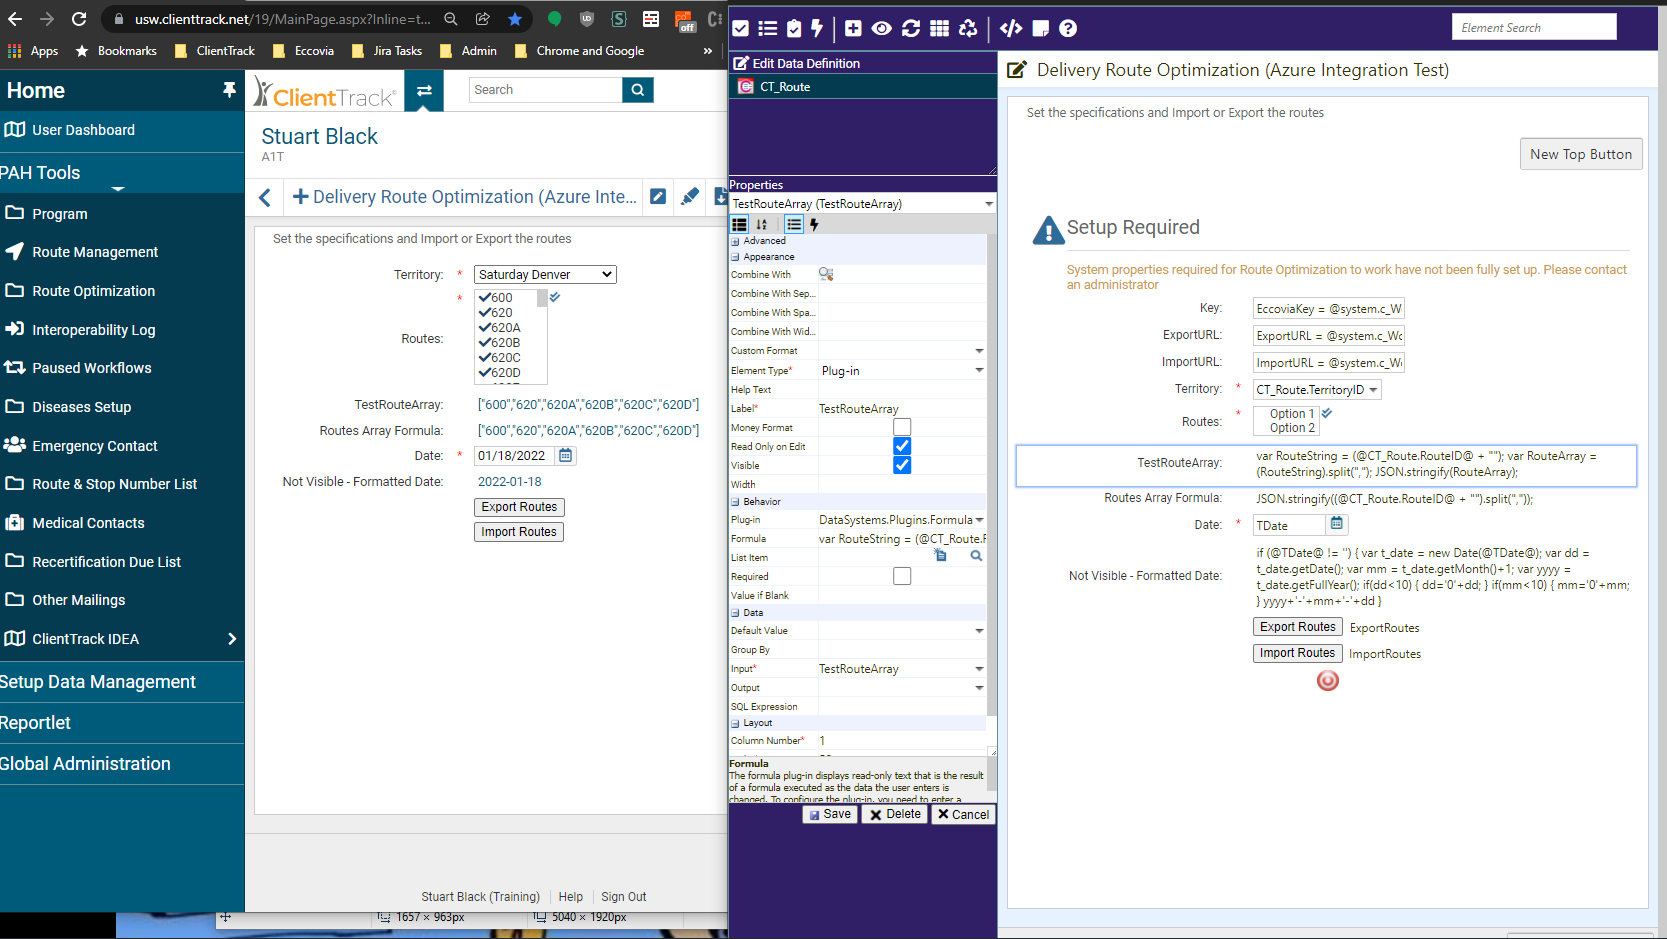
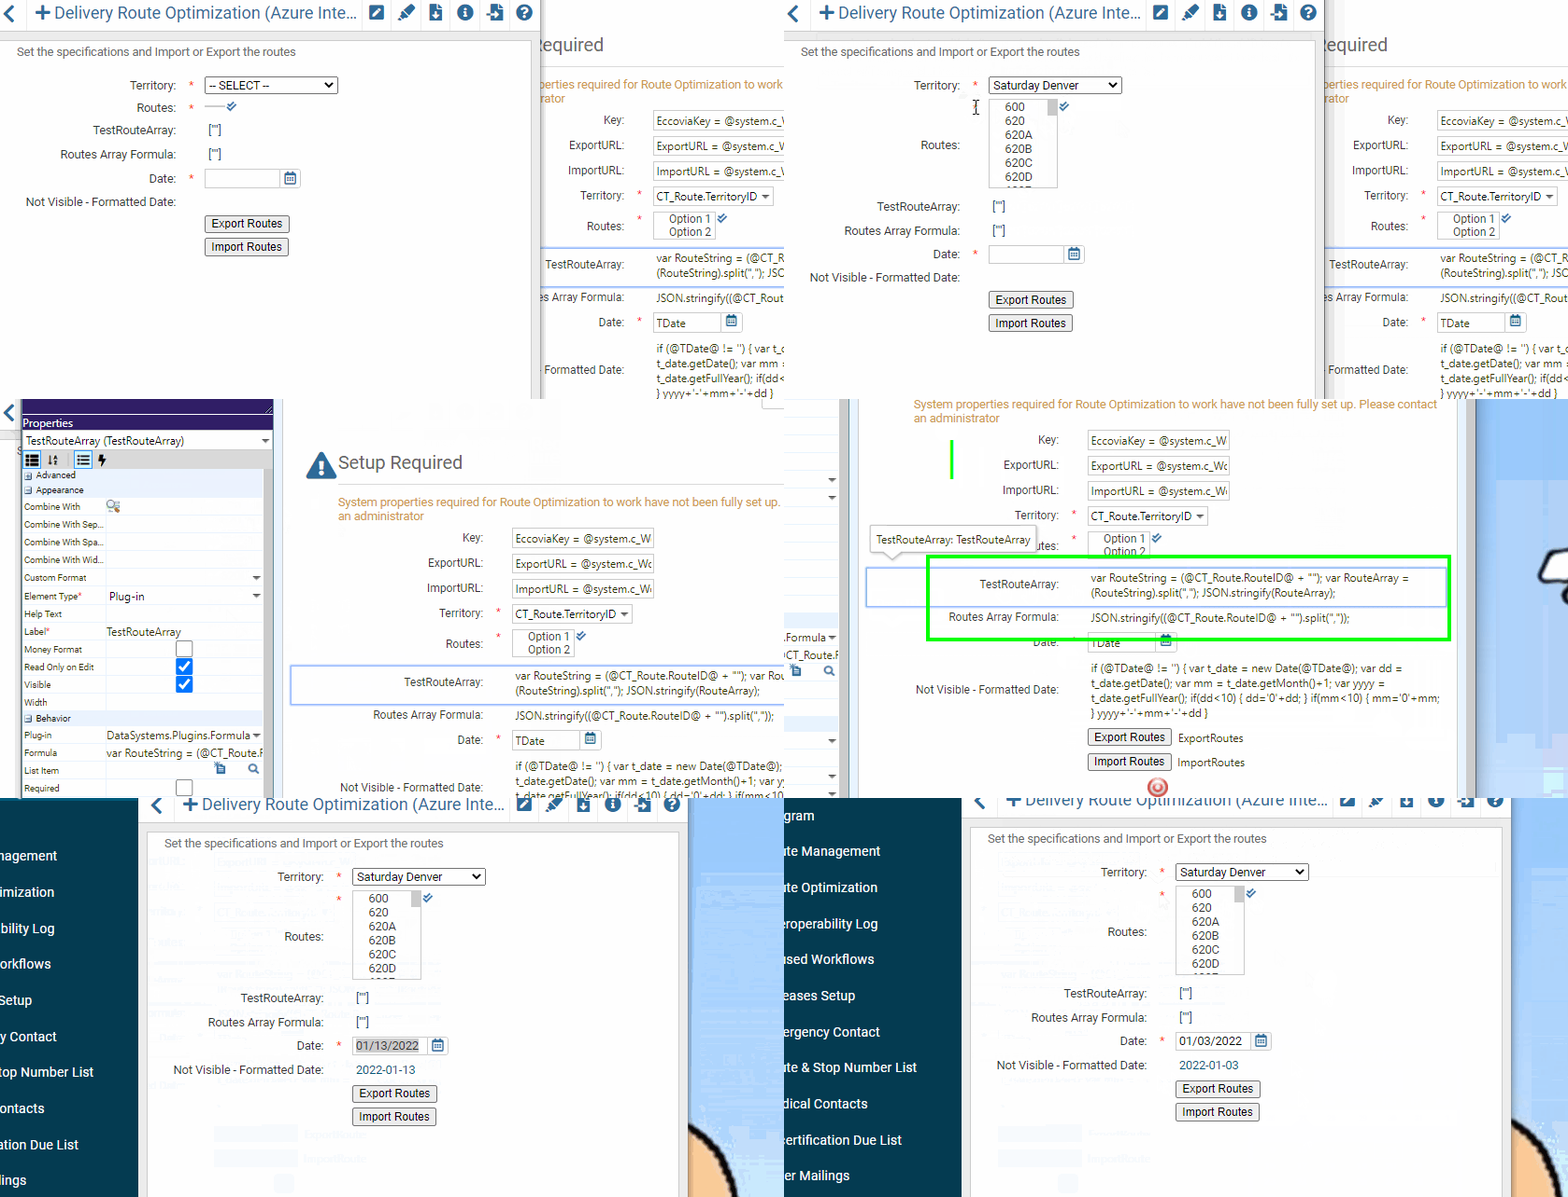
JSON.stringify((@CT_Route.RouteID@ + "").split(","));
// The below: spaces trimmed, empty values skipped
JSON.stringify((@CT_Route.RouteID@ + "").split(/[ ,]+/));


/* This example shows how this can be done programmatically step by step. */

var RouteString = (@CT_Route.RouteID@ + ""); /* Append + "" here to force the value to always be a string */
var RouteArray = (RouteString.split(",");    /* Convert each value separated by a comma to an array. */

JSON.stringify(RouteArray); /* Converts the JavaScript Array object into a String */
Screenshots and gif of the above in action:
Tips for Handling the Response
If the API returns data in JSON format, you can map the values returned back to elements on the form using the Result Mappings property. You specify which element should be set, then specify the result property you want to set it to. You can use nested properties by following the rules of JSON/JavaScript.
Note: You can also set an element’s value to the entire content returned by using the special key $content$. Also note that you can view the constructed Request and Response when the api debug mode is turned on, see tips in this article below
Response headers can be mapped to form elements using the Result Header Mappings property.
Examples for Response Mapping using JSON/JavaScript
Example Response Content
{
  "firstName": "Homer",
  "lastName": "Simpson",
  "spouse": {
    "firstName": "Marge",
    "lastName": "Simpson"
  },
  "children": [
    {
      "firstName": "Bart",
      "lastName": "Simpson"
    },
    {
      "firstName": "Lisa",
      "lastName": "Simpson"
    },
    {
      "firstName": "Maggie",
      "lastName": "Simpson"
    }
  ],
  "Favorite Ice Cream": "Neopolitan"
}
Expected values for example Result Properties
| Result Property | Value |
| firstName | Homer |
| ['lastName'] | Simpson |
| spouse.firstName | Marge |
| children[0].firstName | Bart |
| ["Favorite Ice Cream"] | Neopolitan |
See https://www.newtonsoft.com/json/help/html/SelectToken.htm or https://goessner.net/articles/JsonPath/ for more complex examples.
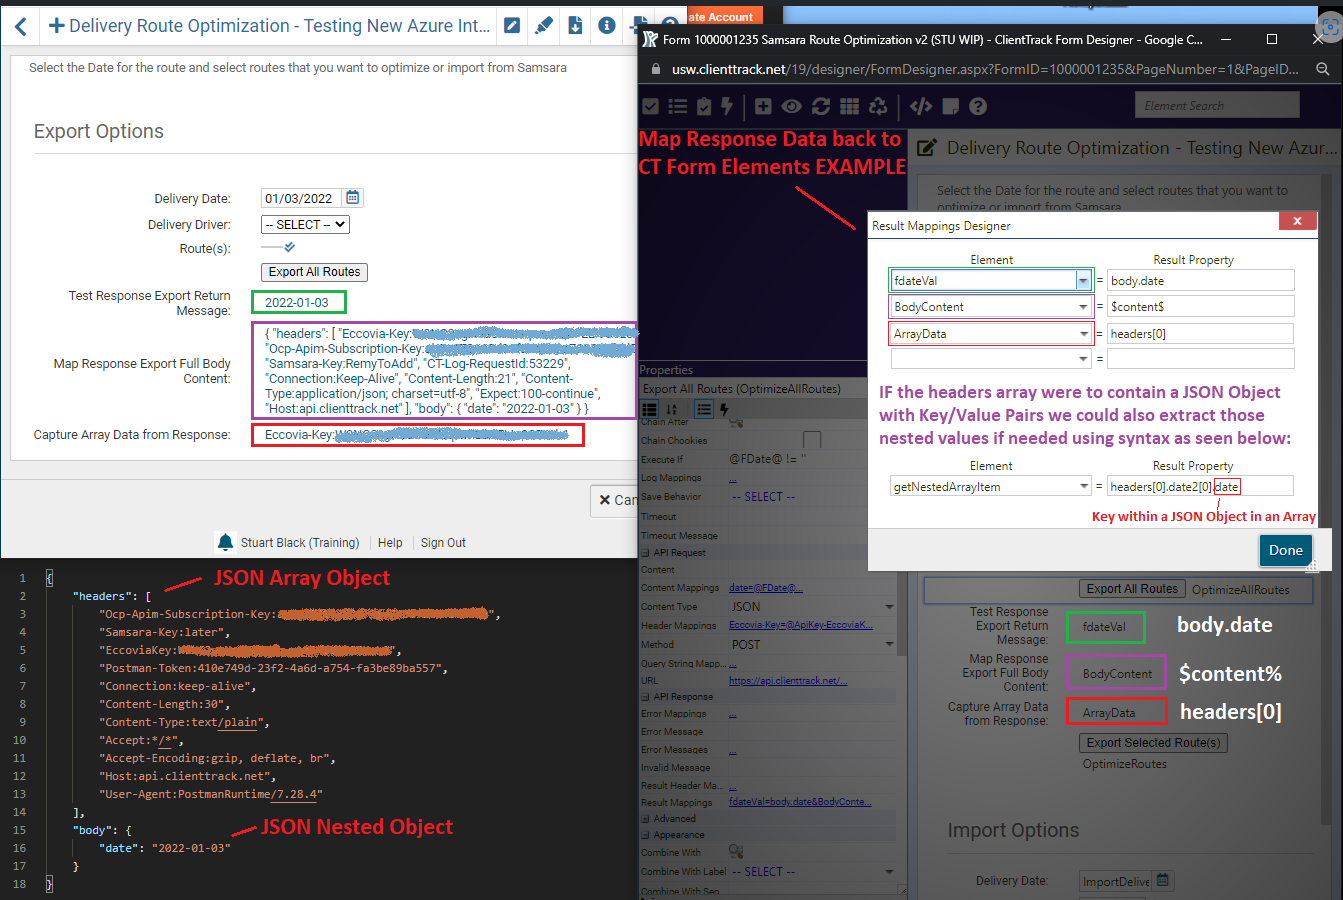
A screenshot below shows an example of how the Result Header Mappings can be mapped:
The below example shows how to do three things:
1. Map a nested key/value pair: body.date. Inside of the body object is the key of date.
2. Map the entire Response: Using the syntax $content$ we can spill the entire response into a form element variable and display it.
3. Map nested Array Data: headers[0].date2[0].date. This example shows how to drill into a JSON Key/Value pair object nested inside two arrays. Within the headers array is an array called date2. Within that array exists a JSON Object with the key date.
Handling Errors
The API should return a response with a status code in the 200-299 range, indicating that it completed successfully. If it doesn’t, it’s considered invalid and won’t be processed by the Result Mappings/Result Header Mappings. Instead the form will display an error message. You can use the Error Messages property to display a particular message for a particular response code (e.g. you might want to display “The item doesn’t exist” for a 404 response). The Invalid Message property configures the default message for an invalid response.
Some APIs return content in their response that may contain a message or other data. You can map this data to elements on the form using the Error Mappings property.
If the API takes too long to execute, as configured by the Timeout property, the request will be aborted and the form will display a message configured by the Timeout Message property, which defaults to “The API timed out.”
If you haven’t configured a message or there’s an exception preventing the API from executing (e.g. there’s a network problem), the form will display a message configured by the Error Message property, which defaults to “There was a problem executing the API: @message@”.
If you configure an error message to be NONE, the form will not display the error message. Dynamic values within an error message will be replaced. @message@ is a special key that will be replaced with the error message of the Exception.
Tips for executing the API
- Once the API is configured, you need to execute it. Properties in the API Execution category control API execution.
- You can use the Execute If property to set a condition that must evaluate to true for the API to execute.
- You can limit the time an API is allowed to execute by setting the Timeout property. The default is 100 seconds. If the API fails to respond within the specified duration, the form will display an error message configured by the Timeout Message.
- The behavior of the Api plug-in varies based on the chosen UI Type (note that UI Type is in the Appearance category).
Tips for the UI Type Property
Interactive Mode (Button or Command Link)
When displayed as a Button or Command Link, the API will execute when the button is clicked.
On an Edit or Multi-Edit form, you can configure the Save Behavior property to also save the form when you click the button, before or after executing the API.
On a Report form, you can configure the Report Behavior property to run the report when you click the button, before or after executing the API.
On a Search or Multi-Edit form, you can configure the Search Behavior property to also load form results before or after you execute the API.
Passive Mode (Checkbox or None)
In passive mode, the execution is triggered by searching, saving, or running the report.
For the API to execute in Checkbox mode, the checkbox must be checked. When using None, the field must have a value of Y.
On an Edit or Multi-Edit form, you can run the API before or after saving the form by setting the Save Behavior property.
On a Report form, you can run the API before or after you run the report by setting the Report Behavior property.
On a Search or Multi-Edit form, you can run the API before or after the form executes the query to load the search results by setting the Search Behavior property.
In some cases, multiple APIs need to be run in sequence, such as executing an API to authenticate and passing a token to another API to load or save a resource. In these cases, you can use the Chain After property to select the Api plug-in that must execute first. This API will execute after the selected API is successful. Please note that it must still be checked or have a value of Y and it will only execute if Execute If not set or evaluates to true. If that API sets cookies that should be sent to the subsequent request(s), you can also check the Chain Cookies checkbox.
Manually Execute the API Using Rules
Regardless of the UI Type, the API can be executed by targeting the element with a “Refresh List” rule action.
Refresh or Form Load:
You can now trigger the Api plug-in via a Refresh List action. E.g., I set up a text box named “AutoEcho” and it triggers the Echo POST Api when the value changes.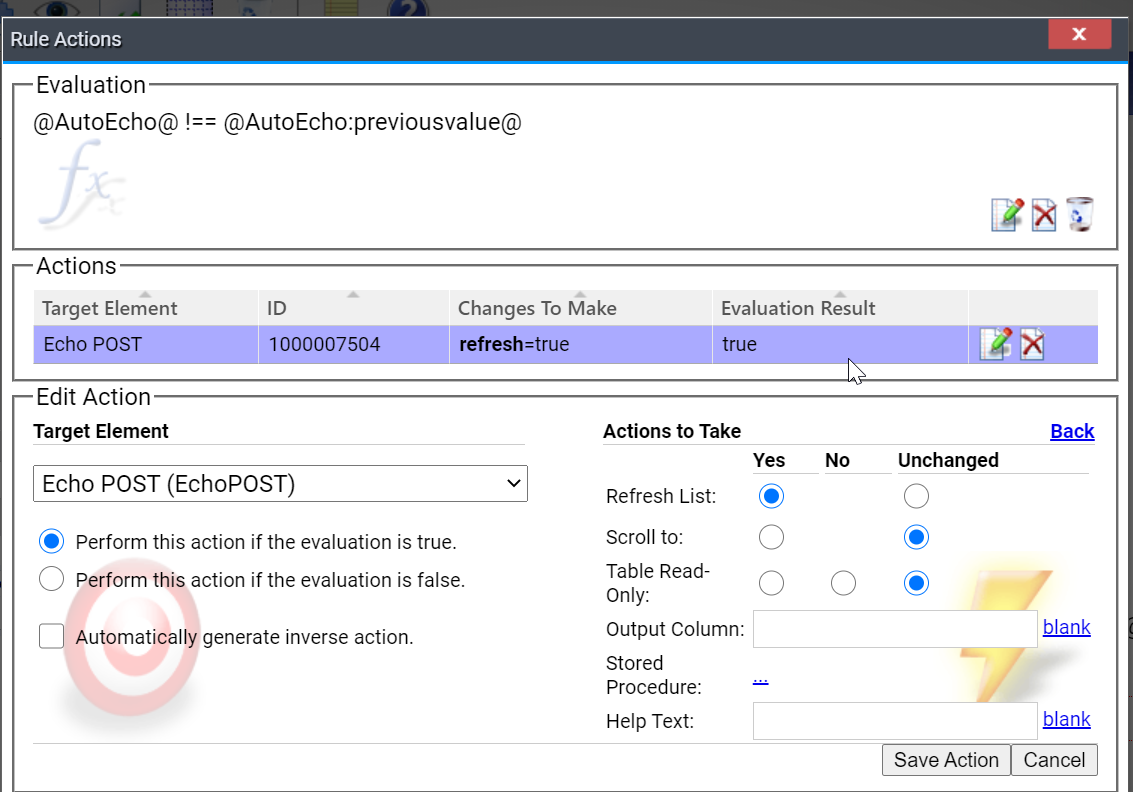
Manage API Keys and Reference them as variables
When a user accesses the Form Designer Tool and also has been given Write access to the “System Integration” Tool Access Permission, they will see a link in the API Element description properties pane to “Manage API Keys” in the Plug-in’s help text (or a user can navigate by appending “integration/api-keys” to the ClientTrack url when signed in). This will allow a user to manage the values that are stored in a separate database via the UI so that they cannot be accessed by anyone without the System Integration permission.

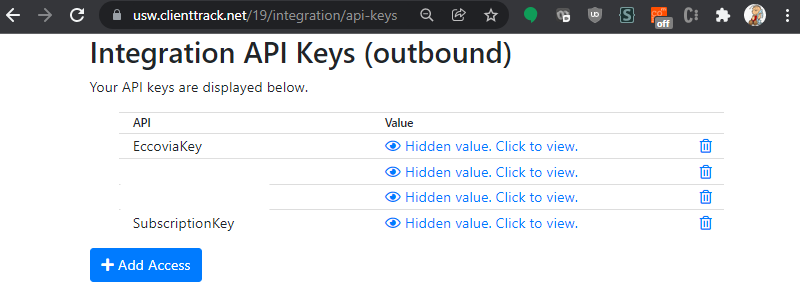
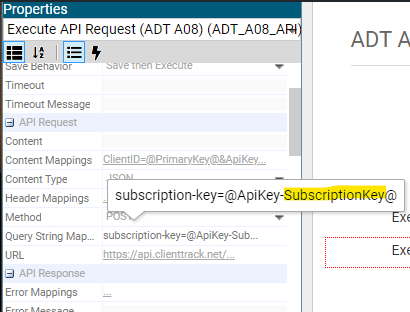
Once key/value pairs are saved in the separate database, the value can be referenced as a variable in the API Plug-in properties by using the notation, @ApiKey-key@. In the example displayed in the below screengrabs, the “SubscriptionKey” was added as an API Key variable and the associated value is leveraged by the plug-in due to the variable specified in the Query String Mapping property (@ApiKey-SubscriptionKey@). This effectively hides API key values from users with Form Designer access that do not have System Integration access.
Tips for Logging/Auditing/Debugging
For auditing or debugging, you can log values using the Log Mappings property. These logs are stored with the other application request logs and are visible via the the log viewer (~/log/request/{requestId}) so DO NOT log sensitive information, such as PHI/PII. Note that the response of the form’s Submit request contains the ID of the request in the X-RequestId header; this will also be logged to the console when you’re in debug mode (the jsdebug cookie is set).
Advanced Debugging - View API Request and Response
For advanced debugging, you must have write access to the Form Designer and Integration. If you do, you can open your browser tools (F12), go to the console, and set the api-debug cookie:
setCookie("api-debug", 1, 1);
When the Api plug-in executes, the full request and response will be logged to your console. Please note that this may contain sensitive information so be careful to remove any such information when sharing or saving.
NOTE: Even if the cookie is set, no data will be sent back to the console if the user does not have the System Integration user permission. This has to be set Globally on the user. If this is simply applied to the user within a single environment the ClientTrack servers will not send back any API data. This permission must instead be applied directly to your -99 Operations user account.
ClientTrack Form Designer API Search Results Plug-in
The DataSystems.Plugins.ApiSearchResults plug-in allows you to make a web request to an external API and merge the results of that request into the search results of this form. It is very similar to the Api plug-in, but expects the API to return an array of objects in JSON format. It then maps the results into the search results. It will create new rows in the result set for any API results that don't match to existing rows.
You can specify how the API results should match to existing records in the result set using the Match On parameter. Any results that don't match are added as new rows. You map the values returned back to elements on the form using the Result Mappings property.
If you want to separate the ClientTrack results from the API results, you can set the API Results Group Label and Non-API Results Group Label properties and the plug-in will group the search results accordingly. You can use dynamic values within these properties (e.g. "@system.ProductName@ Results").
Plug-in Properties
API Results Group Label - The group label to display for results from the API.
Content - The formatted text content to send in the PUT or POST request. This value will override the Content Mappings property.
Note: When needing to dynamically populate the content using a ClientTrack dynamic variable that contains special characters or complex data prefix the variable name within the @@ characters with the string ‘raw-’. For example, if generating a JSON array string based on user selected values within a Multiple Select List box or the MultiSaveList Plugin the input to pass into the content could like like this: @raw-UserSelectedValues@ or @raw-cmClient.Race@.
Content Mappings - The values to send in the content of the PUT or POST API request, in the format property=Element&property=Element.
Content Type - The type of content for POST and PUT requests. The default is JSON.
Error Message - The message to display if there's an error executing the API. @message@ will be replaced with the actual message. Use NONE to ignore the error.
Error Messages - Error messages to display based on the response code from the API, in the format responseCode=message (e.g. 404=Not Found).
Execute If - An expression to determine when to execute the API. If set, the API will only execute if this evaluates to true.
Header Mappings - The values to send in the headers of the API request, in the format header=Element&header=Element.
Invalid Message - The error message to display if the API returns an invalid response (e.g. a 400 response or 500 error).
Link Column - The column you're linking to. Leave blank to use the column specified in the Link ID.
Link ID - The element containing the ID you're linking to.
Link Table - The table you're linking to. Leave blank to use the table specified in the Link ID.
Log Mappings - Values to write to the log, in the format property=Element&property=Element. The URL and method are logged automatically.
Match On - How to match the results of the API to existing results from ClientTrack, in the format Element=property&Element=property&...
Method - The HTTP method to use (default is GET).
Non-API Results Group Label - The group label to display for results that did not come from the API.
Query String Mappings - The values to send in the query string of the API request, in the format key=Element&key=Element. Note (3/25/2021): A bug currently exists that if there are no query parameters set the API will not activate. To get around this simply add a fake query string parameter. Most APIs will ignore query string parameters and so adding key/value pair of FakeKey = FakeValue works in many instances to bypass this exiting
Result Content - The content to display in the result set. You can use dynamic values to refer to values returned by the API (e.g. @Score@). @this.id@, @this.value@, and @this.html@ can be used to refer to the ID, value, or value as HTML of this element.
Result ID - The field in the API results that contains the primary identifier. This ID is saved to the Identifier table to link the API result to the ClientTrack result.
Result Mappings - Maps the properties of the results of the API back to the elements on the form, in the format Element=property&Element=property&... Note: When adding each key into the Result Property field of the Result Mappings Designer the Keys must be added in the order in which they appear within the JSON Object being mapped.
Result Path - The JSON path to the array containing the list of results.
Selection Mode - What to do when the item is selected. "Set Values" is used when searching for duplicates - when an API result is selected, it sets the values on the edit form to the values returned from the API.
System - The system value to use in the Identifier table. By default, it will use the API URL.
Timeout - The amount of time to wait for the API. This can be milliseconds or a timespan value (hh:mm:ss) ex. 00:00:30.
Timeout Message - The message to display if the API times out.
URL - The URL of the API.
