Managing API Keys and Webhooks to integrate ClientTrack and Onfleet
How to create new keys and configure the appropriate settings to support the ClientTrack integration with Onfleet

Written by rrussell
Updated at January 23rd, 2024
Table of Contents
Creating and Managing API Keys and Webhooks to integrate ClientTrack and Onfleet
The ClientTrack and Onfleet applications require some setup to integrate, including generation of API keys, generation of Webhook URLs, and creation/configuration of keys in each application.
The below sections will show you how to create new keys and configure the appropriate settings in each application to support the ClientTrack integration with Onfleet.
Creating new keys for a ClientTrack environment
New ClientTrack API and Subscription Keys must be created by Eccovia staff with permission via the Eccovia internal Integrations UI. These keys must be sent in the API requests to Eccovia's Onfleet Integration endpoints to authenticate and identify the correct ClientTrack database. For more info on the Eccovia Integrations UI: https://eccoviasolutions.atlassian.net/l/cp/nYm2nsa9
Creating an Integration End Point in ClientTrack
- Sign in to the desired environment, navigate to Global Administration > System Integration > Integration End Points, and click “Add New” (your user will need the Integration Access Tool Permission)
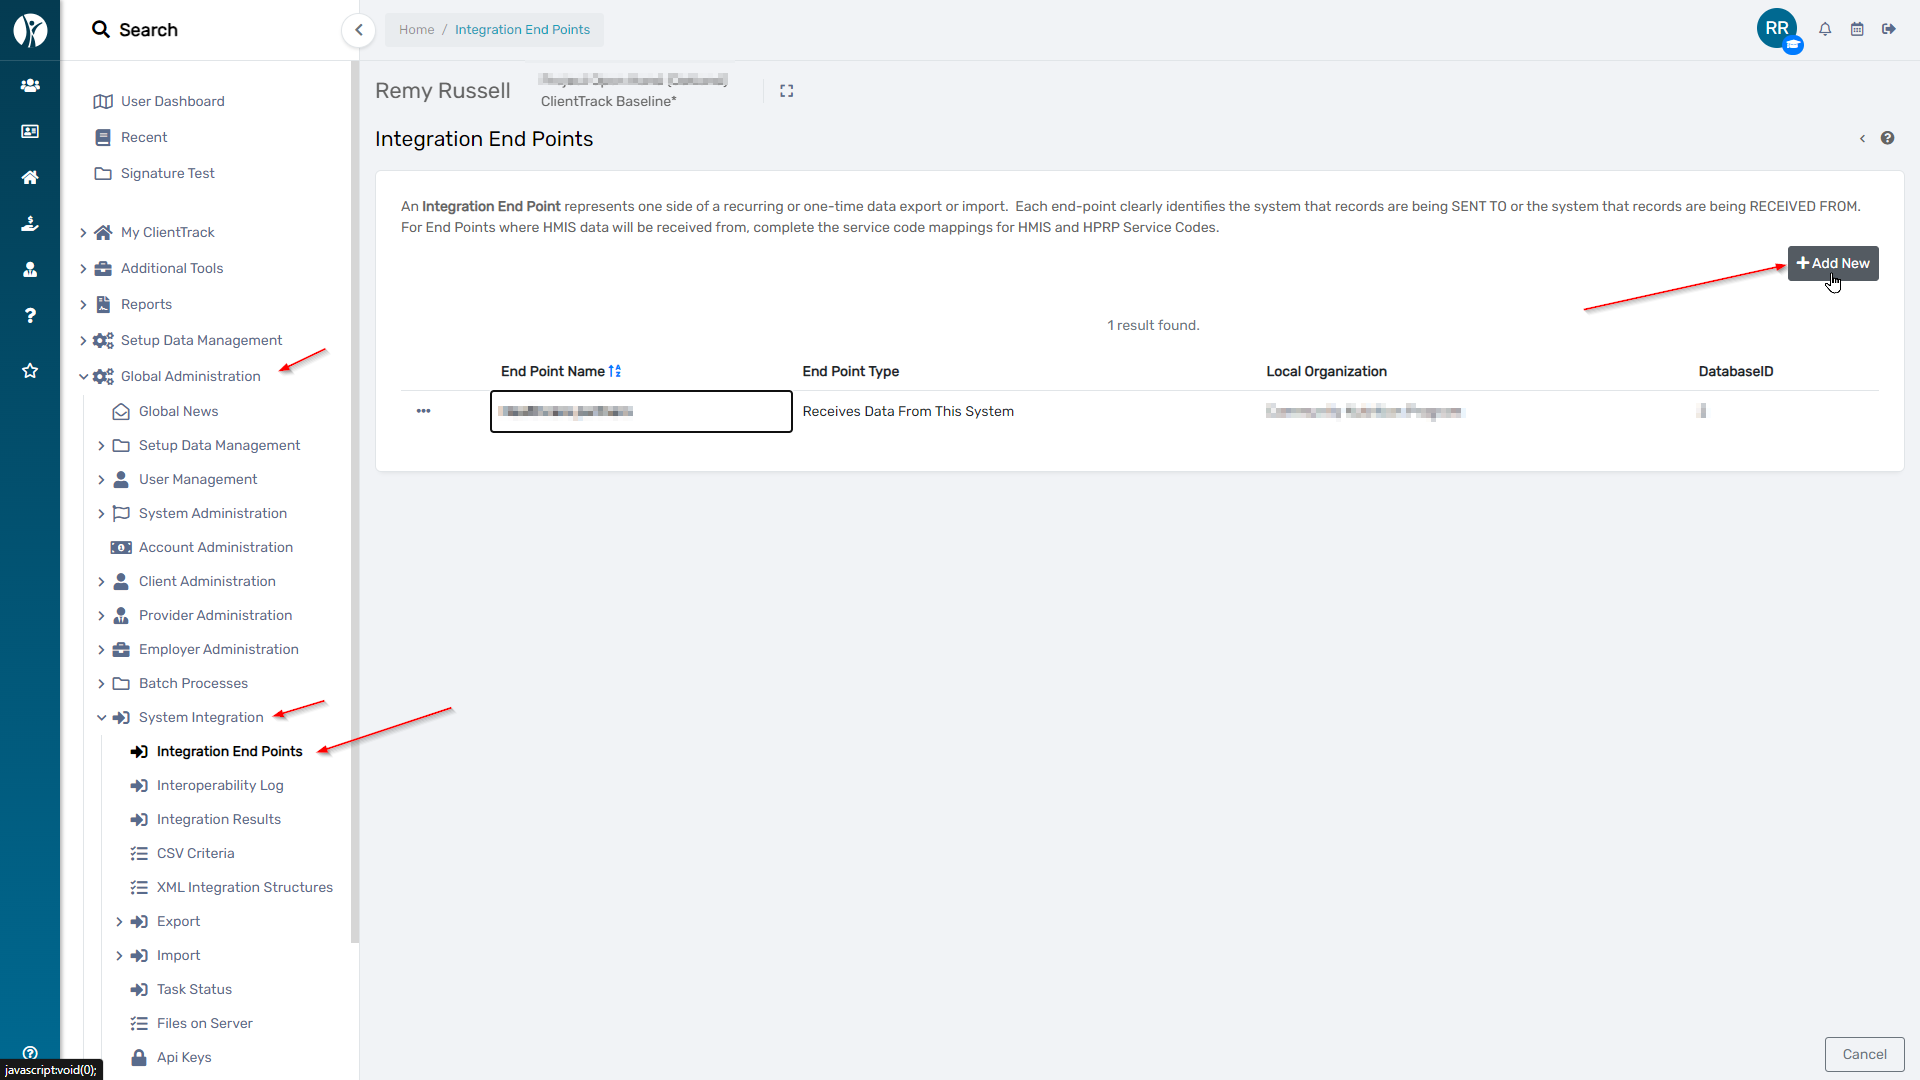
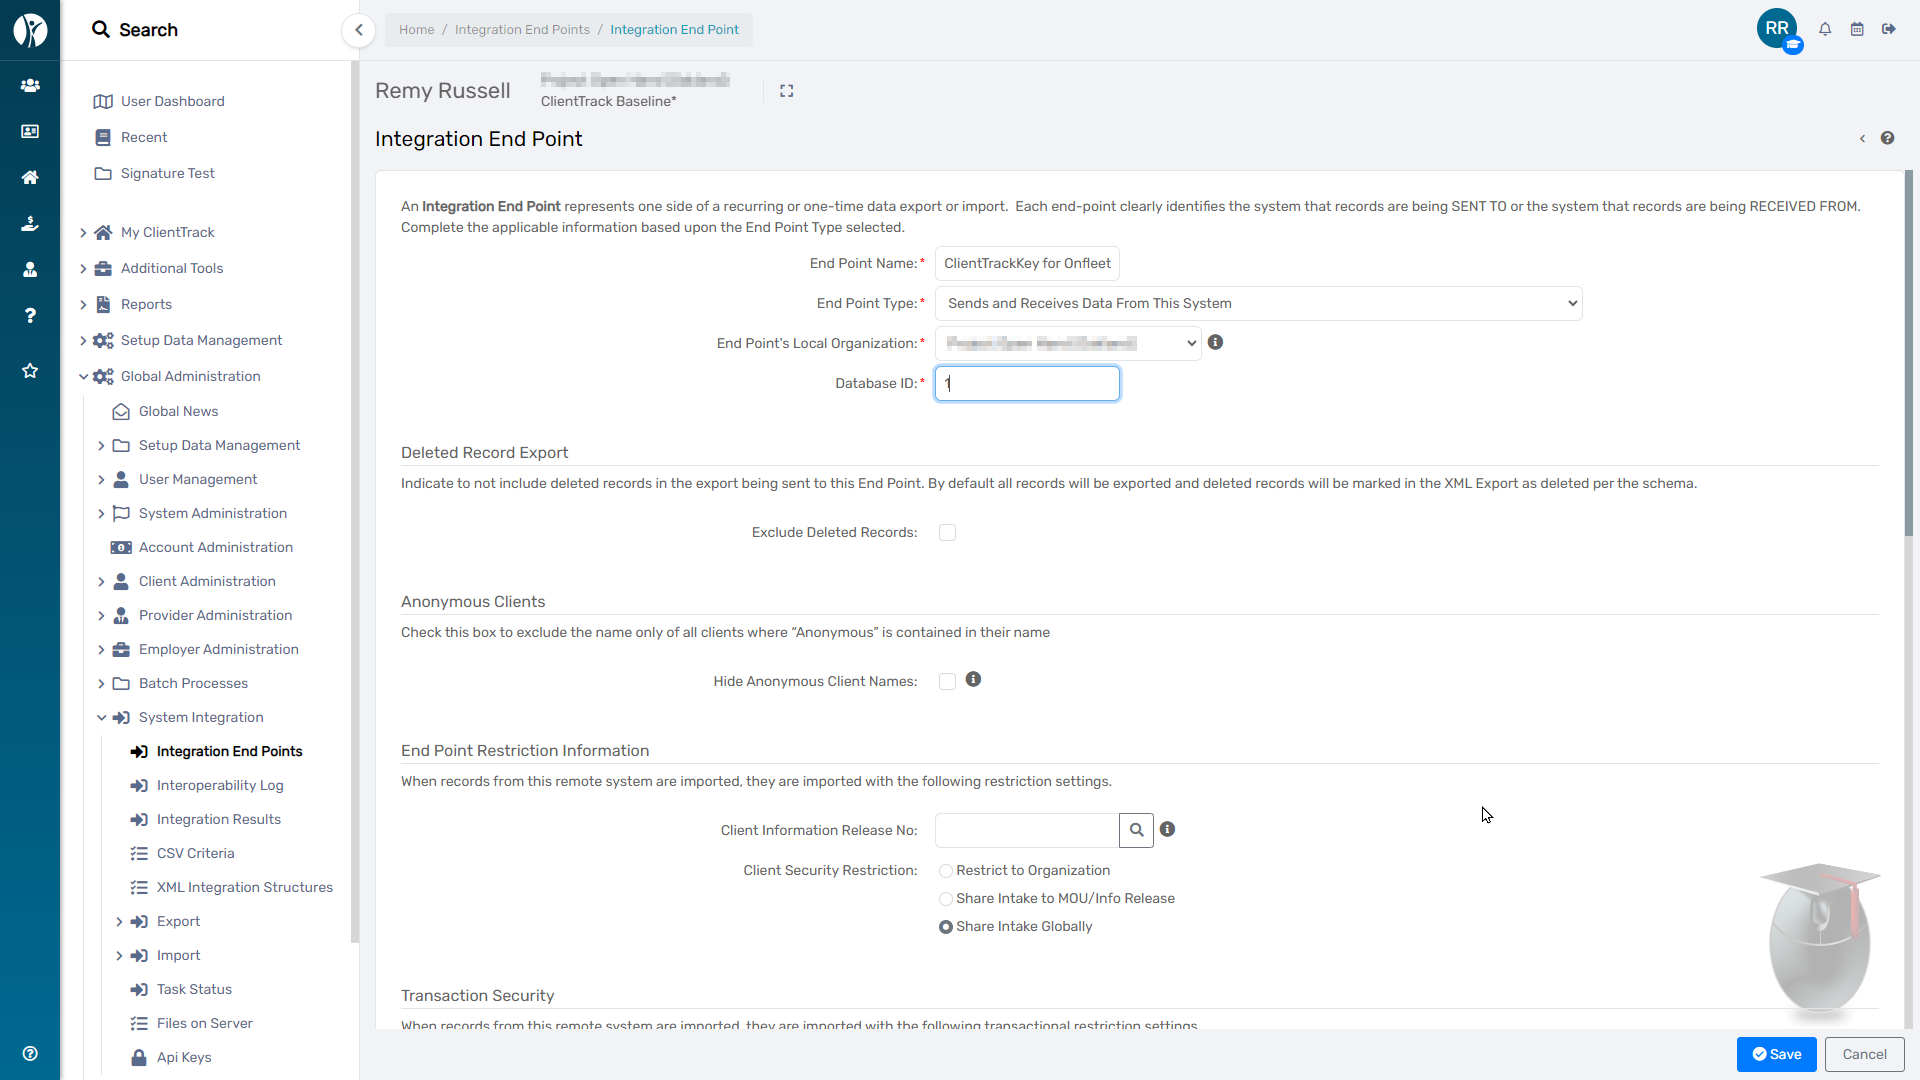
- Name the End Point to distinguish it from other potential end points, set the End Point Type to “Sends and Receives Data From This System”, set the Database ID to 1, and click “Save.”
Creating Subscription and API Keys for a ClientTrack Database / Environment
The following steps are for Eccovia staff with permission to access Eccovia's internal Integrations UI. Note that colors are added to help distinguish the different keys that are necessary for the integration.
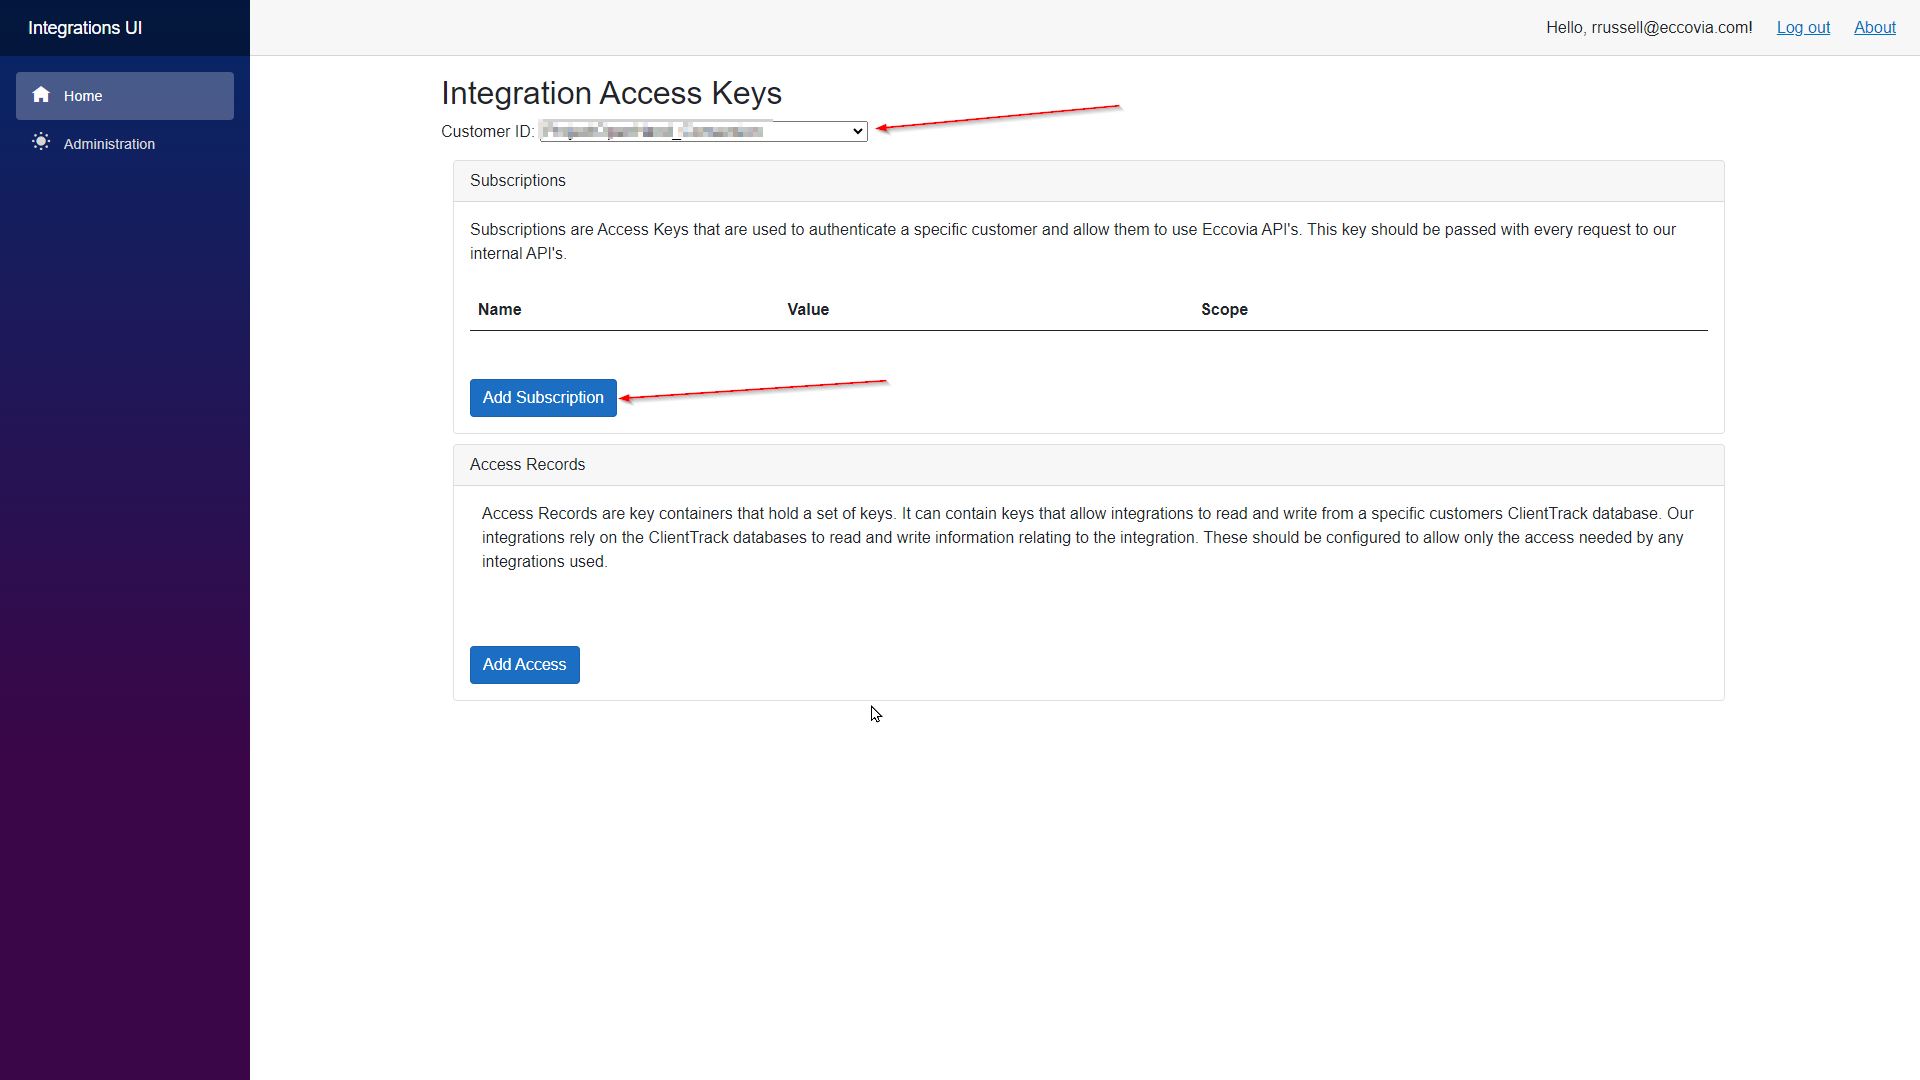
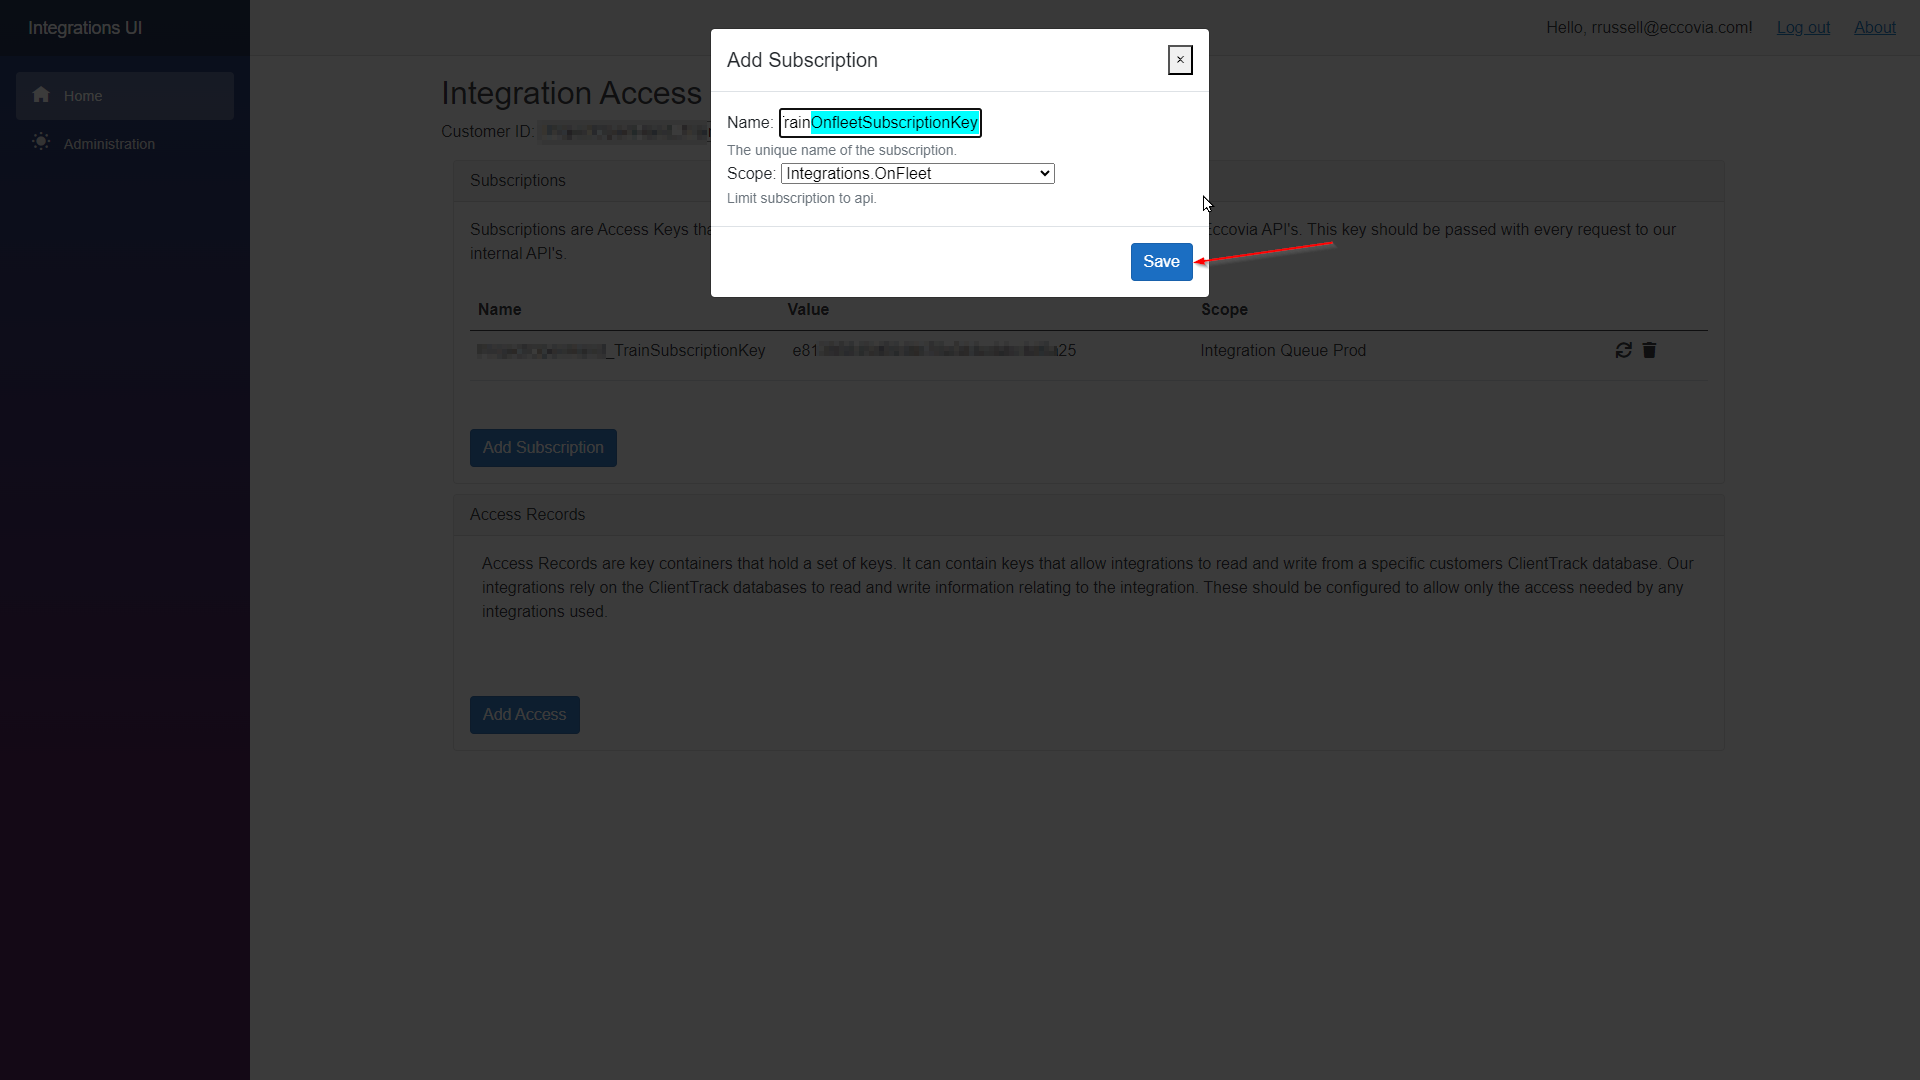
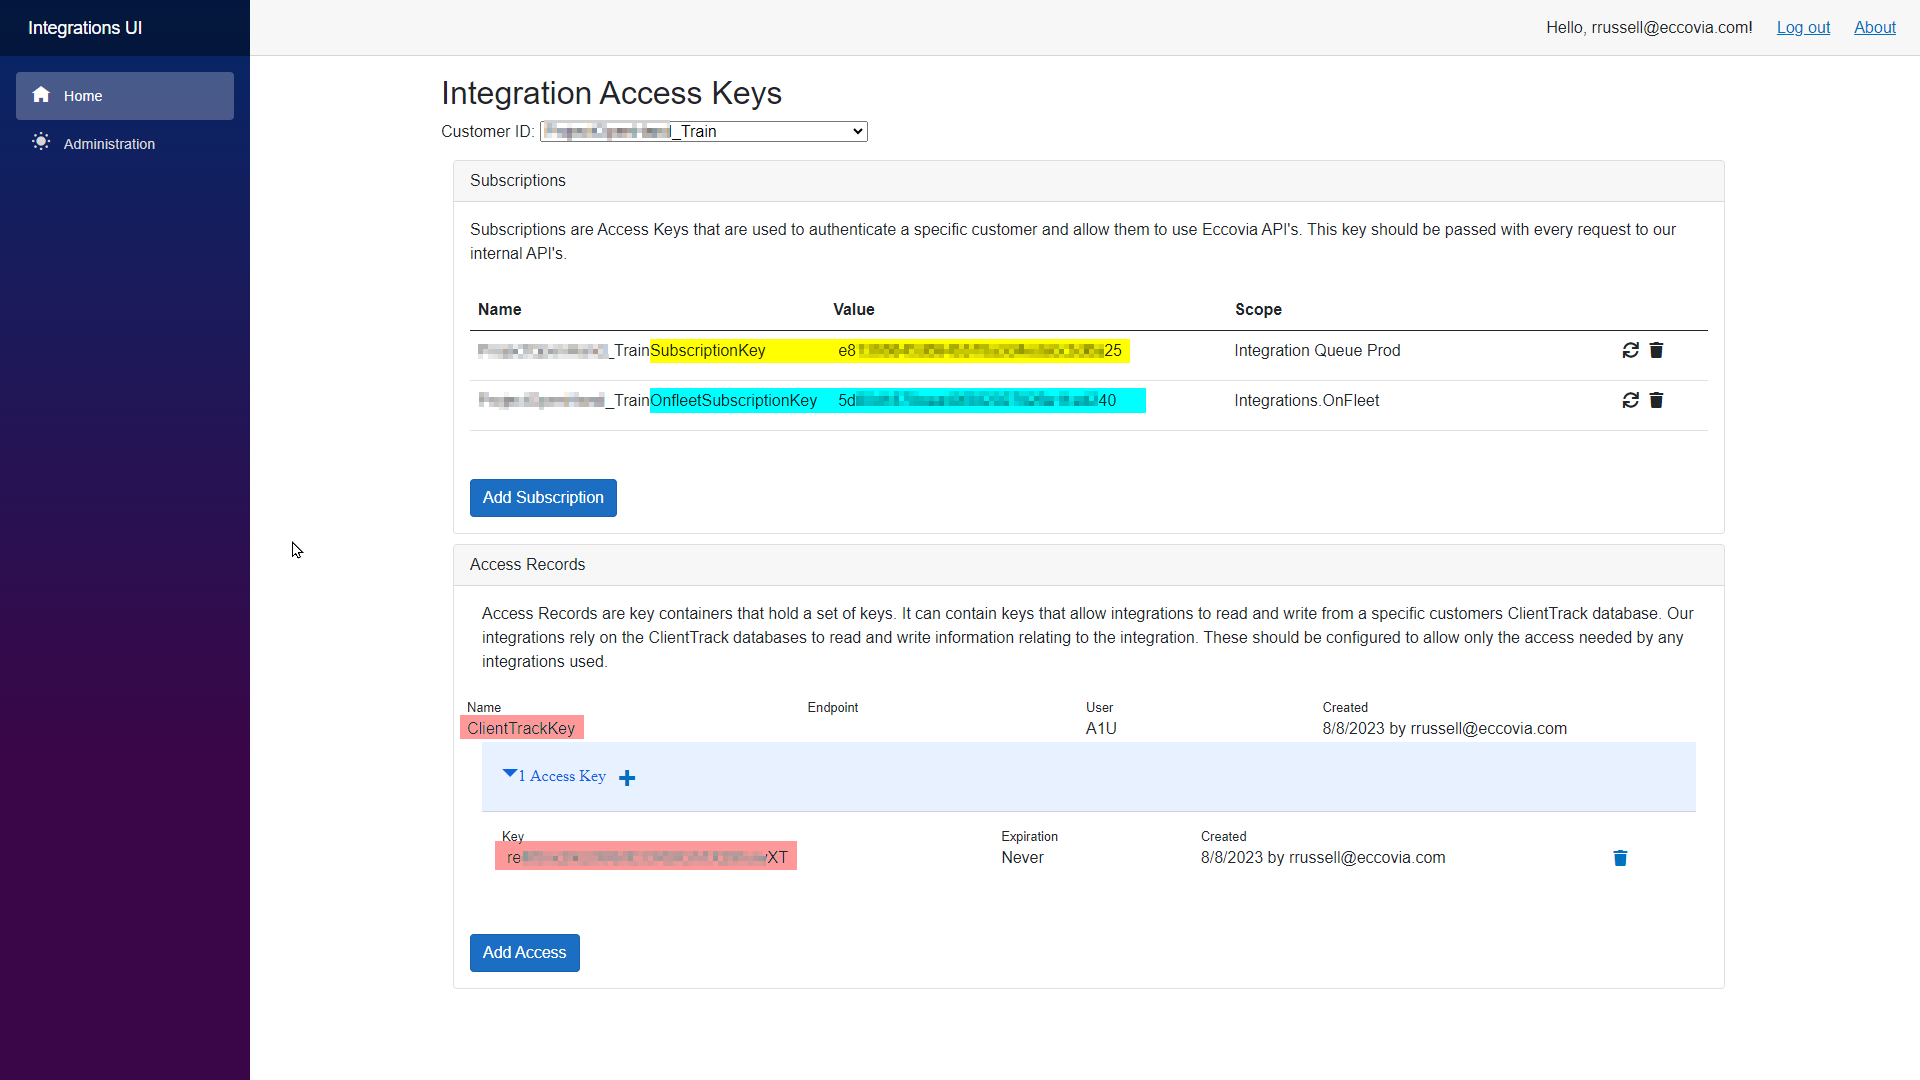
- Visit https://integrationsui.azurewebsites.net/, select the Customer ID for the appropriate ClientTrack Database/Environment, and click “Add Subscription.”
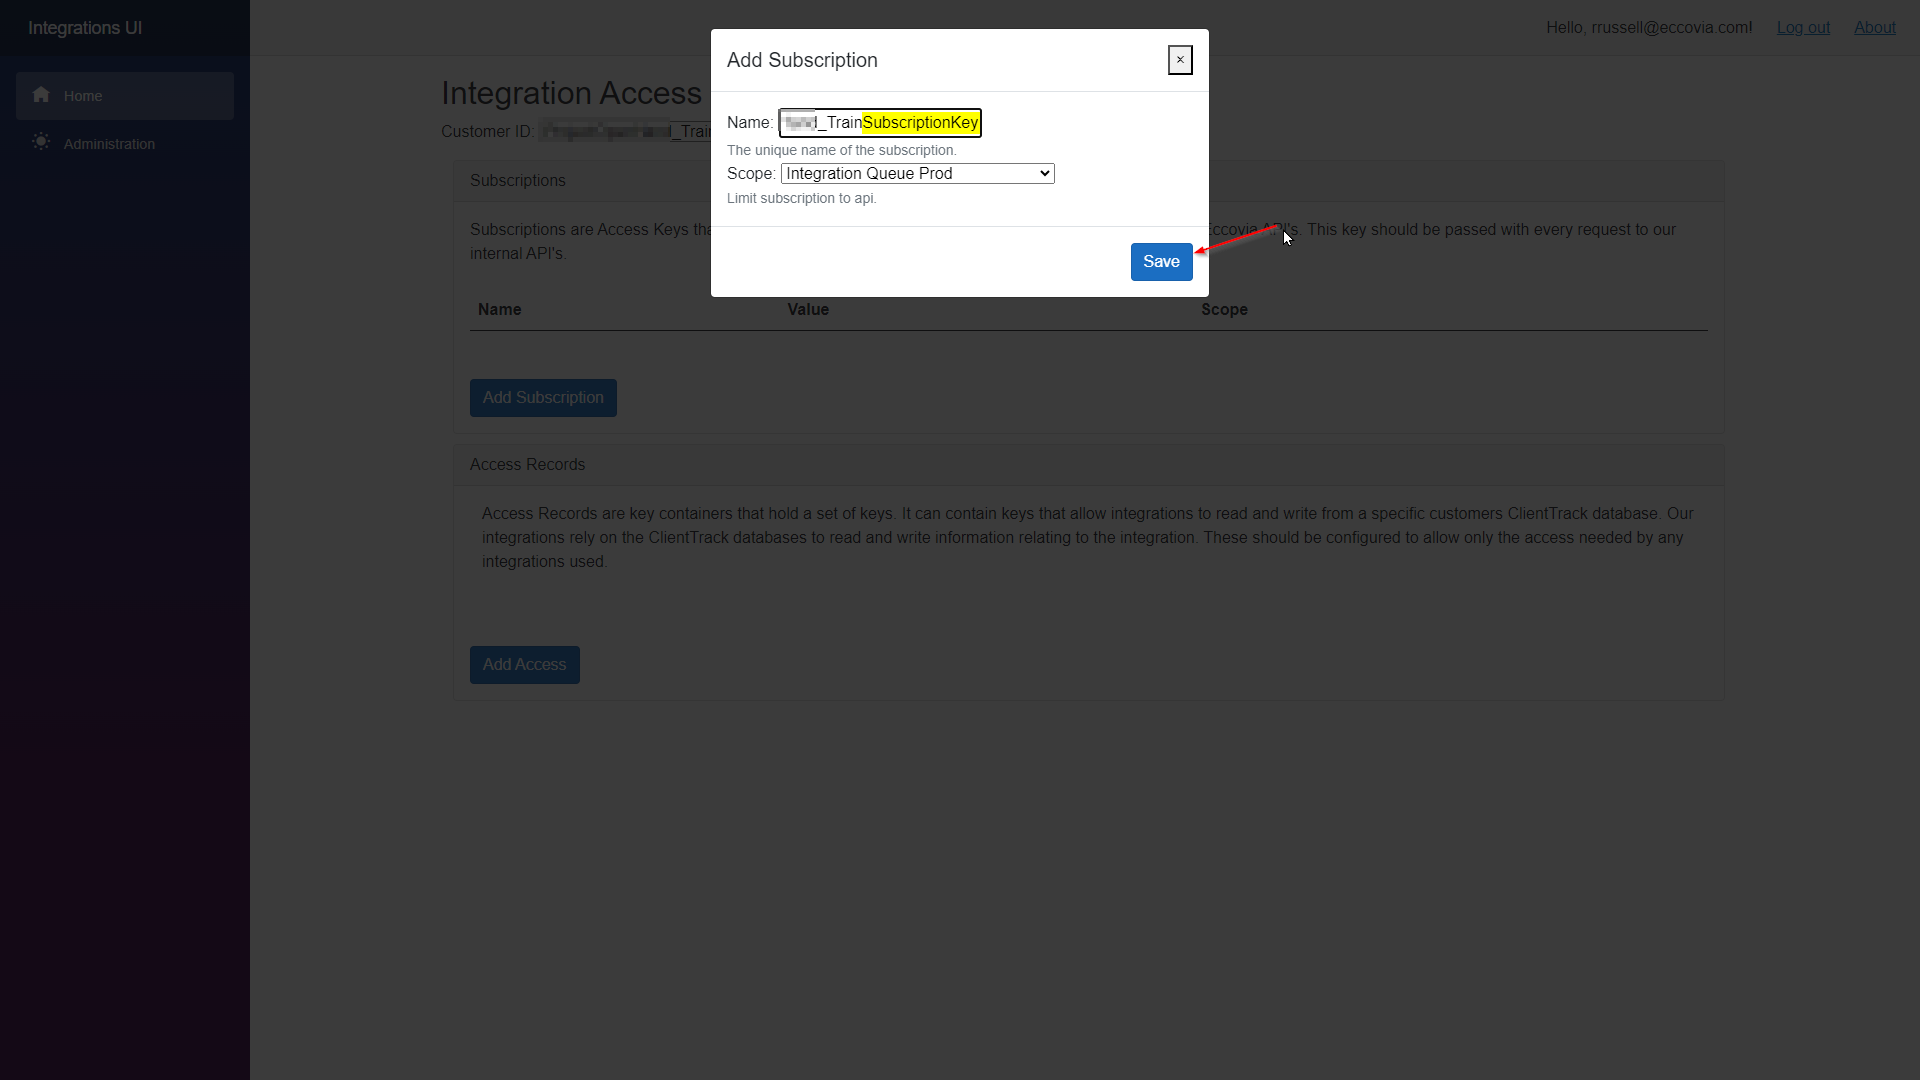
- Name the Subscription and select the “Integration Queue Prod” scope. Pre-pend “SubscriptionKey” with the name of the ClientTrack environment/database to distinguish the key's name from other dbs/environments for which the customer may need the same keys.
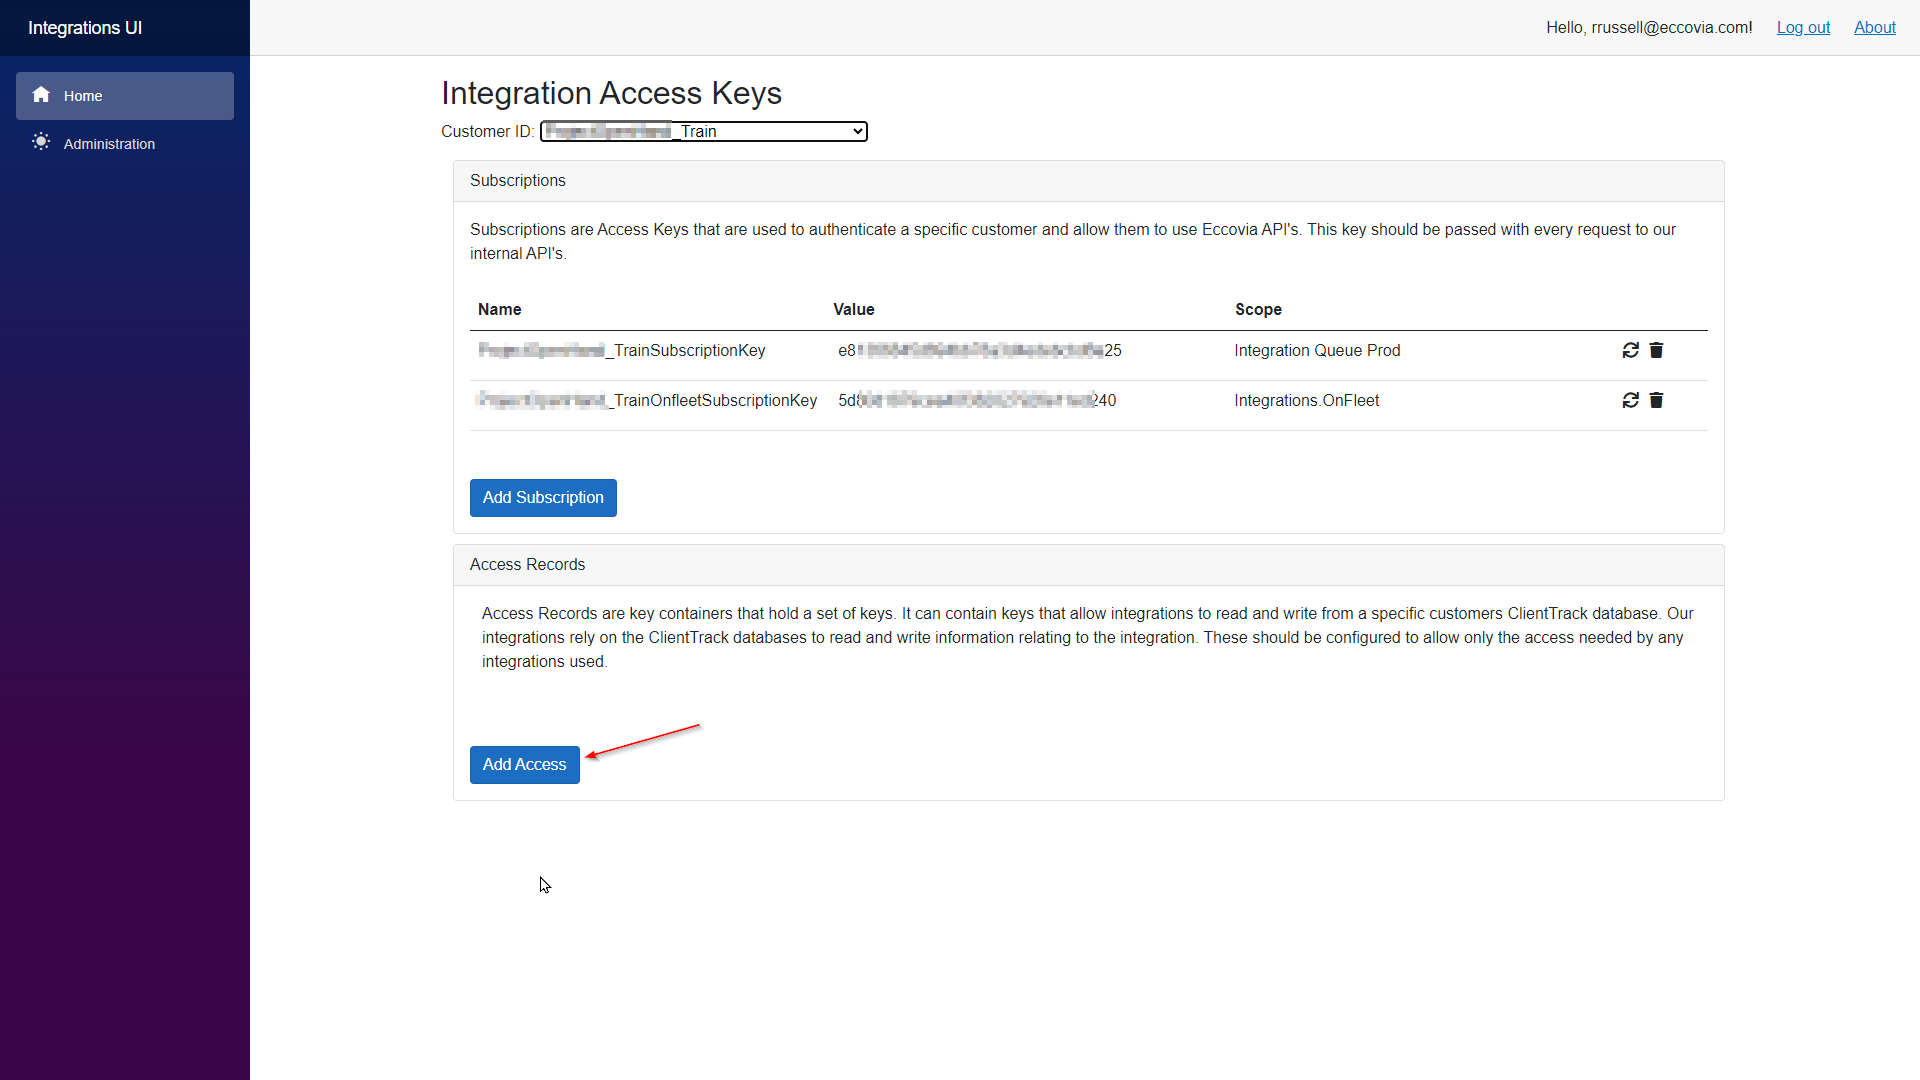
- Create another Subscription and select the “Integrations Onfleet” scope. Pre-pend “OnfleetSubscriptionKey” with the name of the ClientTrack environment/database to distinguish the key's name from other dbs/environments for which the customer may need the same keys.
- Click “Add Access” to create a new Access Record with scope.
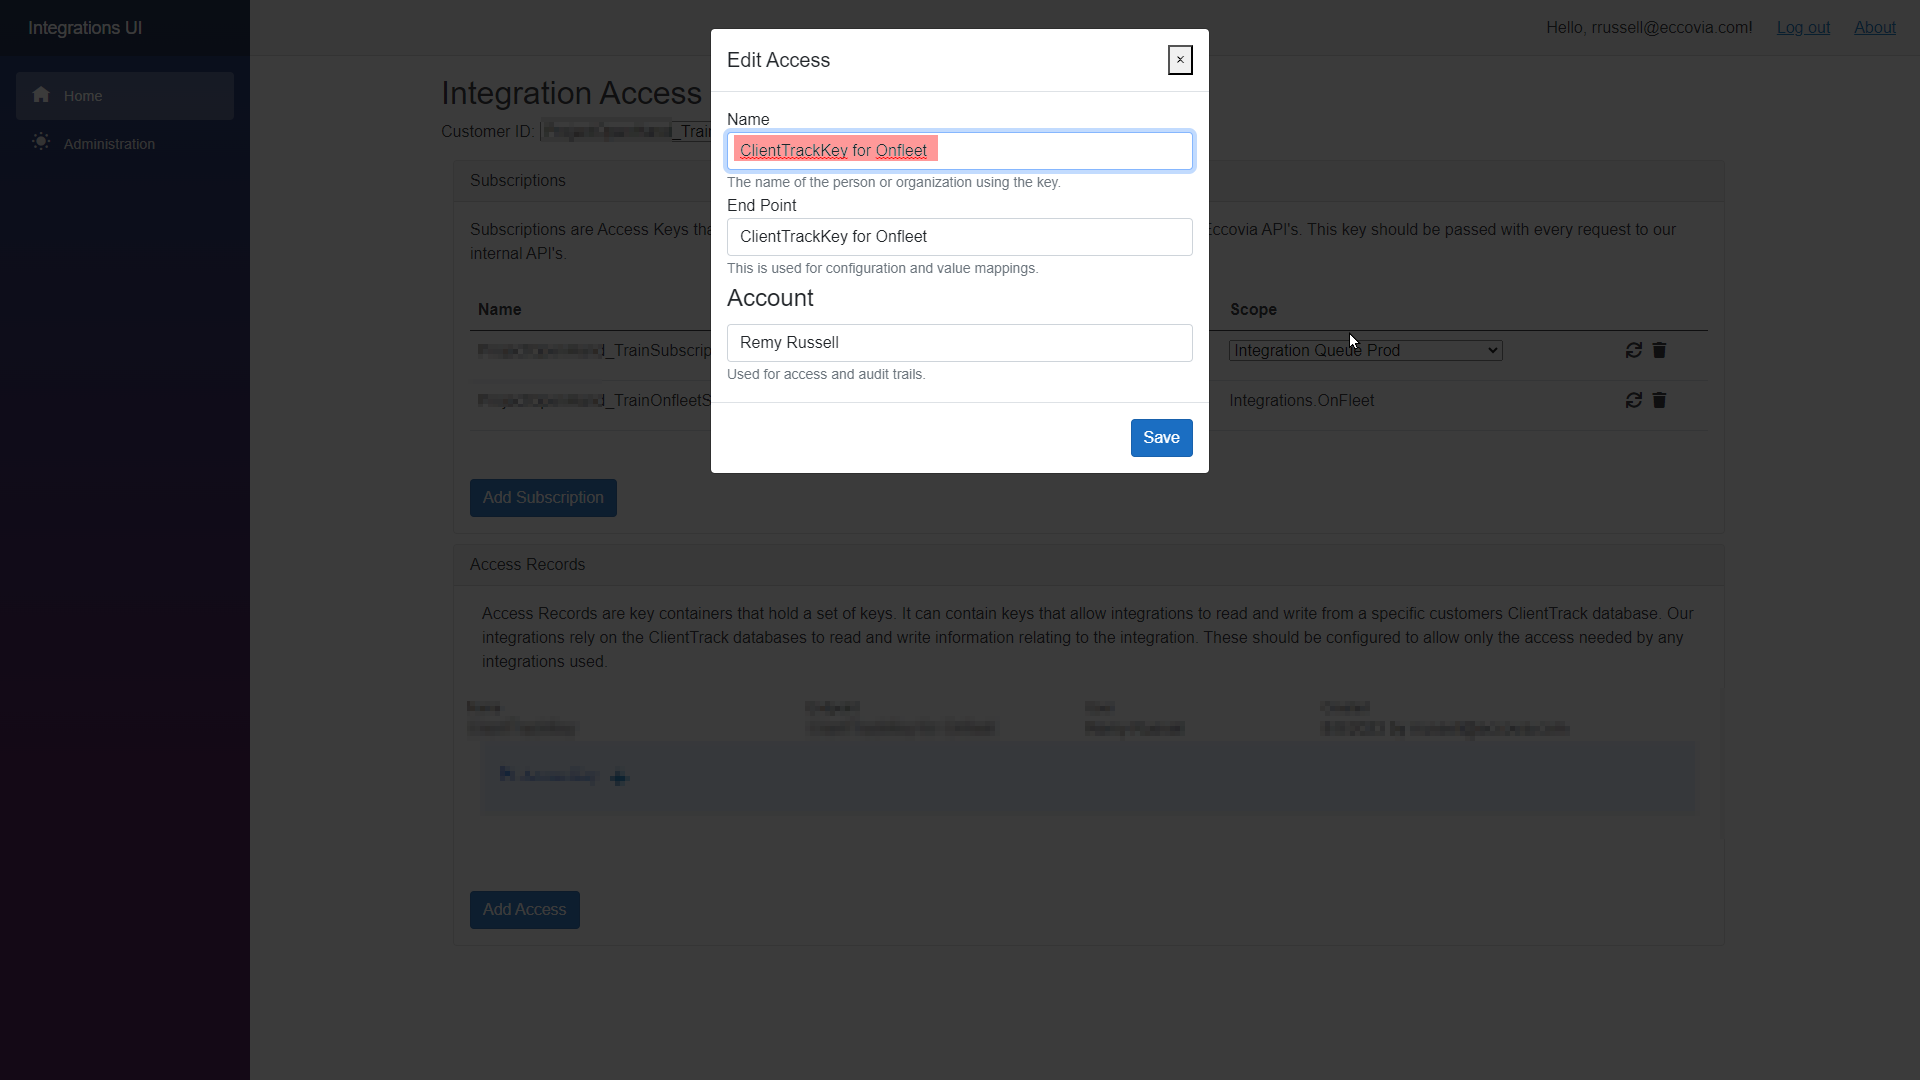
- Name the Access record (e.g. “ClientTrackKey for Onfleet”, select the endpoint created for the Onfleet integration (e.g. “ClientTrackKey for Onfleet” from the example above), and select the appropriate ClientTrack User who should be tagged on API requests made with the Key.
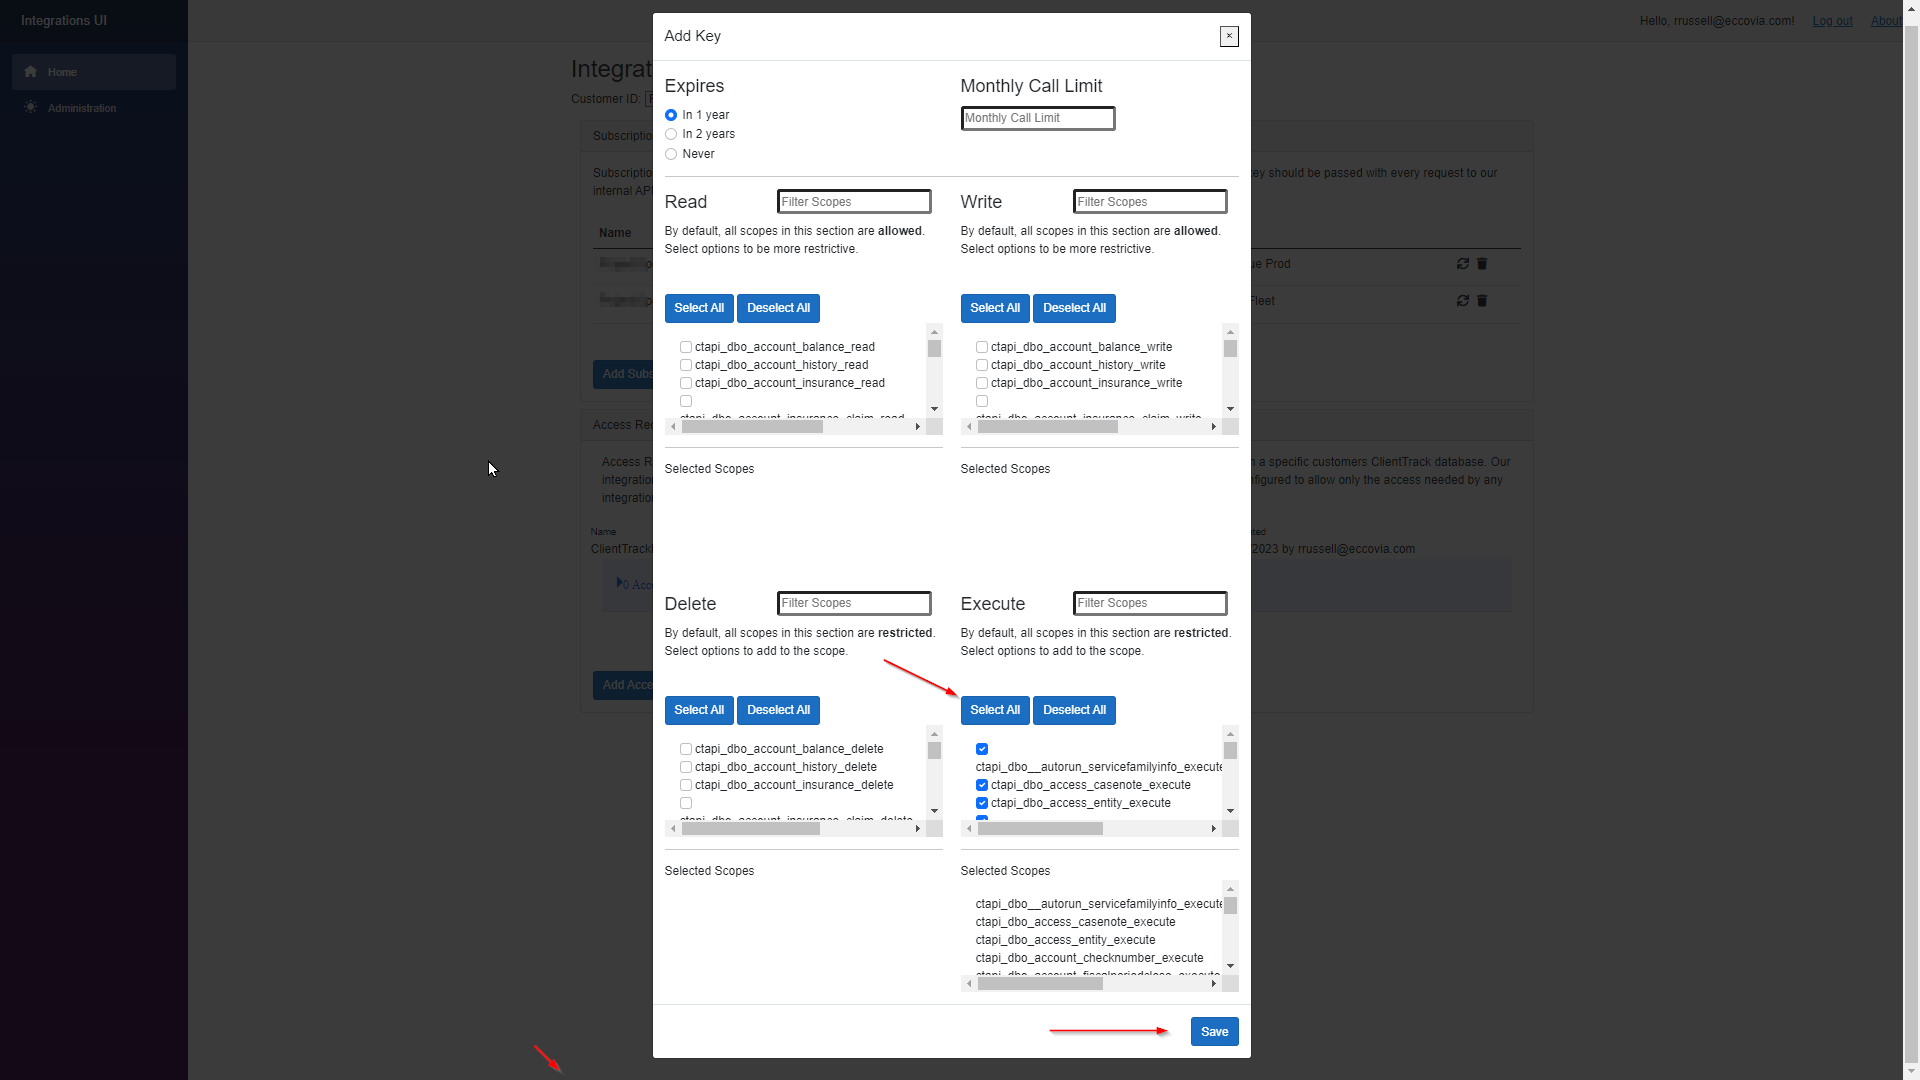
- Set the Expiration and click “Select All” for the Execute Scope (this key needs to execute several stored procedures related to the baselined Onfleet integration features).
- Note the below colors for later in this document where these values are added into the ClientTrack UI as API Key variables.
Creating new Keys in an Onfleet environment
Onfleet has helpful documentation regarding API Keys (API – Onfleet Support Center), but the below steps will cover how to create two API Keys that will be necessary for the ClientTrack integration:
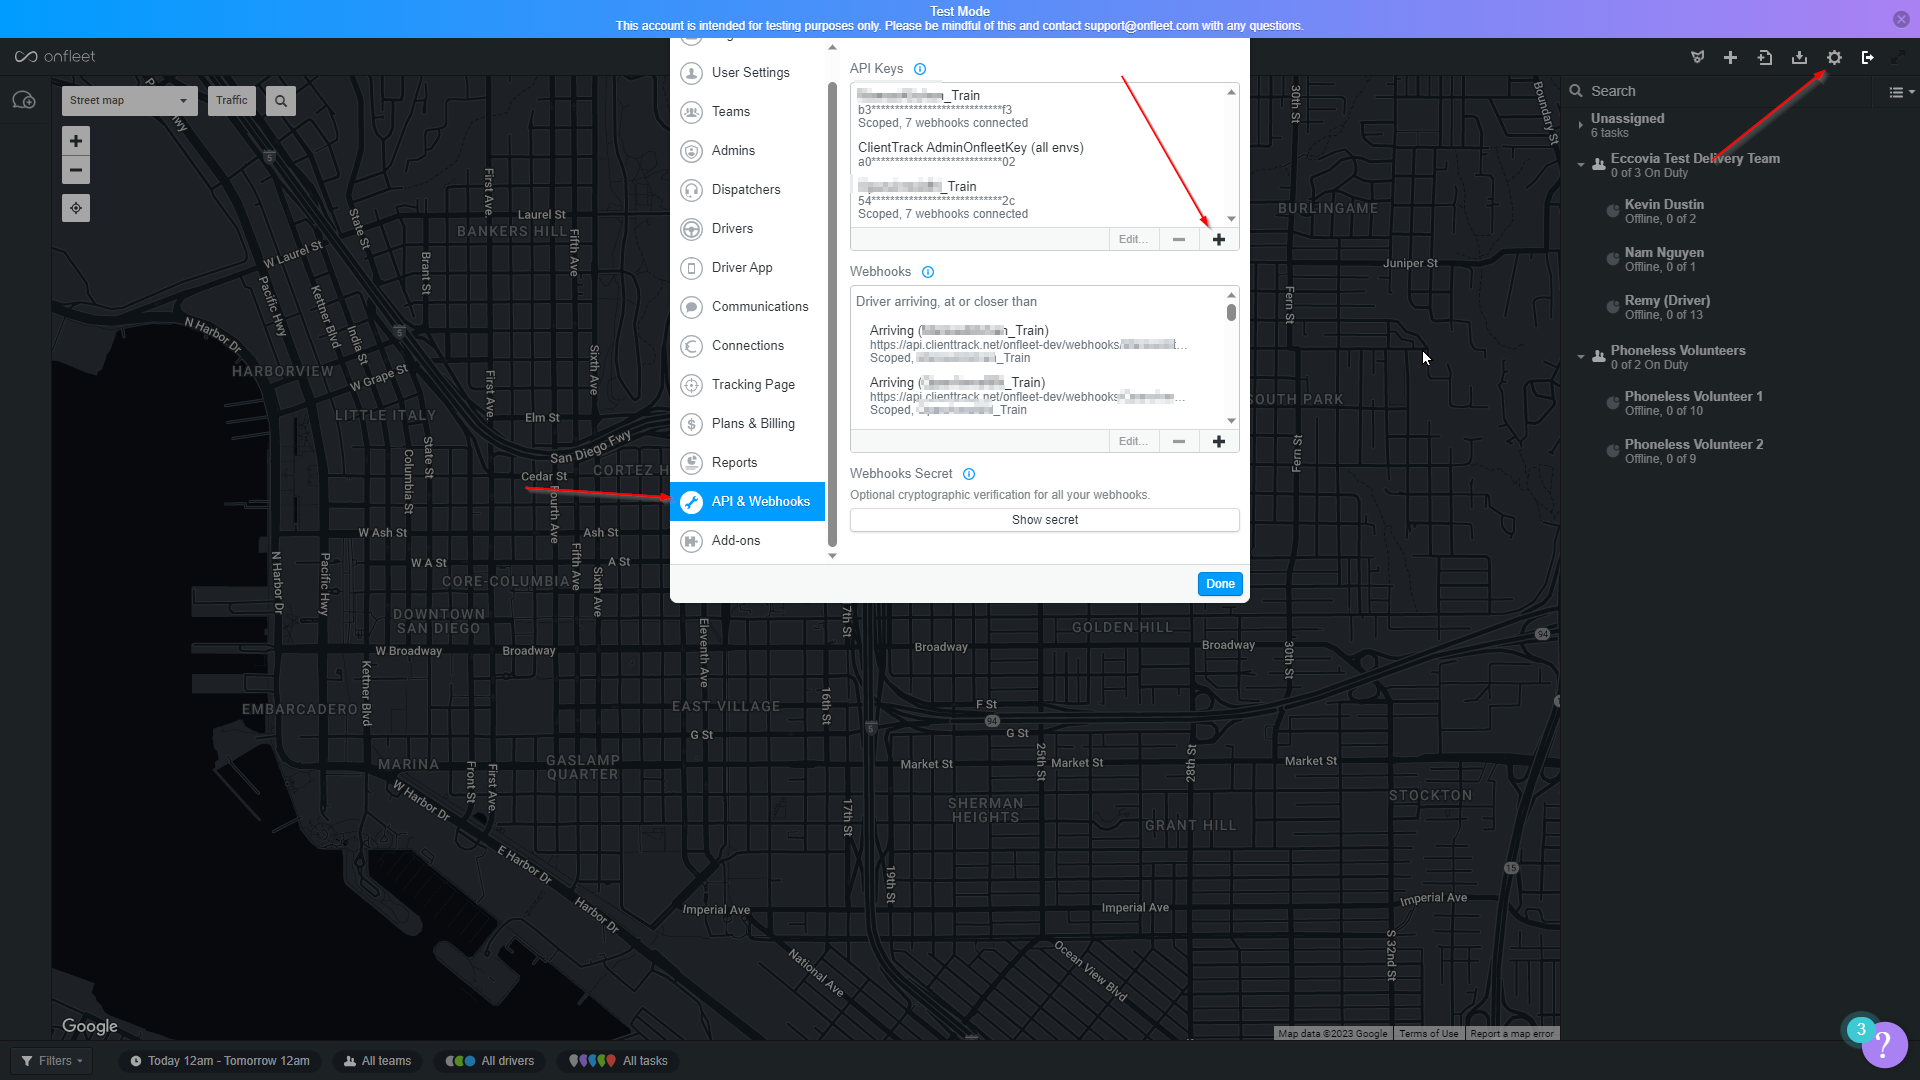
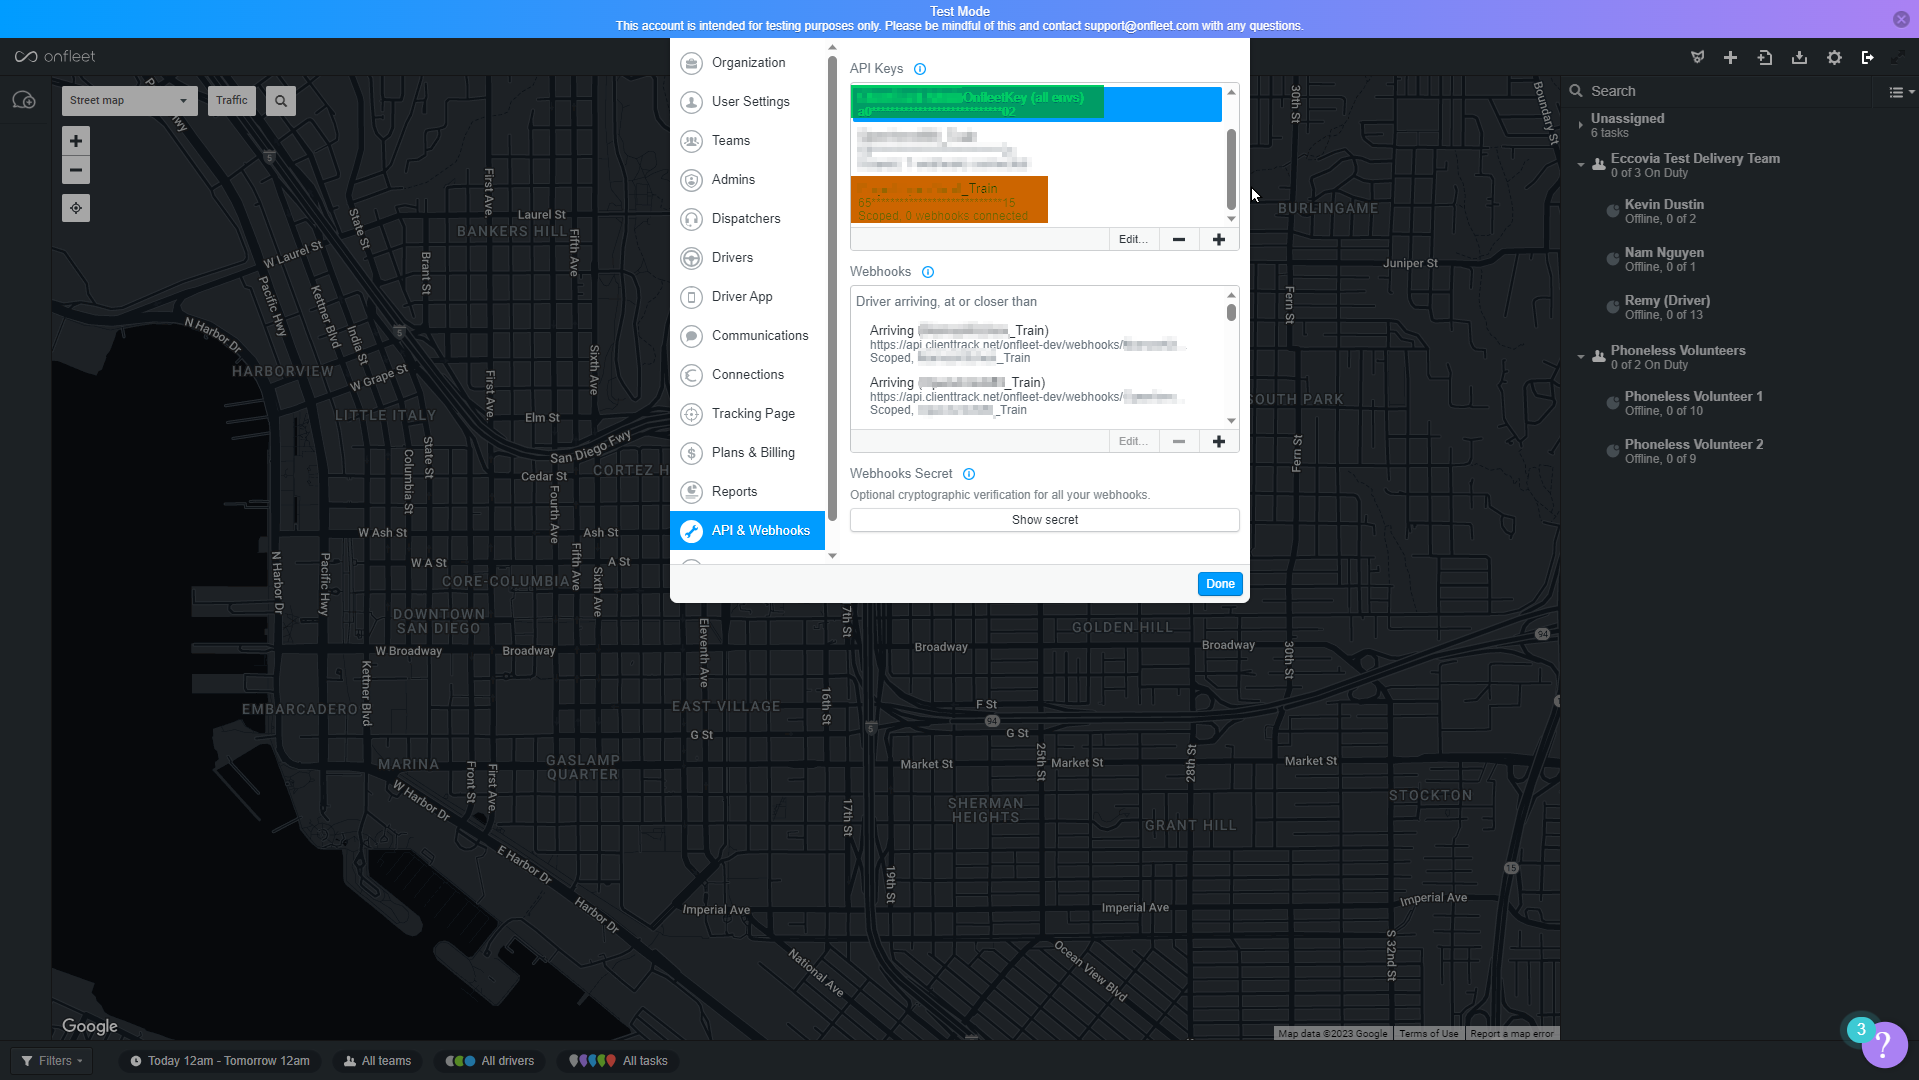
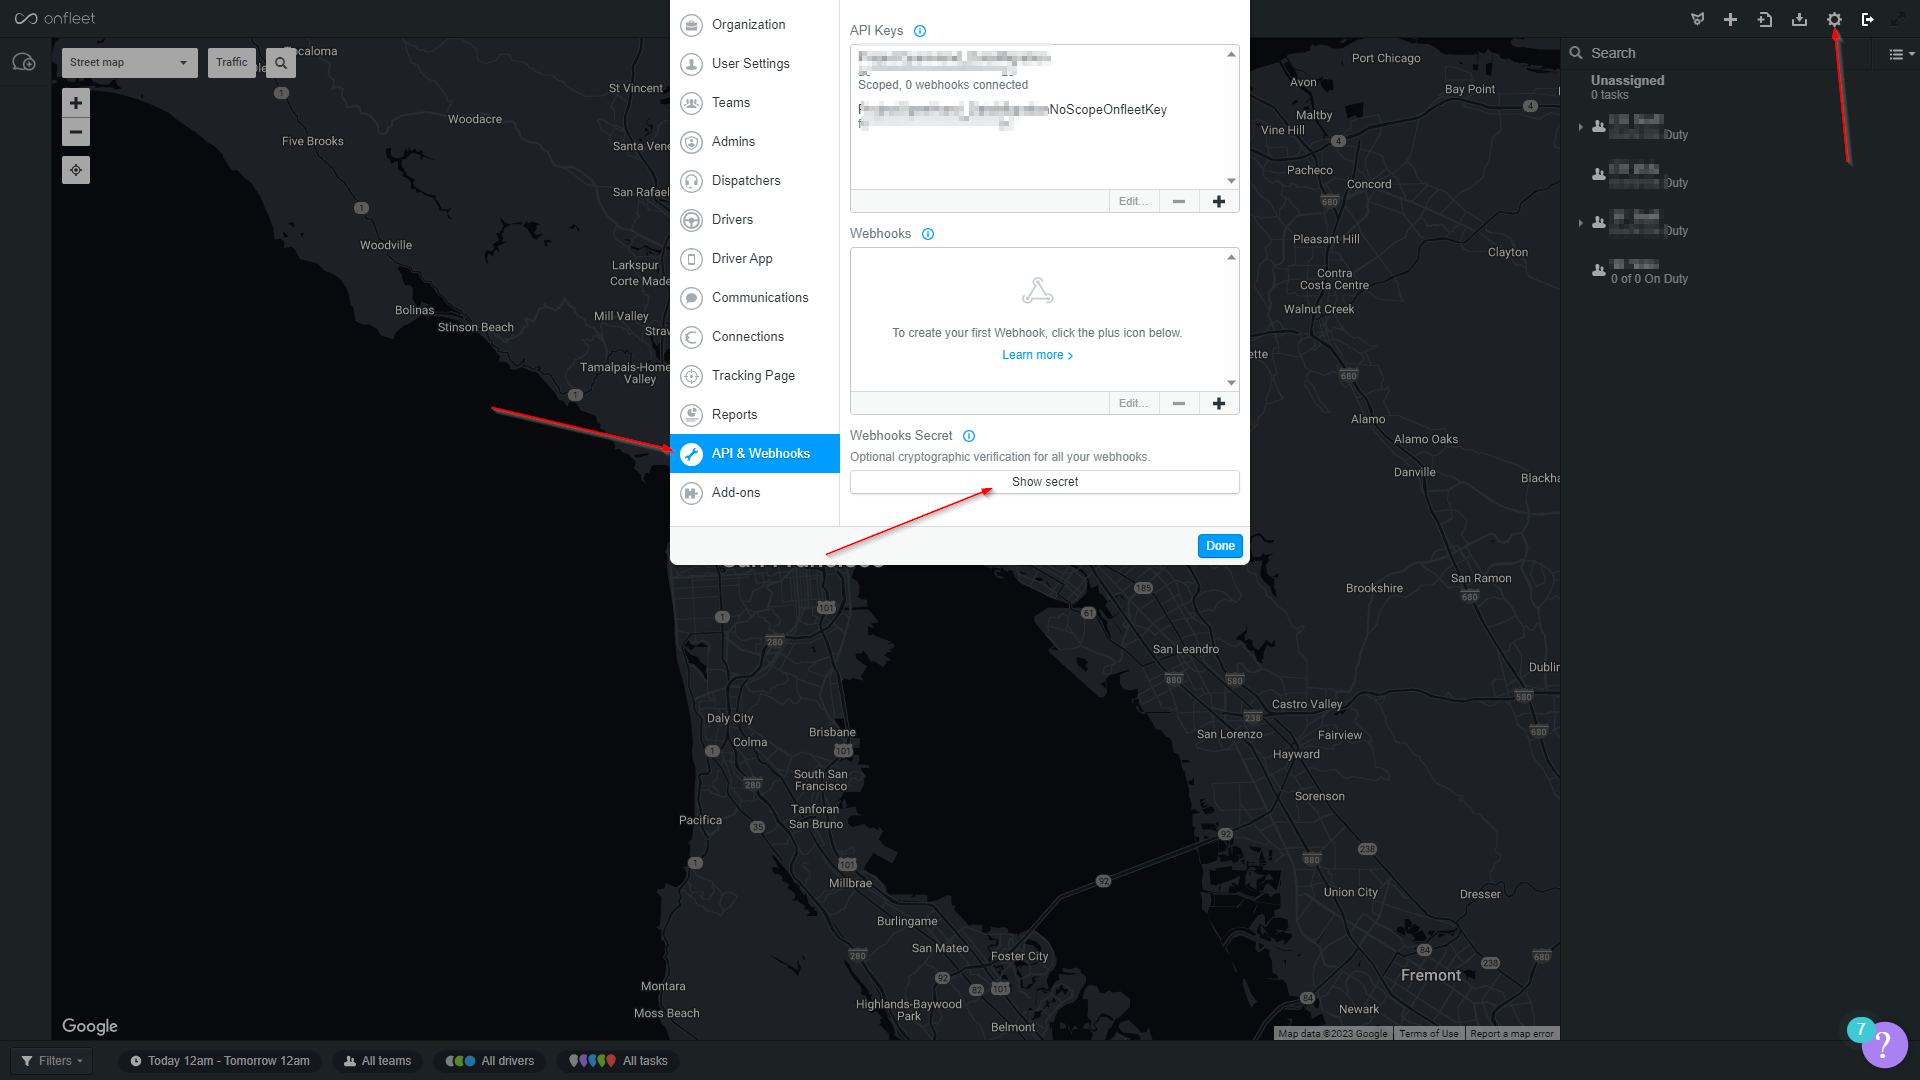
- Sign in to your Onfleet environment, click Settings, then “API & Webhooks”, then click “+” to add a new API Key
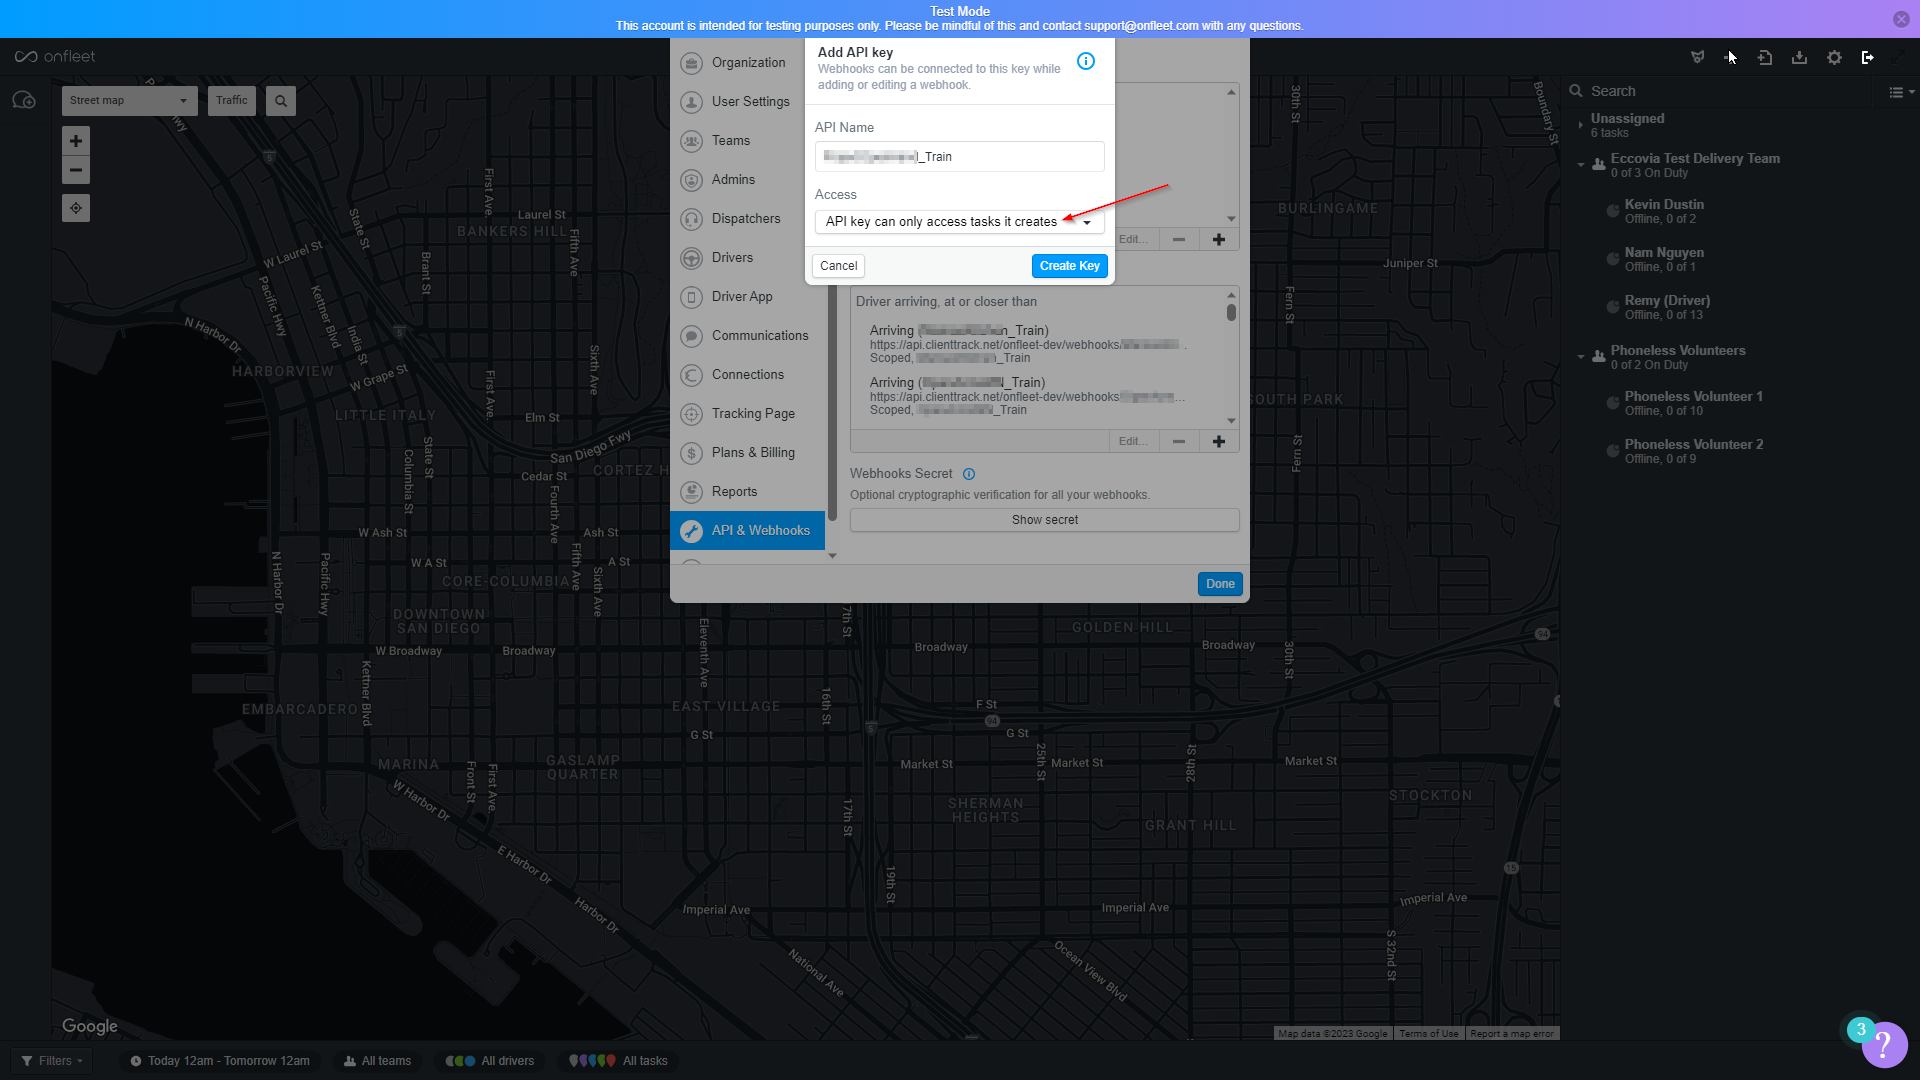
- Name the API Key (ideally after the specific ClientTrack db/environment) and select “API key can only access tasks it creates."
- Note: A “scoped” API Key like this will enable multiple ClientTrack environments to be integrated with the same Onfleet environment while Delivery Tasks are distinguished based on which ClientTrack environment sent the API Request to create them. This may be useful if a customer needs to continue utilizing Onfleet and ClientTrack for production operations while also testing/troubleshooting from a non-production ClientTrack environment.
- Note: A “scoped” API Key like this will enable multiple ClientTrack environments to be integrated with the same Onfleet environment while Delivery Tasks are distinguished based on which ClientTrack environment sent the API Request to create them. This may be useful if a customer needs to continue utilizing Onfleet and ClientTrack for production operations while also testing/troubleshooting from a non-production ClientTrack environment.
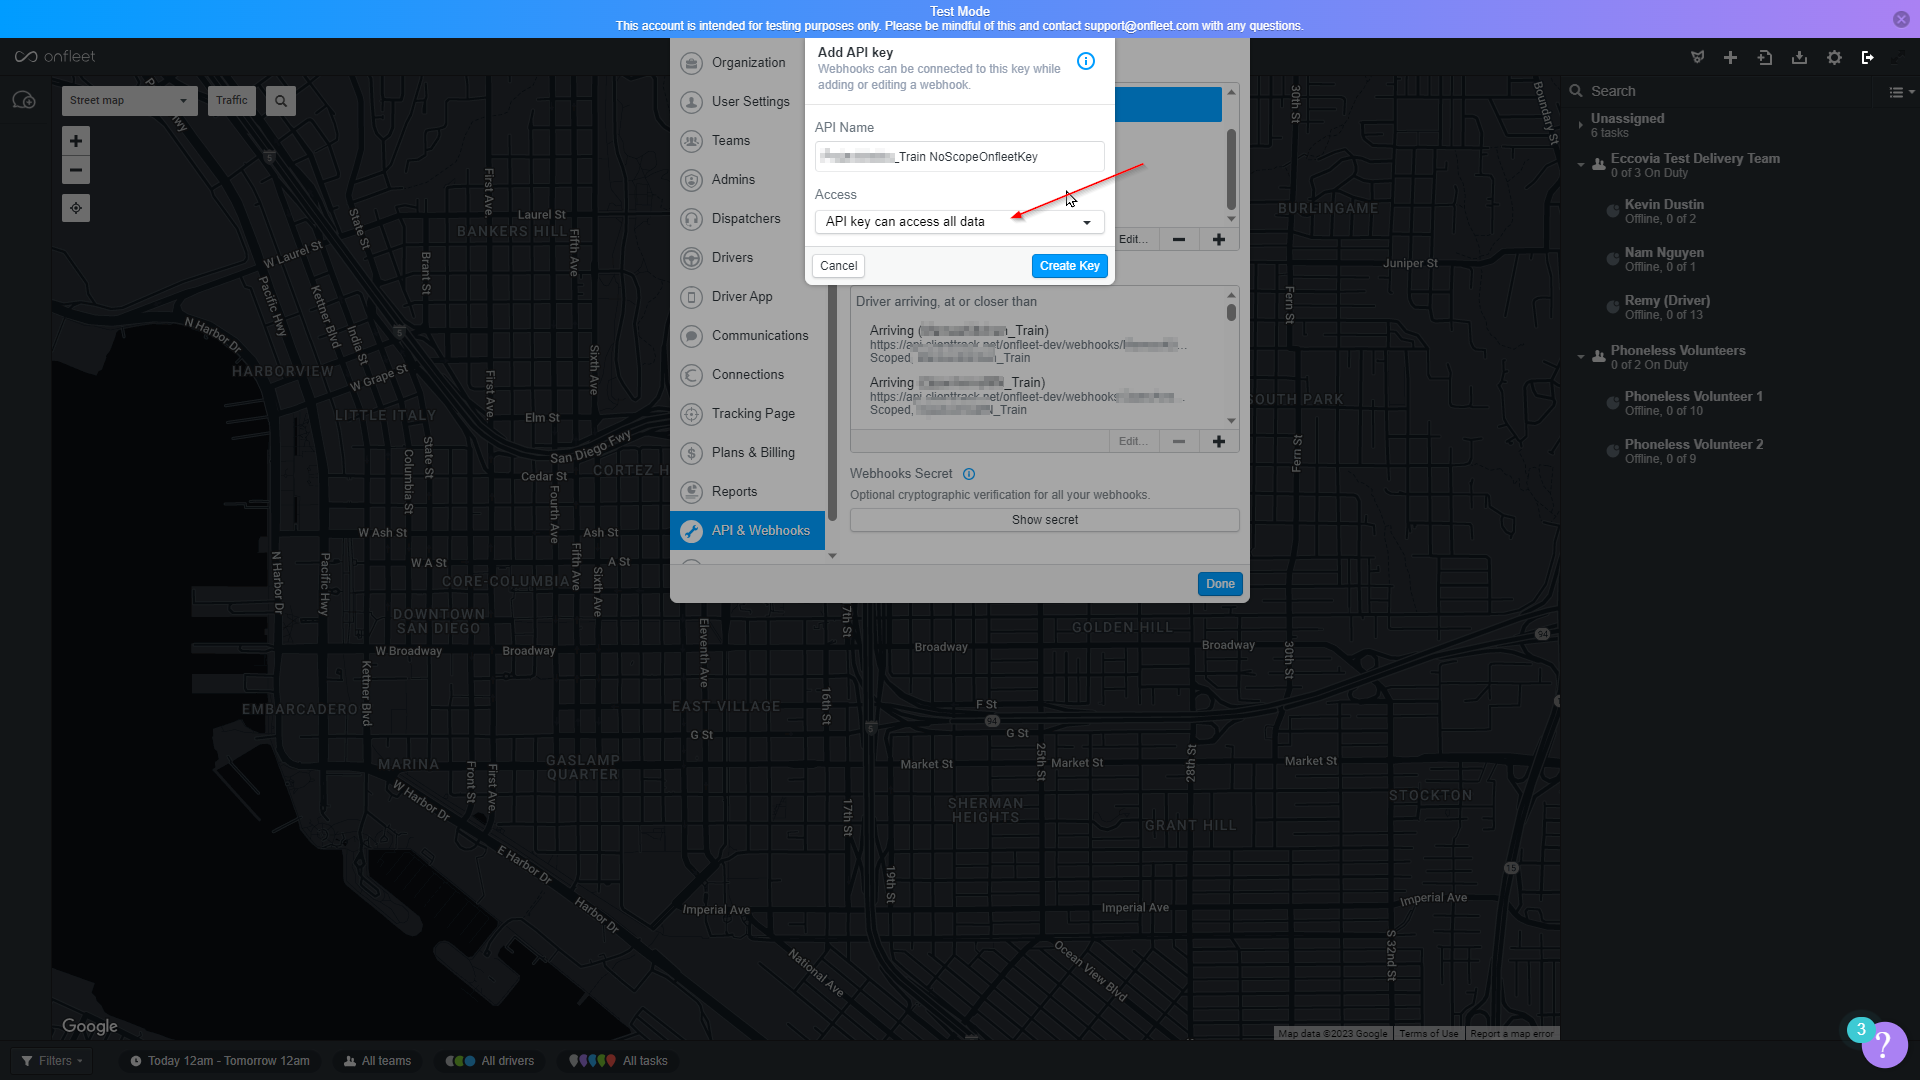
- Create an additional API Key that is NOT scoped (ideally named with the ClientTrack environment and “NoScopeOnfleetKey”) so that some API requests can be made that are not limited to the Delivery Tasks created by a given API key.
- This is necessary for some of the API Calls that can be leveraged for the ClientTrack Integration (e.g. the “Get Workers” or “Get Tasks” requests) . Making these API calls with a non-scoped Key was determined to be useful for some added ClientTrack integration features - namely to prevent creating tasks for recipients w/ a phone number that already exists in Onfleet for a different recipient, and to enable a “Driver Manifest Report” in ClientTrack that requires selecting a set of available Workers via Onfleet API).
- This is necessary for some of the API Calls that can be leveraged for the ClientTrack Integration (e.g. the “Get Workers” or “Get Tasks” requests) . Making these API calls with a non-scoped Key was determined to be useful for some added ClientTrack integration features - namely to prevent creating tasks for recipients w/ a phone number that already exists in Onfleet for a different recipient, and to enable a “Driver Manifest Report” in ClientTrack that requires selecting a set of available Workers via Onfleet API).
- Note the below colors for later in this document where these values are added into the ClientTrack UI as API Key variables.
Adding ClientTrack and Onfleet Keys as API Key variables in the ClientTrack environment
- Sign in to the desired ClientTrack environment, navigate to Global Administration > System Integration > Api Keys (or update the URL after signing in to the following: https://clienttrack.eccovia.com/integration/api-keys), then click “Add Access.”
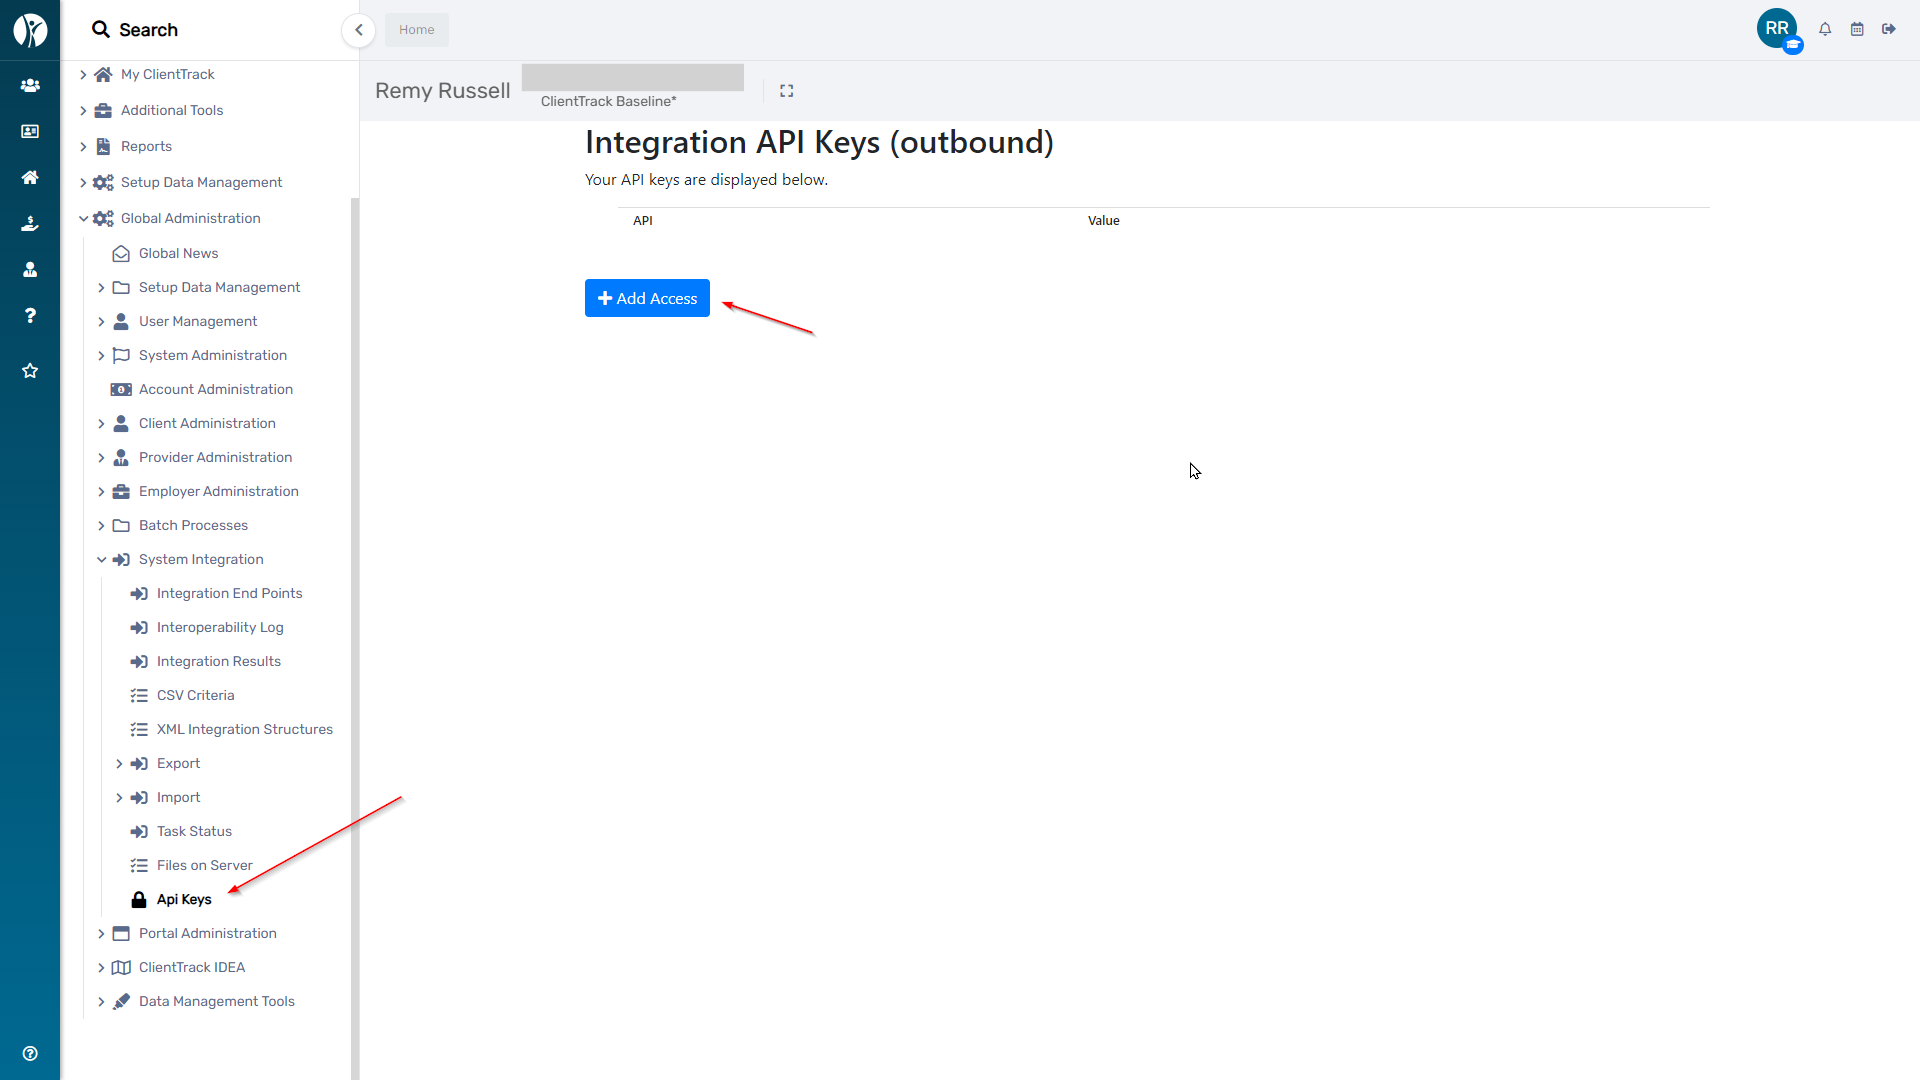
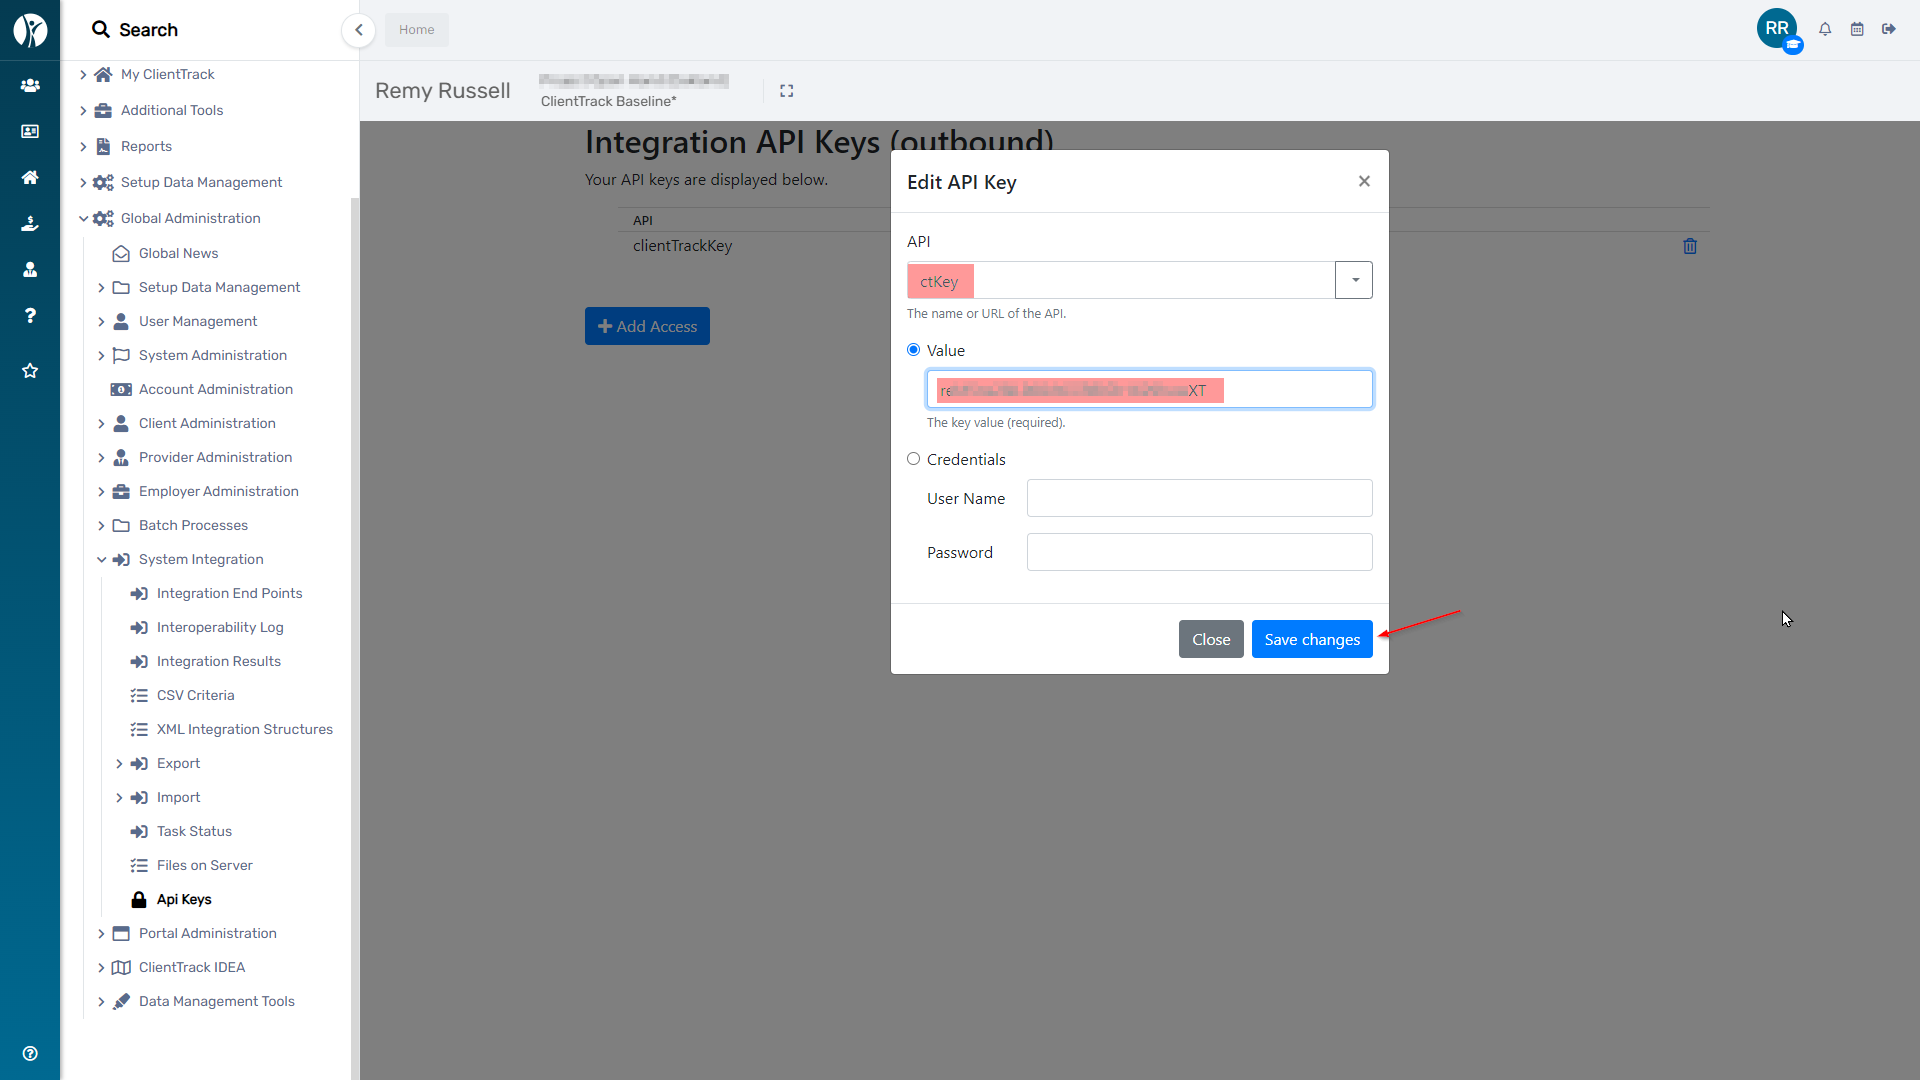
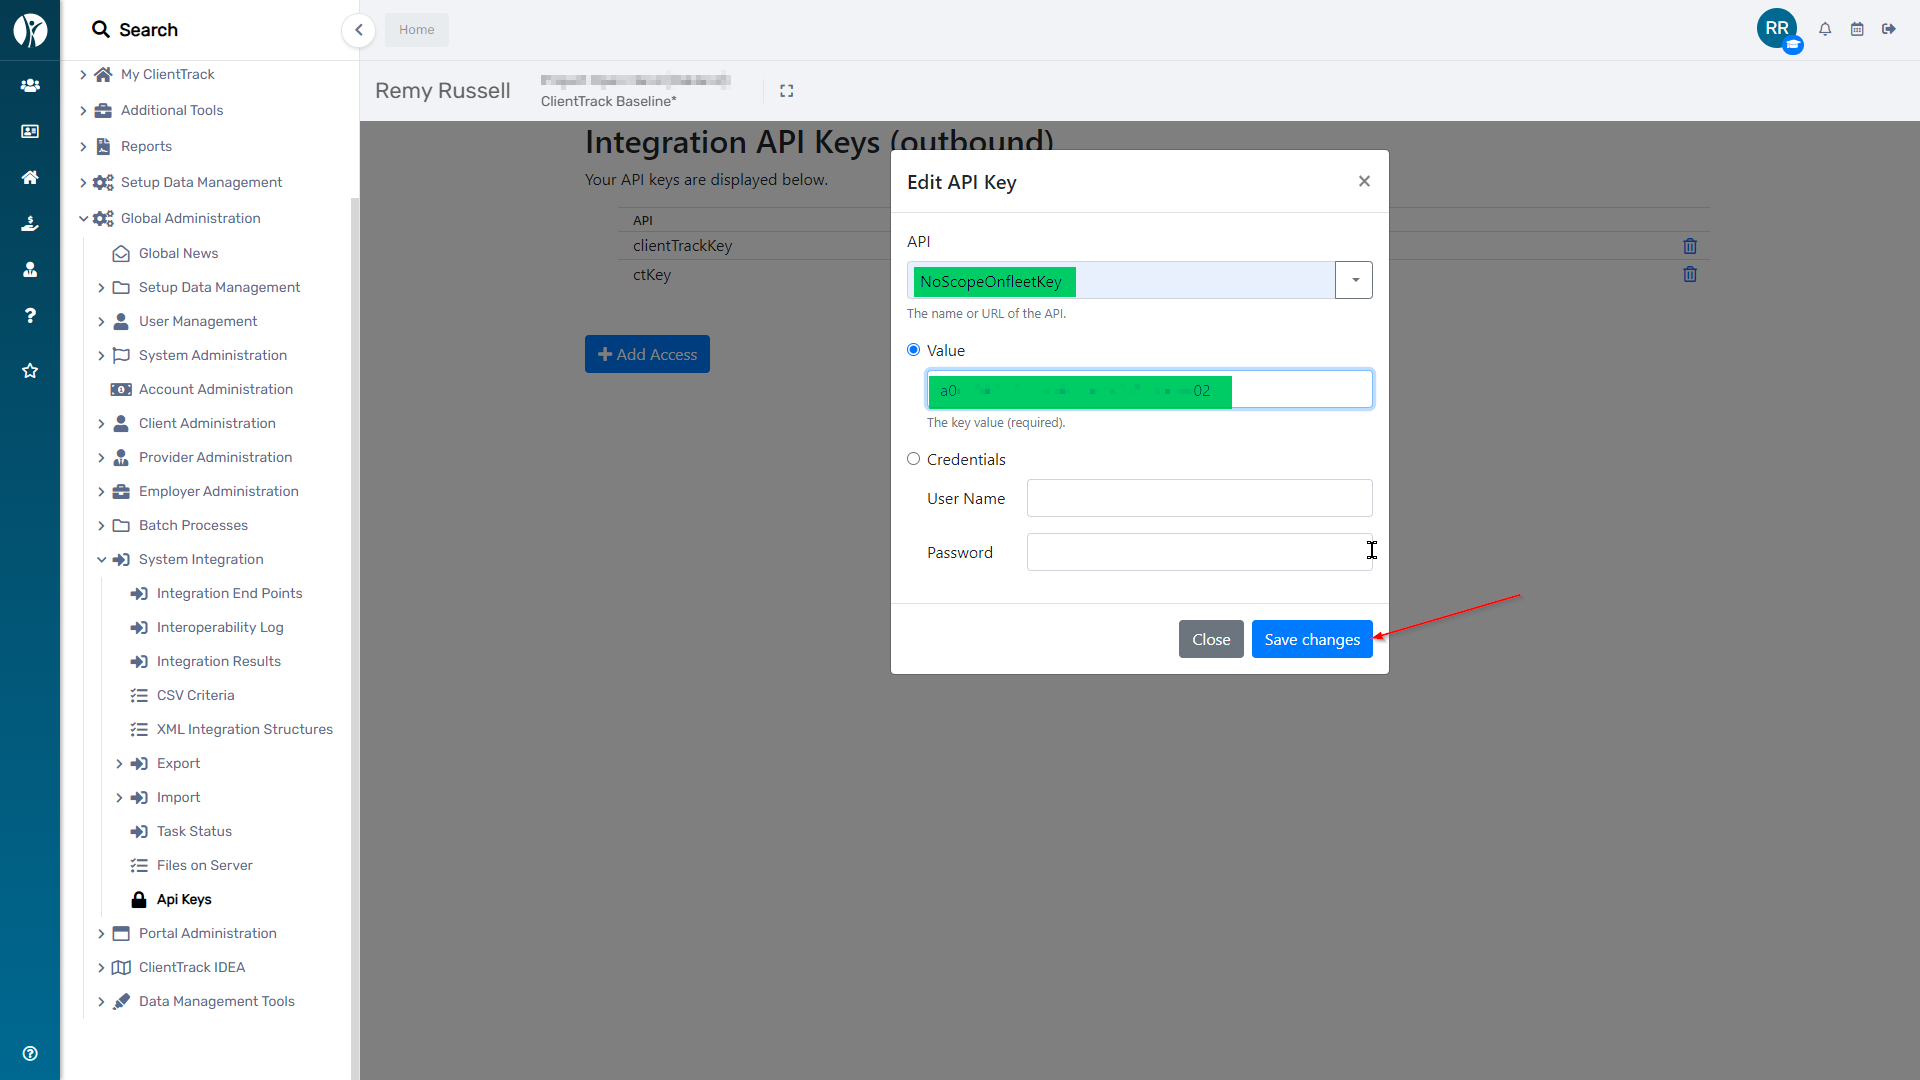
- Create new API Key variables to be used by the ClientTrack Form API Plug-ins. These will be the Key/Value pairs that will be referenced by ClientTrack API Plug-ins to securely send the key values via API request). Note the colors that correspond with the colors highlighted in the Key Generation steps of this document.
- ctKey
- the API access key which represents the specific ClientTrack database
- the API access key which represents the specific ClientTrack database
-
clientTrackKey
- the value must include the prefix, “apikey ” (including a blank space before the actual value) to function correctly with one of the ClientTrack Forms that was configured for the Onfleet Integration.
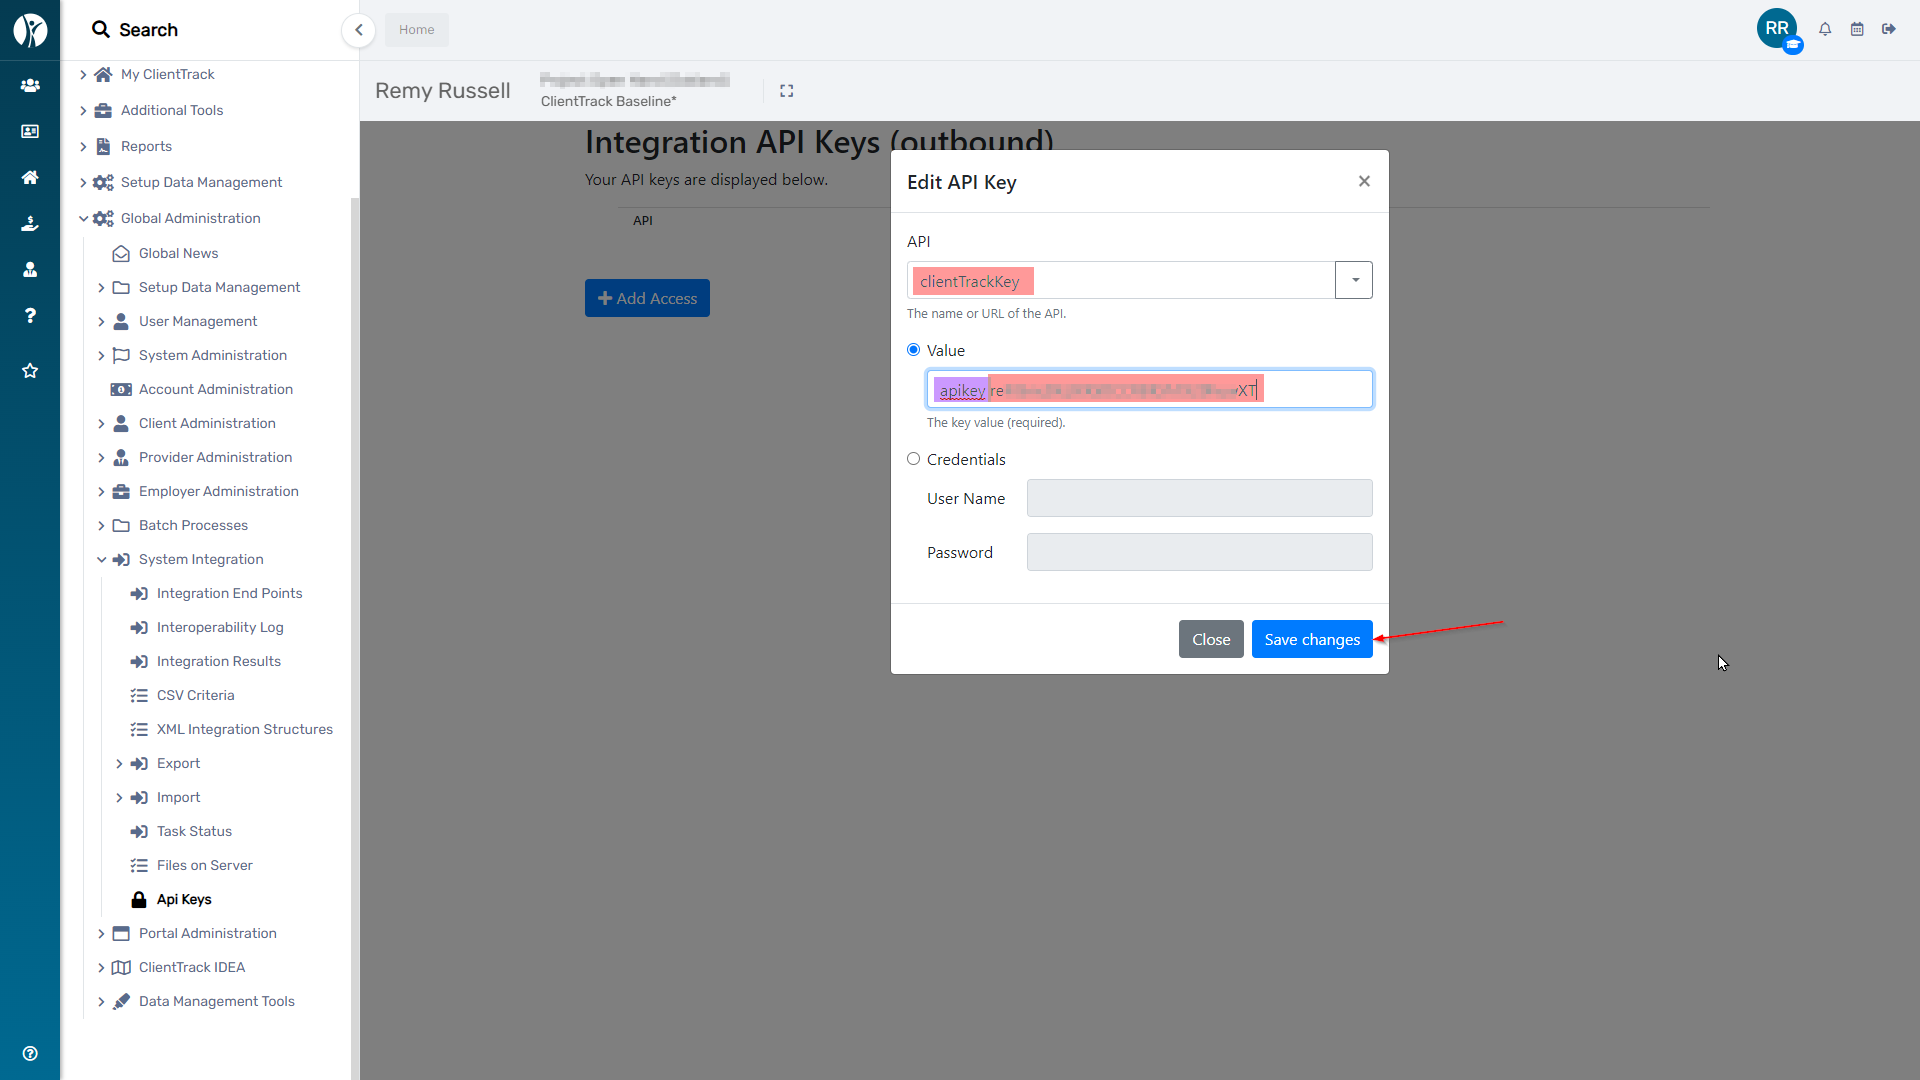
- the value must include the prefix, “apikey ” (including a blank space before the actual value) to function correctly with one of the ClientTrack Forms that was configured for the Onfleet Integration.
-
NoScopeOnfleetKey
- the Onfleet key created without any scope in the Onfleet API settings
- the Onfleet key created without any scope in the Onfleet API settings
-
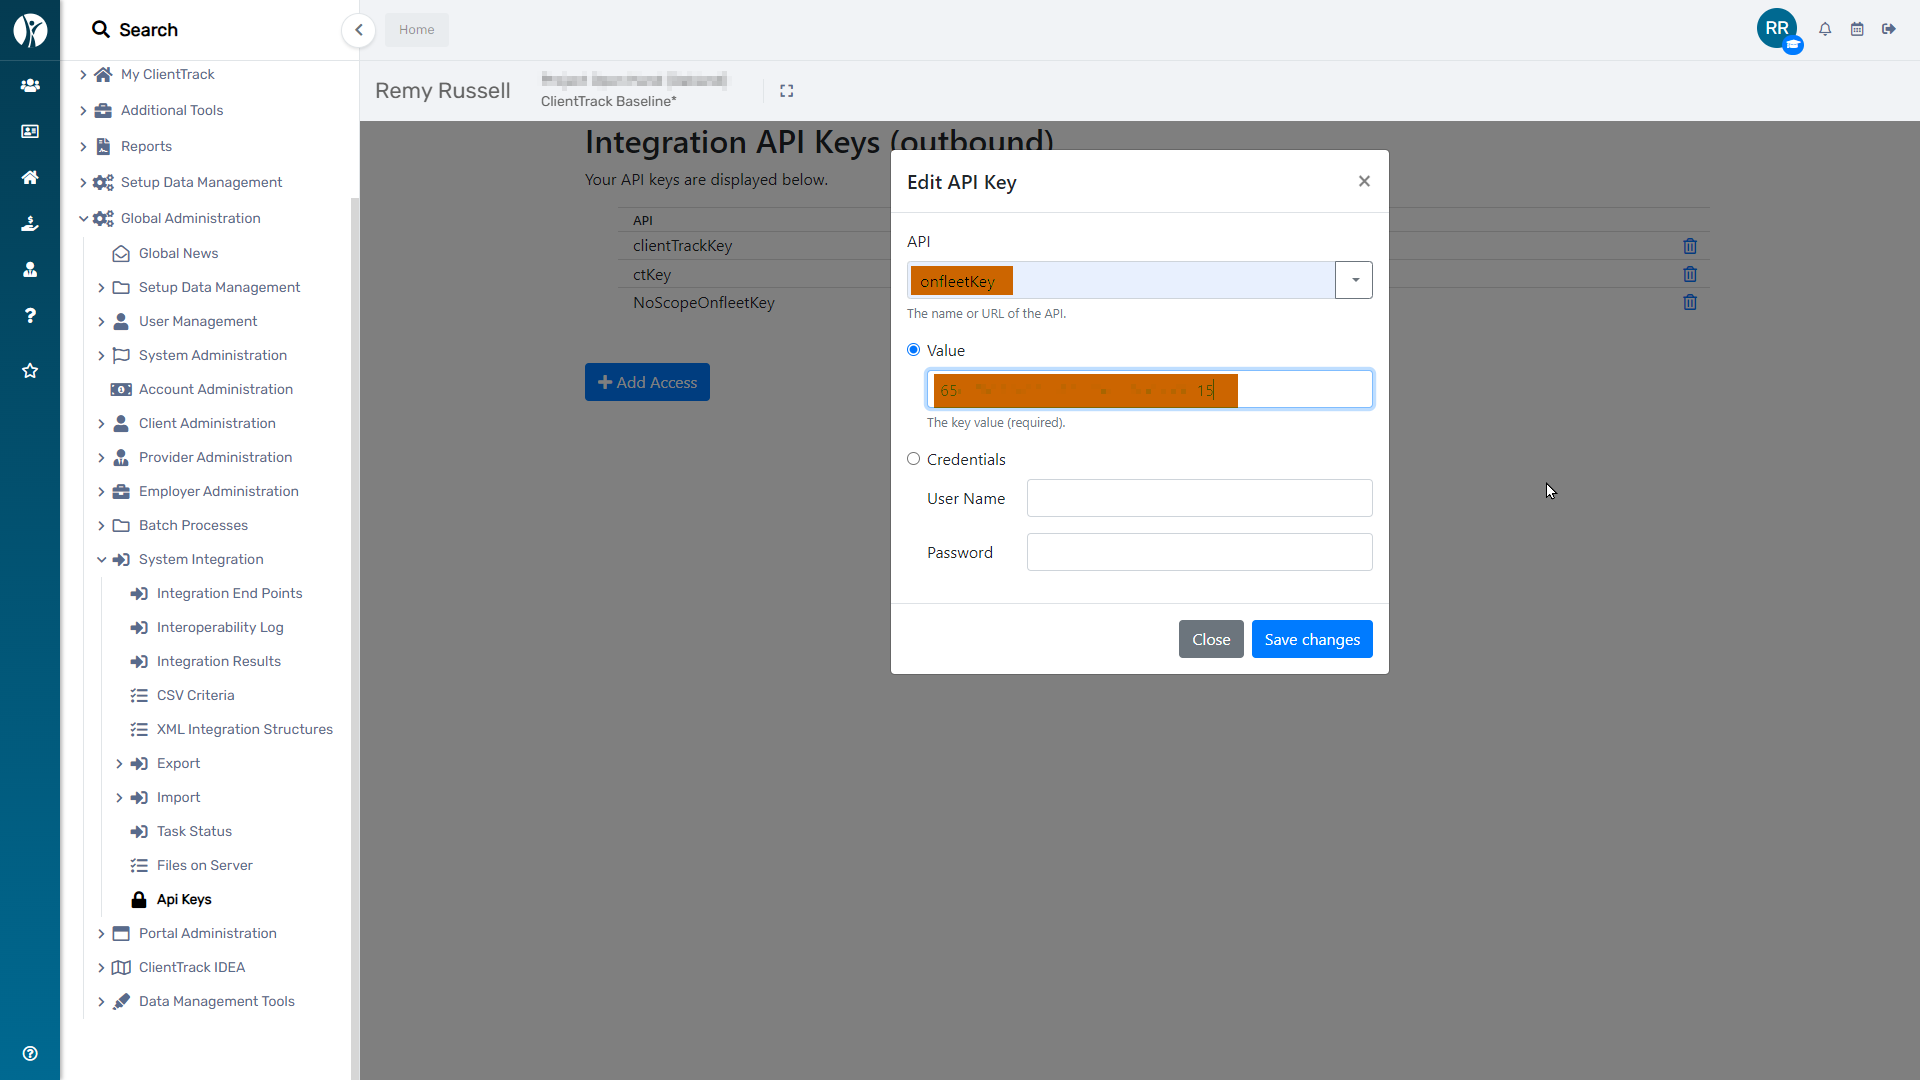
onfleetKey
- the Onfleet key created with a scope for the specific ClientTrack database in the Onfleet API settings
- the Onfleet key created with a scope for the specific ClientTrack database in the Onfleet API settings
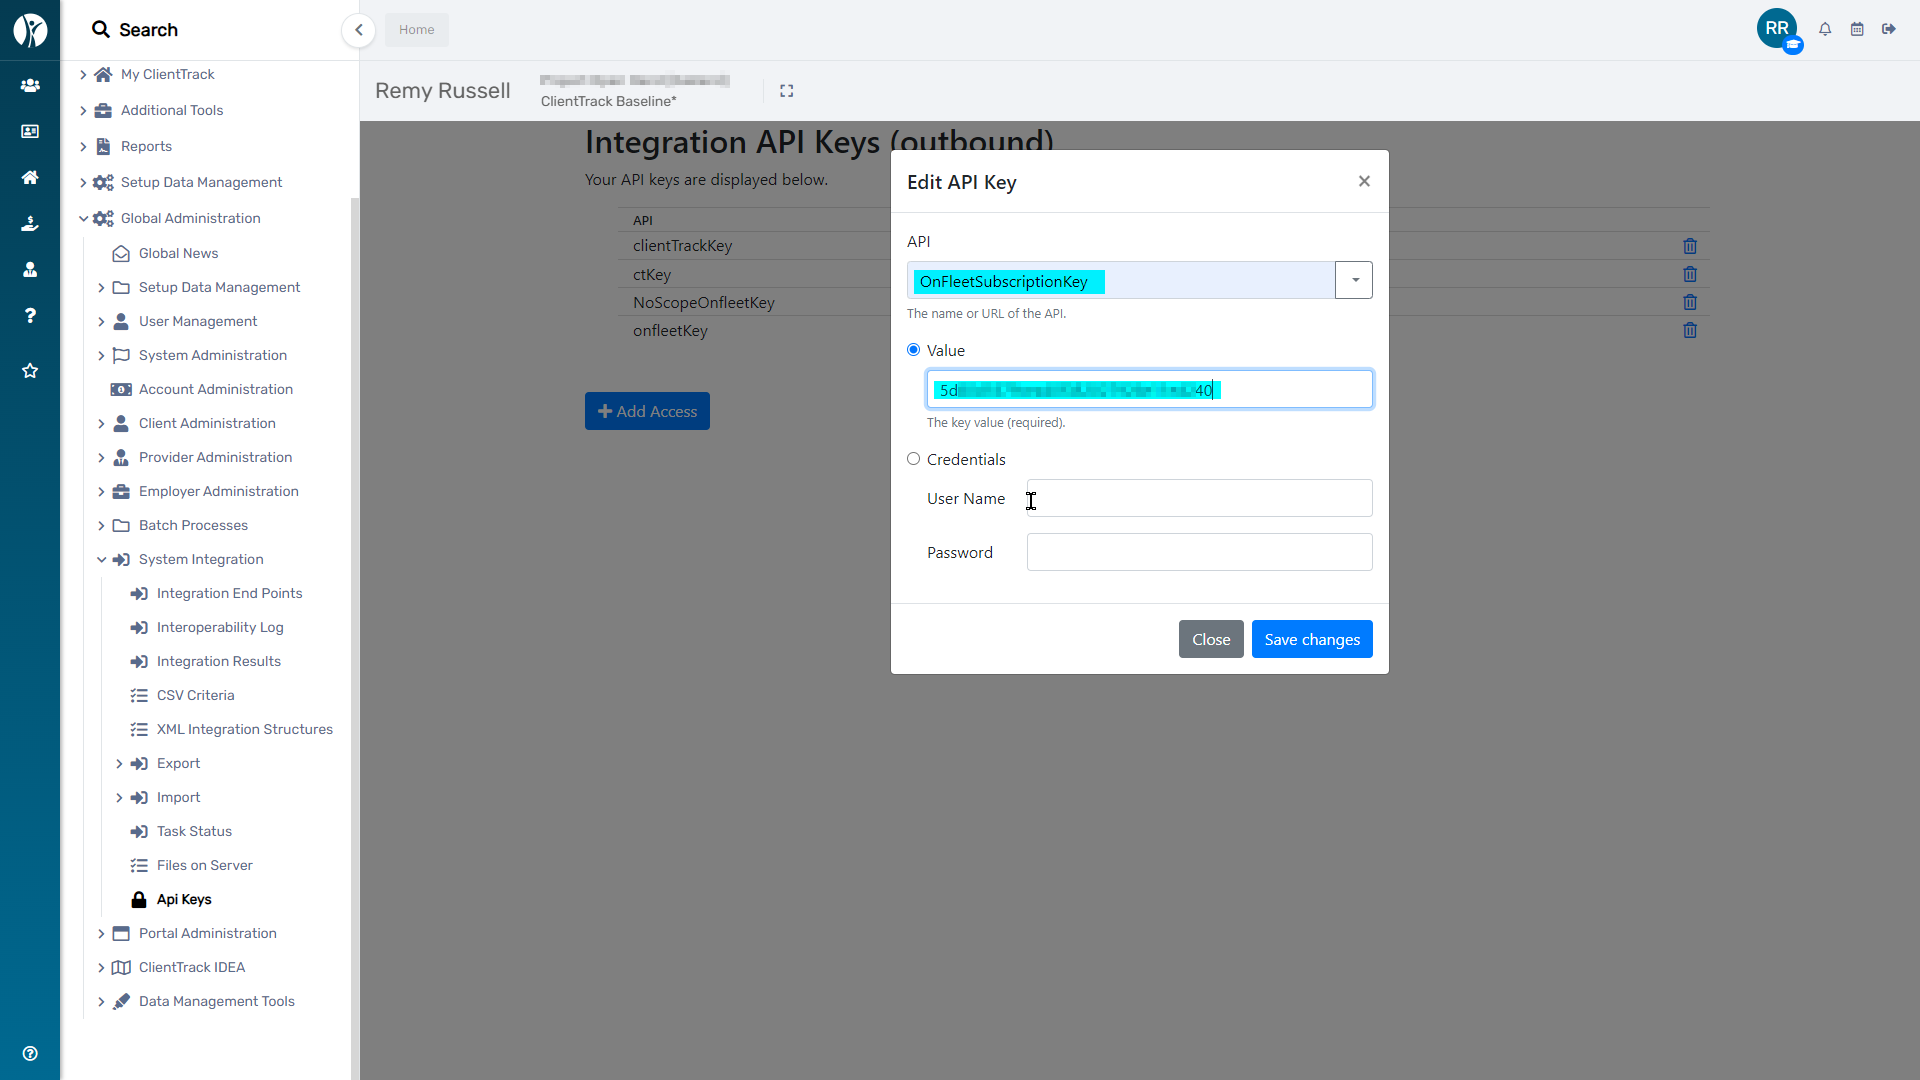
- OnFleetSubscriptionKey
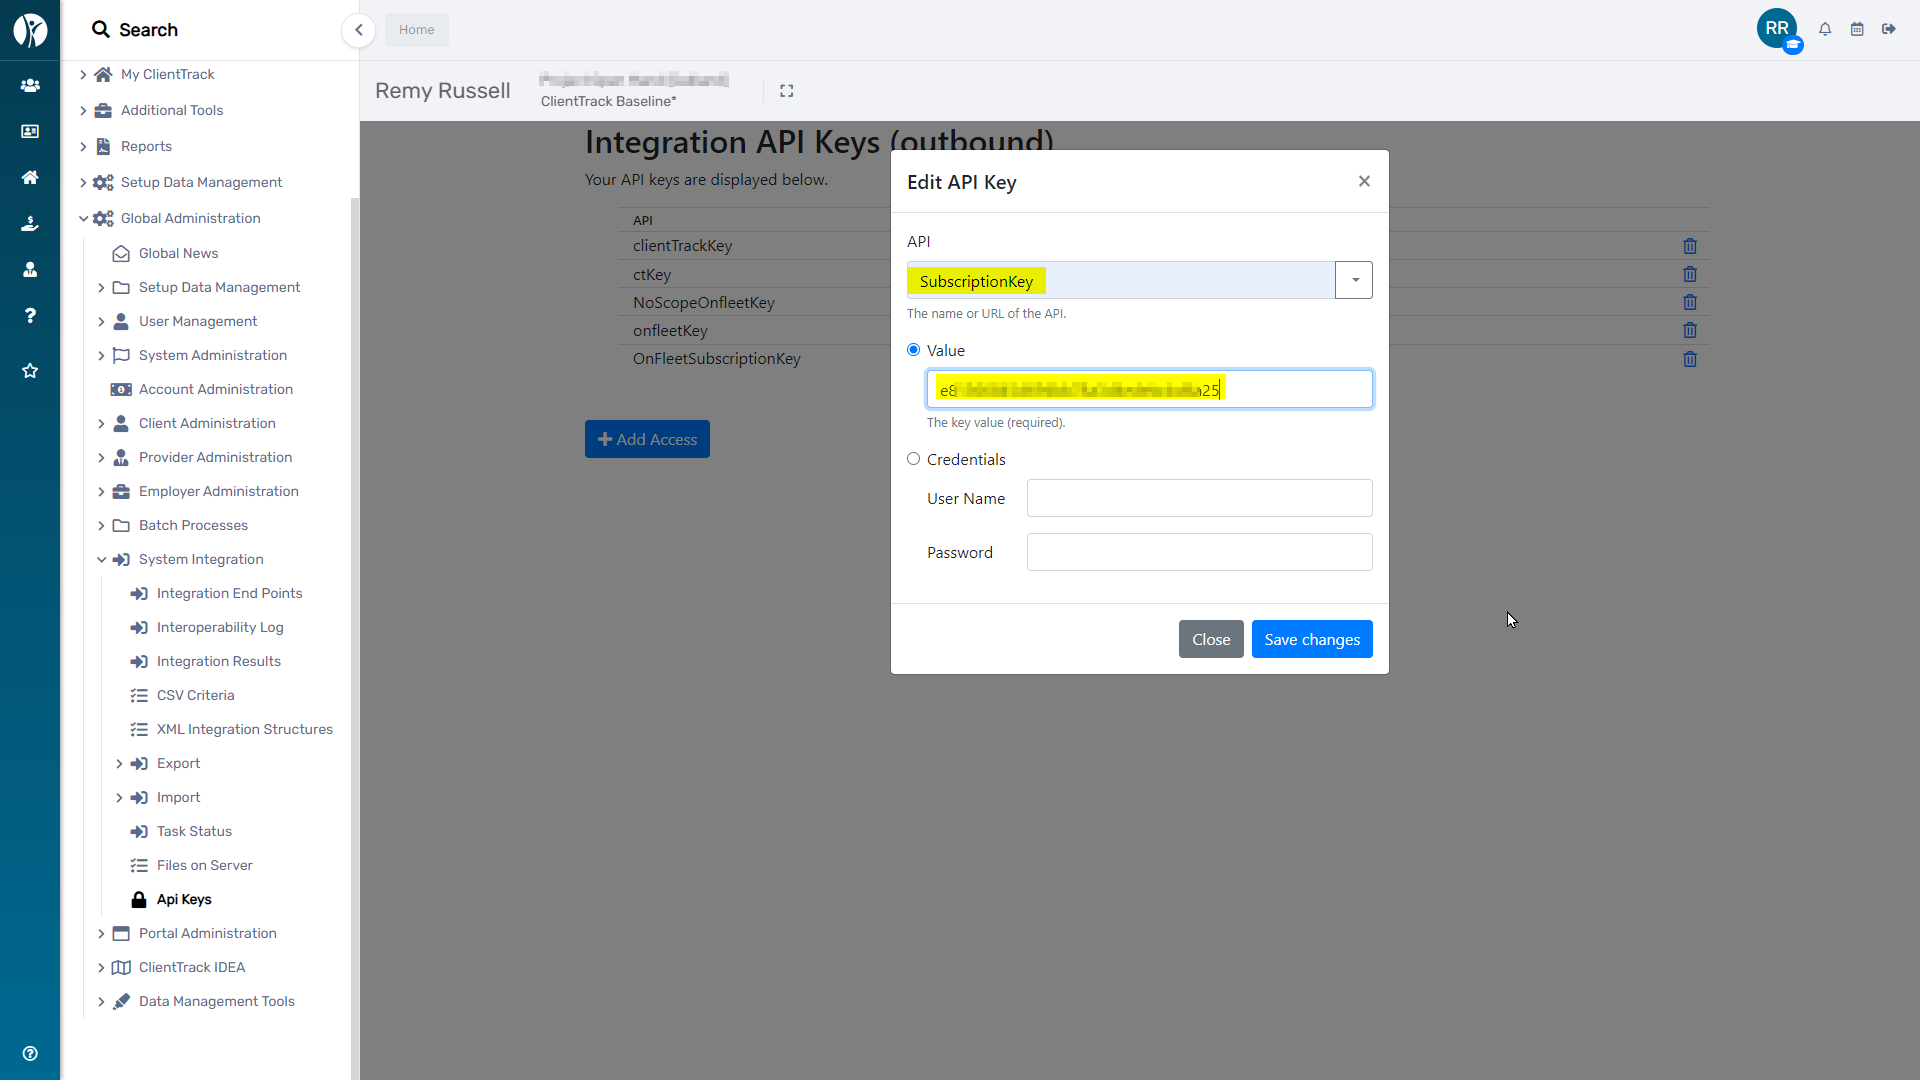
- SubscriptionKey
- ctKey
The resulting set of ClientTrack Integration API Keys should look like below. Note that the Key name must match the variables that are configured within the API Plug-ins. The below API Key names were used for Eccovia's first few implementations that integrate with Onfleet, but different naming conventions could be used at the Form Designer's discretion, assuring the notation in the API plug-in Properties reference the variable names.

Creating new Webhooks in Onfleet and Establishing Webhook URLs for ClientTrack
Onfleet has helpful documentation regarding Webhooks (Webhooks – Onfleet Support Center), but the below steps will cover how to create the set of Webhooks that will be useful for the ClientTrack integration.
- Sign in to your Onfleet environment, click Settings, click “API & Webhooks”, click “Show secret”, then copy the value and transmit it to an Eccovia Integration Engineer in a secure manner. While we do not currently have a UI to do so, an Eccovia Integration Engineer must manually associate this Onfleet Webhooks secret to the Webhook URL associated with each integrating ClientTrack Database/Environment.
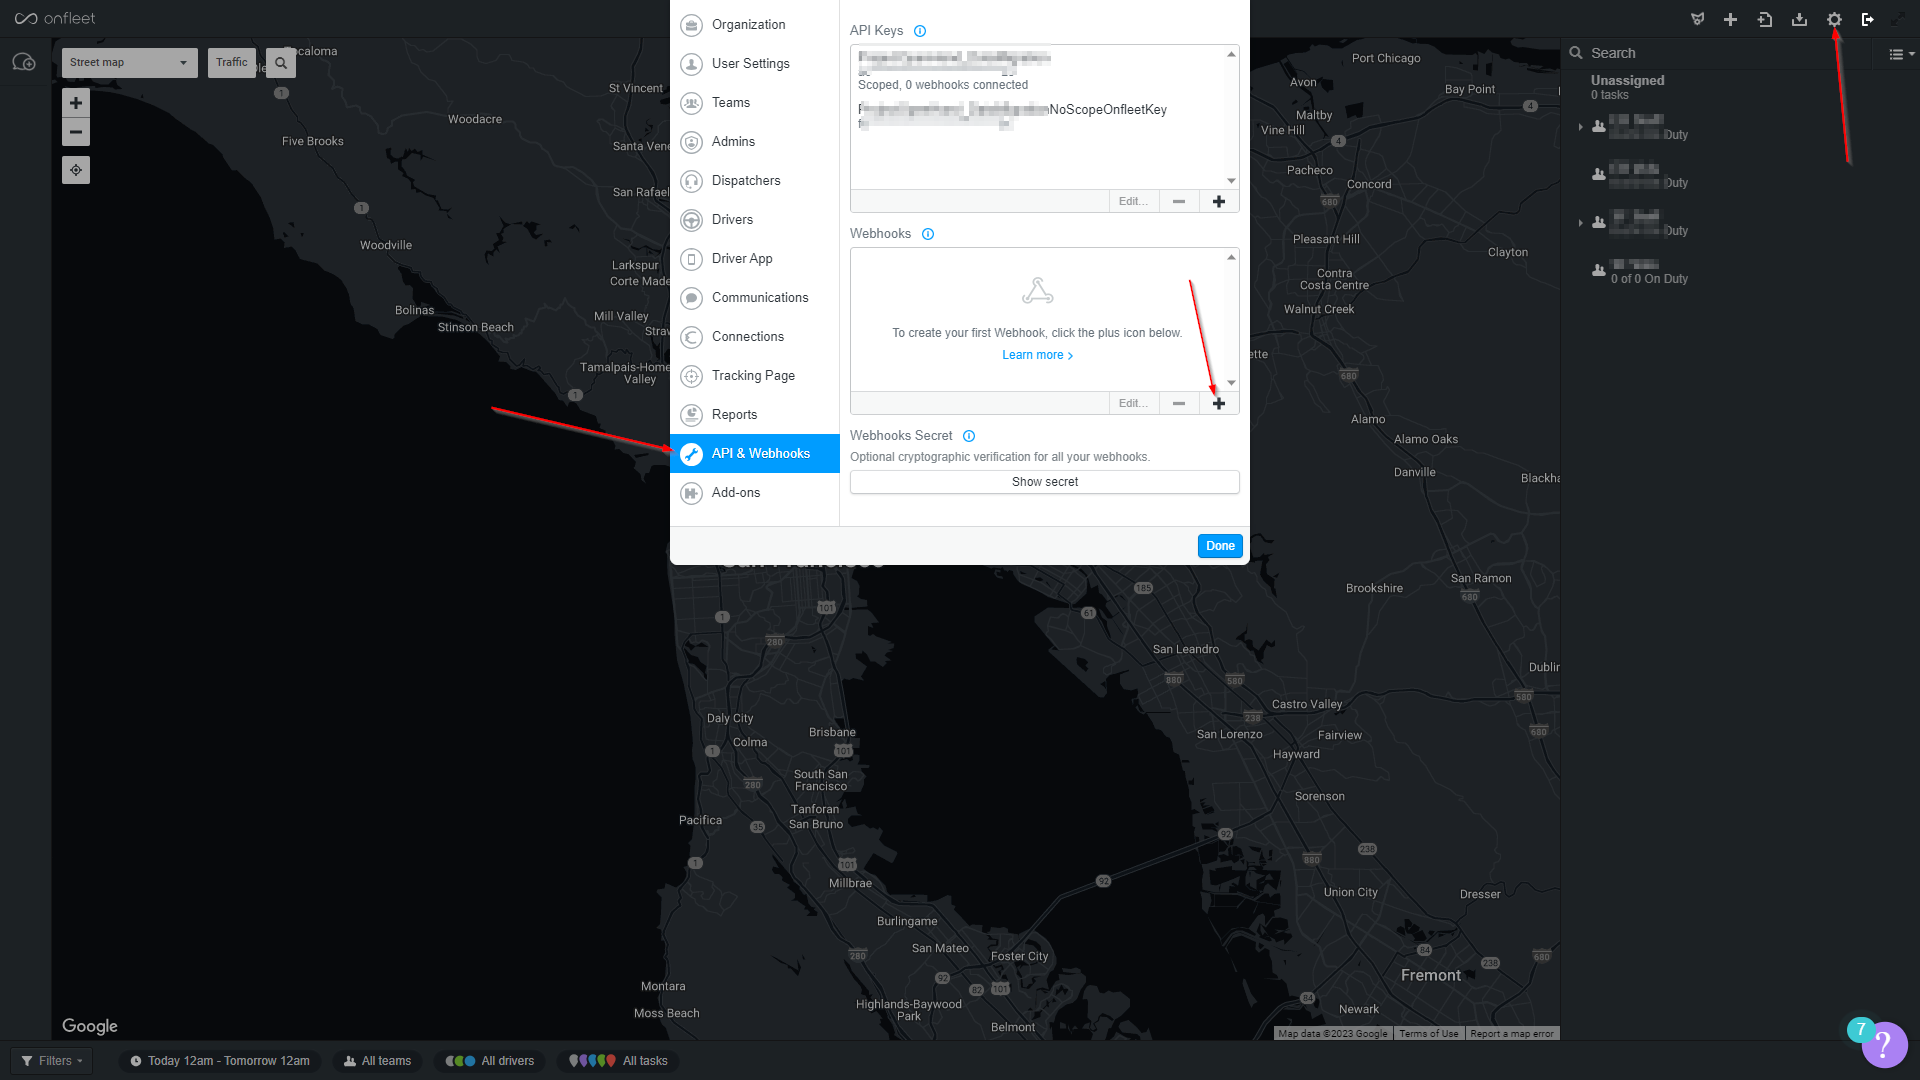
- click “+” to add a new Webhook
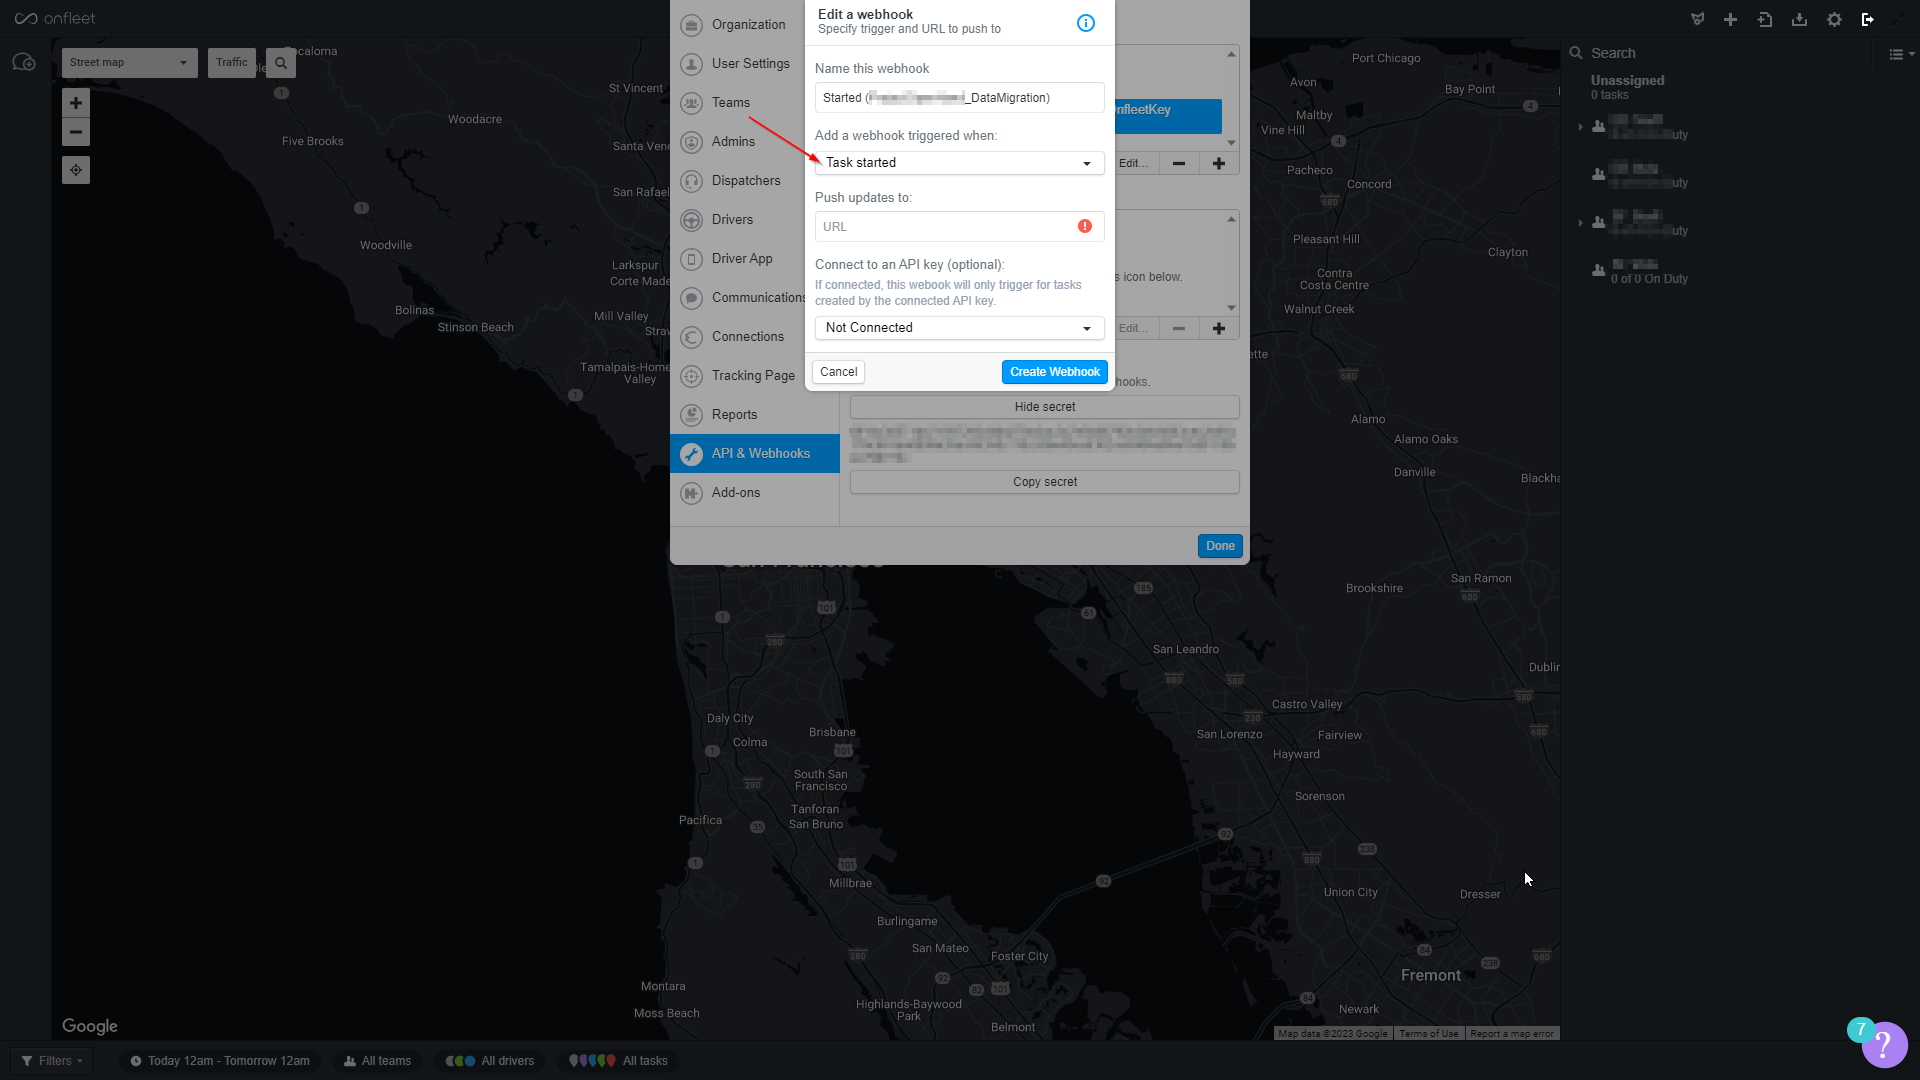
- Select a Webhook trigger and name the Webhook (include a specific ClientTrack db/environment name to distinguish the Webhook in case another ClientTrack db/environment needs to leverage the same trigger)
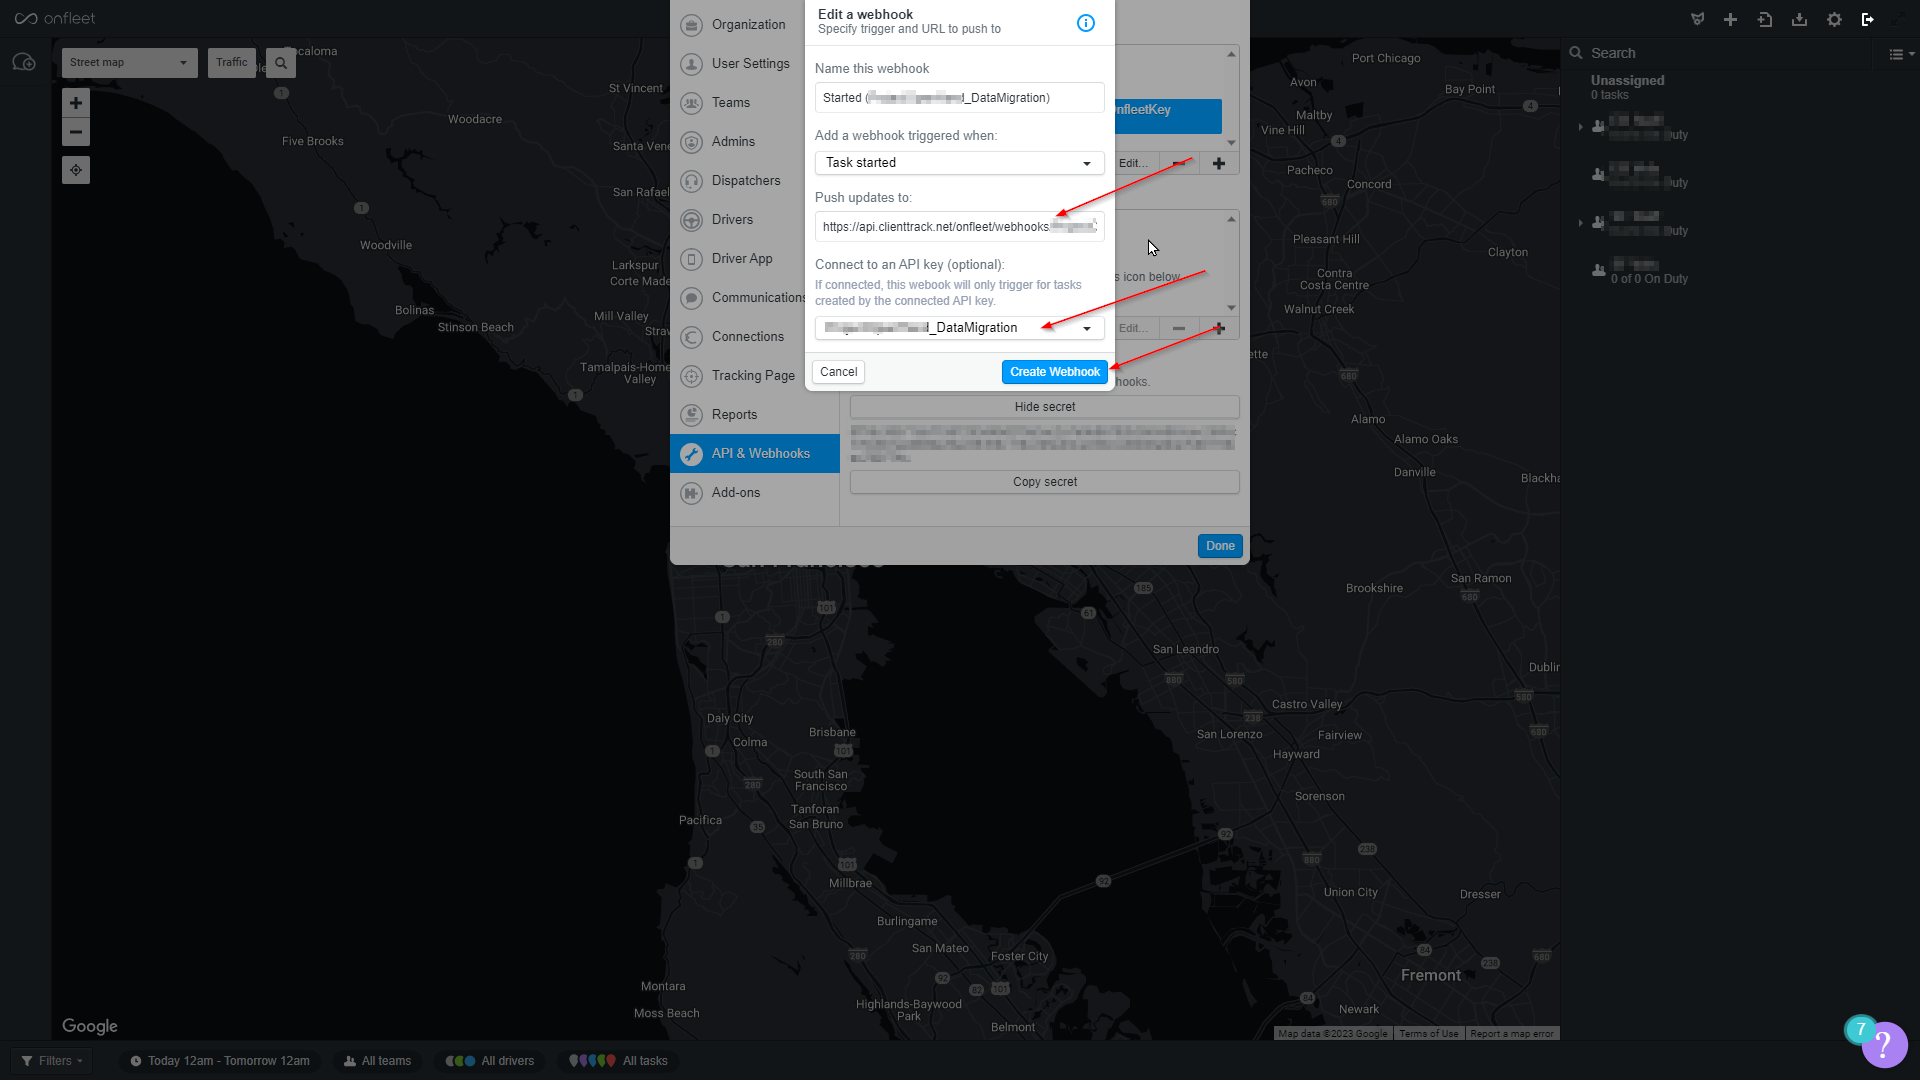
- Specify the URL (replace the last section of the following URL path with the customerID of the ClientTrack database, https://api.clienttrack.net/onfleet/webhooks/<customerId>), select the API Key to Connect to the Webhook. and click “Create Webhook”
- Note that connecting the Webhook to a specific API Key (the scoped API key) ensures that Webhook events for Delivery Tasks are sent to the appropriate ClientTrack Webhook URL based on the ClientTrack db-specific Key that created the Delivery Task. If multiple ClientTrack dbs/environments are integrated with the same Onfleet environment, the Scoped API Keys and connected Webhooks ensure that event details triggered by Onfleet events are sent to the appropriate ClientTrack environment.
- Note that connecting the Webhook to a specific API Key (the scoped API key) ensures that Webhook events for Delivery Tasks are sent to the appropriate ClientTrack Webhook URL based on the ClientTrack db-specific Key that created the Delivery Task. If multiple ClientTrack dbs/environments are integrated with the same Onfleet environment, the Scoped API Keys and connected Webhooks ensure that event details triggered by Onfleet events are sent to the appropriate ClientTrack environment.
- Repeat the previous steps for the other 6 relevant Webhook triggers AND for each ClientTrack db/environment that you'd like to integrate with the Onfleet environment.
