Setting Up Projects, Funding Sources/Grants, and Services
Gain insight on how to set up projects, funding sources, and services in your HMIS

Written by jmagee
Updated at June 4th, 2024
Table of Contents
Security Organization Setup
When a User logs into an organization, that organization’s settings determine the visibility of client demographic and transaction information. The Workspaces, Menu Groups, Menu Options and Forms are determined by Workgroup settings.
Security Organizations in ClientTrack serve various functions including:
1. managing security,
2. visibility of client demographics and transactional records, and
3. managing access to programs.
Managing Security Organizations
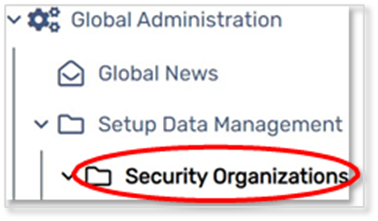
Home > Global Administration > Setup Data Management > Security Organizations
New Security Organization
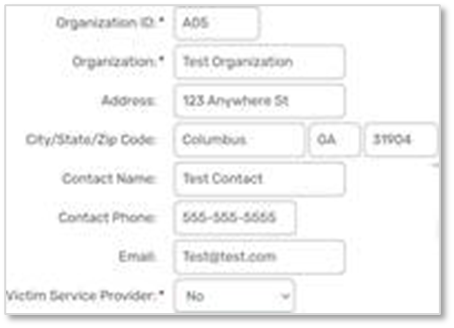
When creating a new Security Organization, it is best practice to check for a preexisting Security Organization by using the search and checking for deleted records in the Recycle Bin to not create duplicate records. System Administrators should consider using a common naming convention. For example, using the legal name of the organization or a common locally recognized name.
If the Security Organization does not already exist or does not need to be restored as a deleted organization, select the button on the upper right to “Add New Security Organization.”

Editing Security Organization
To edit an existing Security Organization, click on the Action button next to the Security Organization and selecting the Edit Security Organization.
Information Releases and MOU’s
Organization-level sharing of data is defined by an MOU (Memorandum of Understanding). An MOU indicates the information sharing relationship between organizations. The sharing relationship can be one-way or bi-directional. You are encouraged to work with your Client Success Manager (CSM) or Implementation Engineer (IE) to ensure the setup of MOU’s align with your current local policies and procedures.
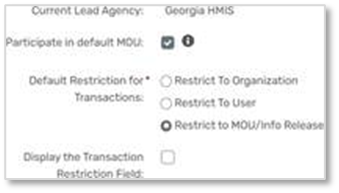
As a System Administrator, you should log in as the new Security Organization BEFORE setting up Users, Programs, Funding Sources/Grants, etc. It is not required to do so but is helpful to ensure the new organization has the appropriate access to the other setup data related to their organization.
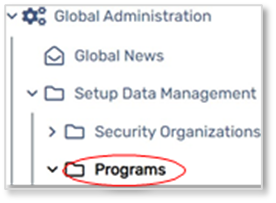
Project Setup
Home > Global Administration > Setup Data Management > Programs
Programs are utilized in ClientTrack to indicate how a Client will be participating with an Organization.
Programs can be differentiated from one another by the Program Type, types of Services the client might receive, the expected outcome for clients who participate, and the resources being used to provide services for the Program.
Clients are enrolled into Programs upon entry, participate in a Program for a length of time and are then exited from the Program when their participation is complete.
New Programs
- A list of existing Programs will display
- Best Practice: search using multiple naming conventions and checking for any deleted Programs so that duplicates are not created. Implementations should also consider the use of the legal name of a Program or the use of a more common and locally recognizable name.
- Select the Add HMIS Program button on the upper right of the form to create a new Program.
- Program Name
- Best Practice: utilize a defined naming convention, especially in larger implementations. Use of a naming convention can include a CoC or Region number, Program Type (ES, PSH, PATH, etc.), Funding Source, or other information that would be helpful to end users for identification purposes.
- Clients Can Enroll – will clients be enrolled in this program
Note: When setting up a HUD Program, it is important to select the appropriate and applicable HUD Project Descriptor information to maintain HUD and Partner Agency data collection and reporting compliance. In the example above, a HOPWA Type has not been added since this is not a HOPWA Program.
- Enter the appropriate Continuum of Care, Geocode and Address information.
- The data from this section is used for Annual Performance Reports (APR, Consolidated Annual Performance and Evaluation Report (CAPER), System Performance Measures (SPM’s) and the Longitudinal Systems Analysis (LSA). It is important that all required information is properly entered to ensure accurate HUD and Partner Agency compliance reporting.


- The data from this section is used for Annual Performance Reports (APR, Consolidated Annual Performance and Evaluation Report (CAPER), System Performance Measures (SPM’s) and the Longitudinal Systems Analysis (LSA). It is important that all required information is properly entered to ensure accurate HUD and Partner Agency compliance reporting.
-
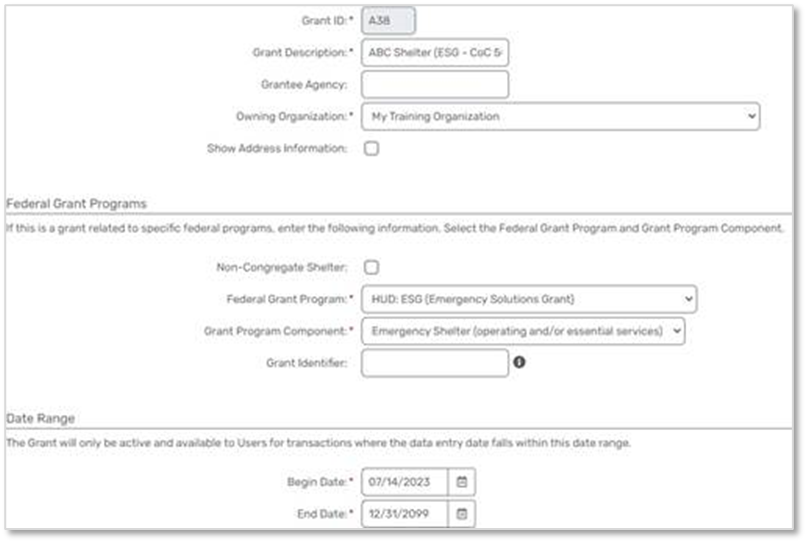
Funding Sources - Select one or more Funding Sources applicable to the program.
-
Select the organization(s) which will be accessing this program for enrollment
- Finish – once all options are selected and items configured, click Finish to save the project.
Auto-Exit
Auto-Exit functionality allows the system to automatically exit a client if they have not received a service in a specified number of days. This happens through a nightly procedure. The exit date will be the date of the client’s last service or, if the client received no eligible services, the date will be the same as the enrollment date.
Alert on Auto-Exit
An Alert will be automatically added to the Notification section of the Client’s Dashboard indicating they were exited from the program.
Direct Enrollment Reference for Participation
Using this option will use all service activity based on the Services tied to the Enrollment rather than the Services identified as Participation Services in program setup. If not using this option, Participation Services will need to be configured to avoid clients from being exited erroneously.
Auto-Exit Days - Number of days without a Service activity before the Client should be exited.
Alert on Auto-Exit - Alert will be created for each client when they are automatically exited.
Auto Exit Consider All Household Member Services for Participation
Selecting this option will prevent clients from being exited if there are other Case Members in the Enrollment with a Service entry. As an example, this keeps children from being auto-exited when their parent(s) receives services in an program in which they are a Case Member.
Editing Programs
Existing Programs can be edited by clicking the Action button next to the Program and selecting Edit
Service Setup
Home > Global Administration > Setup Data Management > Service Codes
New Service Code
- List of all available Service Codes will display
- best practice: use the search and check the Recycle Bin to determine if the service is already available in the database.
- Add New Service Code - If the Service Code does not exist, and is not listed in the Recycle Bin as a deleted Service Code, click “Add New Service Code.”
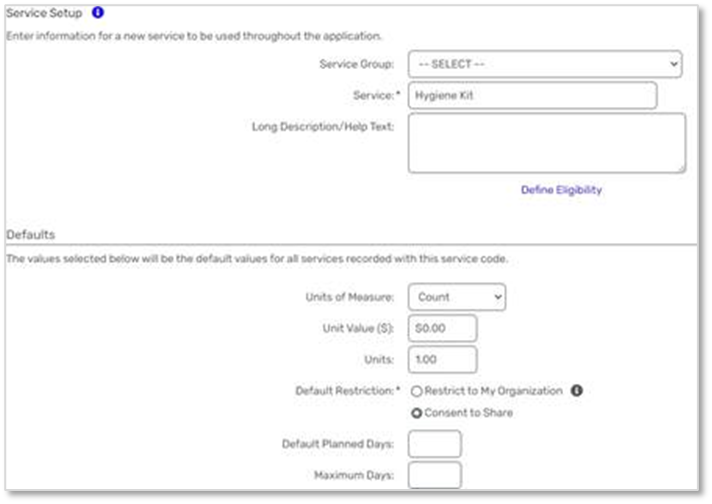
- Service Group – used to group similar services together for ease of use
- Service Name – name used to identify the service being provied
- best practice: use a uniform naming convention for identification of Services. Examples include designating the Funding Source/Grant affiliation (SSVF– Rental Assistance, ESG-RRH – Rental Assistance, HOWPA – Rental Assistance, etc.) and then only associate those services to the respective Funding Source/Grant.
- Defaults: Unit of Measure, Unit Value or Unit Count – enter default values as applicable
- Service Categories - Select the appropriate Service Categories for use within the database. Example, only Service Codes with the Referral Service category selected will be able to be selected when making client referrals.
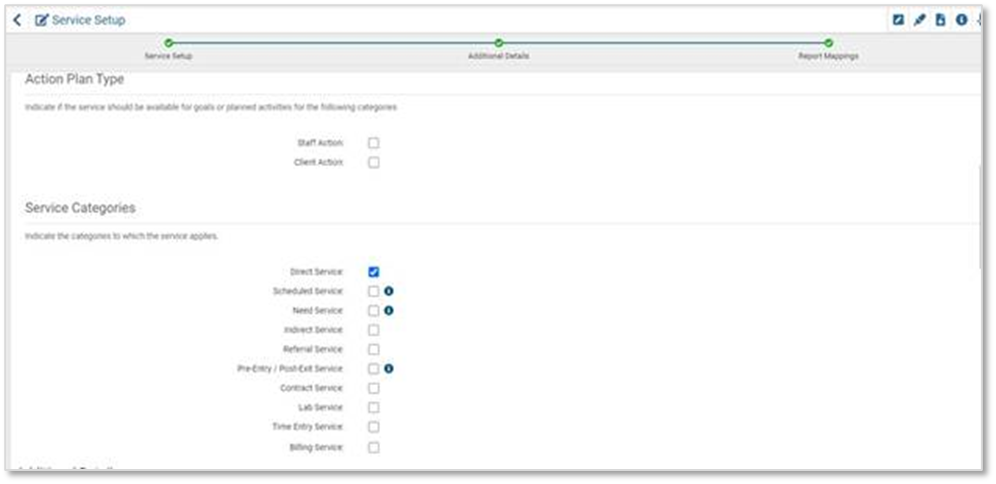
Service Categories |
Functional Description |
Direct Services |
A Service provided by an Accessing Organization. This is the most common option. |
Scheduled Service |
A Service that is applied to each client with an open Enrollment and must be set as a Direct Service |
Need Service |
A Service that can be utilized with a Needs Assessment. |
Indirect Service |
Services that can be recorded in instances where the Service does not need to be tied to a Client Record. (Day Shelter wants to document that they served 50 meals on a particular date but does not need the Service recorded on an individual Client Record.) |
Referral Service |
Services that can used during the Referral process. A Referral Service does not have to also be a Direct Service. |
Pre-Entry/Post-Exit Service |
Services that can be documented to Client Records prior to and after an Enrollment. These Services will NOT be included for HUD and Partner Agency Reports. |
Contract, Lab, Time Entry and Billing Services |
N/A |
- Accessing Organizations - select organization(s) which should have access to the service.
- Best Practice: select only the organizations that offer the service to reduce the number of items on the list when a service or referral is being provided to the client by the organization.
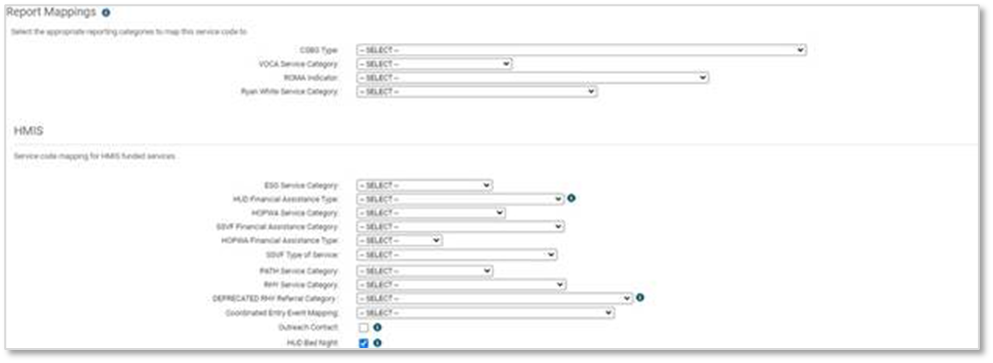
- Report Mappings - Select the appropriate Report Mappings to maintaining compliance HUD and Partner Agency Reports
- While services across HUD projects may be similar, it is a best practice to setup separate services for each distinct funding stream.
- For example, Rental Assistance is an applicable services cross multiple HUD project types (ESG, SSVF, HOPWA, etc.). Rather than setting up a single Rental Assistance service and assigning multiple HMIS report mappings, you can also setup multiple Rental Assistance Services such as ESG – Rental Assistance, SSVF– Rental Assistance, HOPWA – Rental Assistance, etc. and assign the appropriate report mappings to each. This makes it easier to differentiate the type of rental assistance provided when running system-wide reports or viewing client service histories.
- Outreach Contact - check if the service should be included as a “Contact Service”.
- When documenting a Service considered an Outreach Contact, Location of Service will also be required.
- This has been replaced by Current Living Situation for federal reporting. The field may be being used for local reporting
- HUD Bed Night - check the box if the service is considered a Bed Night Service for purposes of a Night-by-Night Emergency Shelter. Data used on the HUD CSV Export, determination of Length of Stay, and the Point in Time Count.
Editing a Service Code
Existing Service Codes can be edited by clicking the Action button next to the Program and selecting Edit Service Code
Service/ Funding Source Association
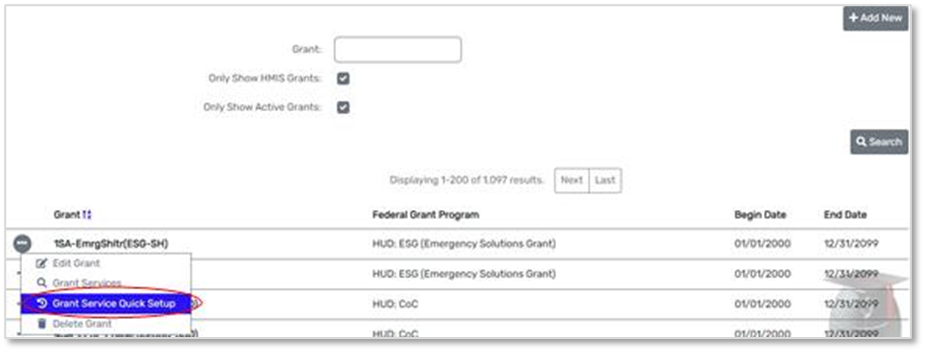
Home > Global Administration > Setup Data Management > Grants
While not required, it is best practice to setup a relationship between Grant/ Funding Sources and Service so that only appropriate services are available when selecting and enrollment and grant from the services screen.
- List of all available Grants/ Funding Sources will display
- Click the action icon next to the Grants/ Funding Sources name
- Select Grant Service Quick Setup
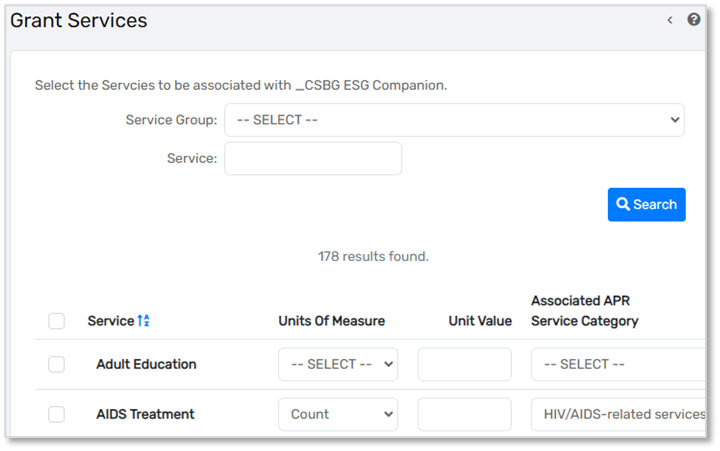
- Select the service(s) that should be associated with the Grants/ Funding Sources
- Use the Service Group dropdown and the Service options to search for the service(s) that are associated
- Click Save and Close when finished